| Table of Contents |
|---|
This is an exciting place to be! You are ready to submit your app to the stores.
**NOTE** This page assumes you already have the necessary iOS and Google accounts, and that you have set up your global account assets in the MobileSmith platform. If you have not, click here for instructions.
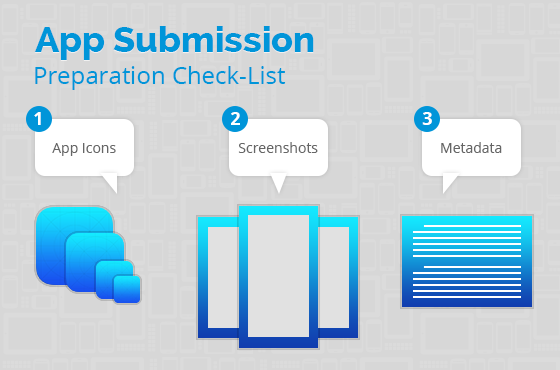
Checklist
Here is a list of the items you will need to submit your app to the app stores. You can click here to download a copy of the checklist.
Apple App Store
App Information
Name: The name of your app as it will appear on the App Store. 50-character limit.
Subtitle: A summary of your app that will appear under your app’s name on the App Store for customers with devices running iOS 11 or later.
Privacy Policy URL: A URL that links to your organization's privacy policy. Privacy policies are required for apps that are Made for Kids or offer auto-renewable or free subscriptions. They are also required for apps with account registration, apps that access a user’s existing account, or as otherwise required by law. Privacy policies are recommended for apps that collect user- or device-related data.
Note: We will need a link to your privacy policy on your website to be used in the app store and the app itself. Please provide me with this URL to your Client Success Representative.
Category: The category that best describes this app. For more information, see the App Store Category Definitions.
Note: For Apple, you can choose a Primary and Secondary Category.
Pricing & Availability
Price: The price determines the App Store price and your proceeds. If your app is free, choose Free.
Availability: Choose where your app is available to download.
Note: We recommend making your app available only in the United States.
App Store Listing
Screenshots: Apple allows up to 5 screenshots of your app. We can get these screenshots for you if you don’t have all the available devices. Please let me know which screenshots of the app you’d like to see in the App Store. If you are creating modified screenshots, the submission sizes need to be 1242 x 2208 pixels. Screenshots must be in the JPG or PNG format, and in the RGB color space. App previews must be in the M4V, MP4, or MOV format and can’t exceed 500 MB.
Promotional Text: Promotional text lets you inform your App Store visitors of any current app features without requiring an updated submission. This text will appear above your description on the App Store for customers with devices running iOS 11 or later.
170-character limit.
Description: A description of your app, detailing features and functionality. It will also be used for your Apple Watch app.
4000-character limit.
Keywords: One or more keywords that describe your app. Keywords make App Store search results more accurate. Separate keywords with a comma.
100-character limit including commas and spaces.
Support URL: A URL with support information for your app. This URL will be visible on the App Store.
Marketing URL: A URL with marketing information about your app. This URL will be visible on the App Store.
App Icon: 1024 x 1024 px. This icon will be used on the App Store and must be in the JPG or PNG format, with a minimum resolution of at least 72 DPI, and in the RGB color space. It must not contain layers or rounded corners.
Copyright: The name of the person or entity that owns the exclusive rights to your app, preceded by the year the rights were obtained (for example, "2008 Acme Inc."). Do not provide a URL.
App Review Contact Information: The person in your organization who should be contacted if the App Review team has any questions or needs additional information. First Name, Last Name, Phone Number, and Email Address required.
Google Play
Store Presence
Title: The name of your app as it will appear on the App Store. 50-character limit.
Short Description: This is what is listed before you click for the full description on the app page. 80-character limit.
Full Description: This is what is listed if they click to get the full description. 4,000-character limit.
Screenshots: JPEG or 24-bit PNG (no alpha). Min length for any side: 320px. Max length for any side: 3840px. At least 2 screenshots are required overall. Max 8 screenshots per type.
Note: If you are creating modified screenshots, the submission sizes need to be 1440 x 2560 pixels.
App Icon: 512 x 512 px. 32-bit PNG (with alpha)
Feature Graphic: 1024 x 500 px. JPG or 24-bit PNG (no alpha)
Promo Graphic (Optional): 180 x 120 px. JPG or 24-bit PNG (no alpha)
Categorization
Category: The category that best describes this app. For more information, see the full list of Google Play App Categories.
Contact Details
Website: A URL with marketing information about your app. This URL will be visible on the App Store.
Email: Please provide an email address where you may be contacted. This address will be publicly displayed with your app.
Phone: Please provide a phone number where you may be contacted.
Privacy Policy
Privacy Policy URL: We will need a link to your privacy policy on your website to be used in the app store and the app itself. Please provide me with this URL to your Client Success Representative.
Pricing & Distribution
Price: The price determines the App Store price and your proceeds. If your app is free, choose Free.
Availability: Choose where your app is available to download.
Note: We recommend making your app available only in the United States.
Application Level
For each application created in the MobileSmith platform, there are unique assets which are required.
Apple
To start the process for application level assets, follow steps 1 – 4 from the previous section to log into the iOS Dev Center and navigate to the iOS Apps dashboard. You will now want to create the App ID, Push Distribution Certificate and the Provisioning Profile.
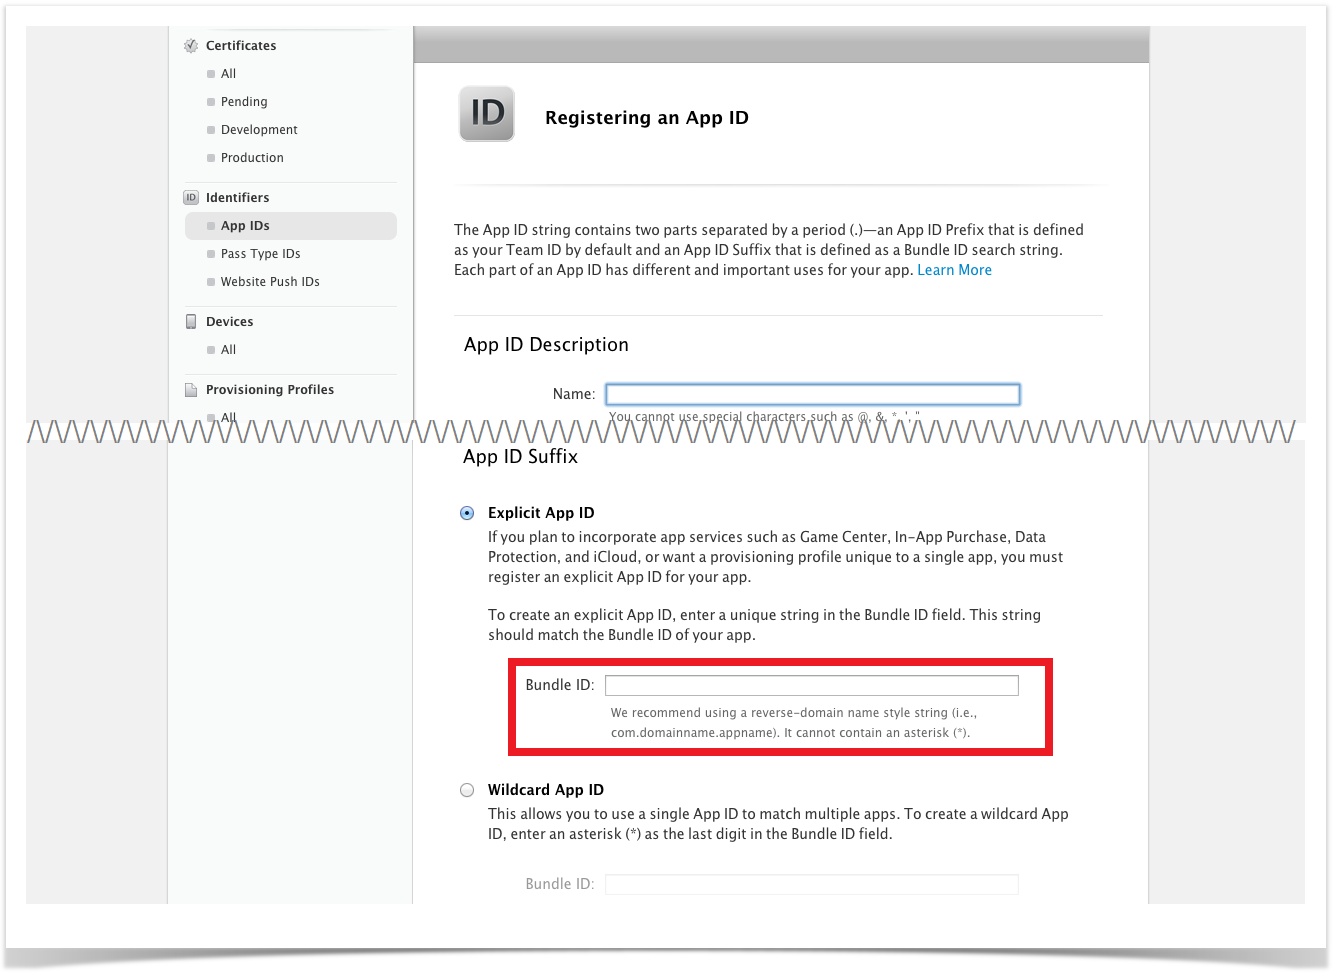
App ID
1. In the left nav bar under Identifiers, click App IDs and then the ‘+’ in the right panel to create a new App ID. Remember if you have an iPad version of your app, you’ll need to create a separate App ID for that version.
2. On the next page you will need to enter the following information:
a. App ID Description: App Name
b. App Services: Select the checkbox next to Push Notifications
c. App ID Suffix: Leave the default Explicit App ID radio button selected and enter a Bundle ID using the recommended style -> com.domainname.appname
3. Click Continue and then confirm your App ID on the next page. Ensure there is a green radio button next to Push Notifications to show it is enabled. Following confirmation click Submit.
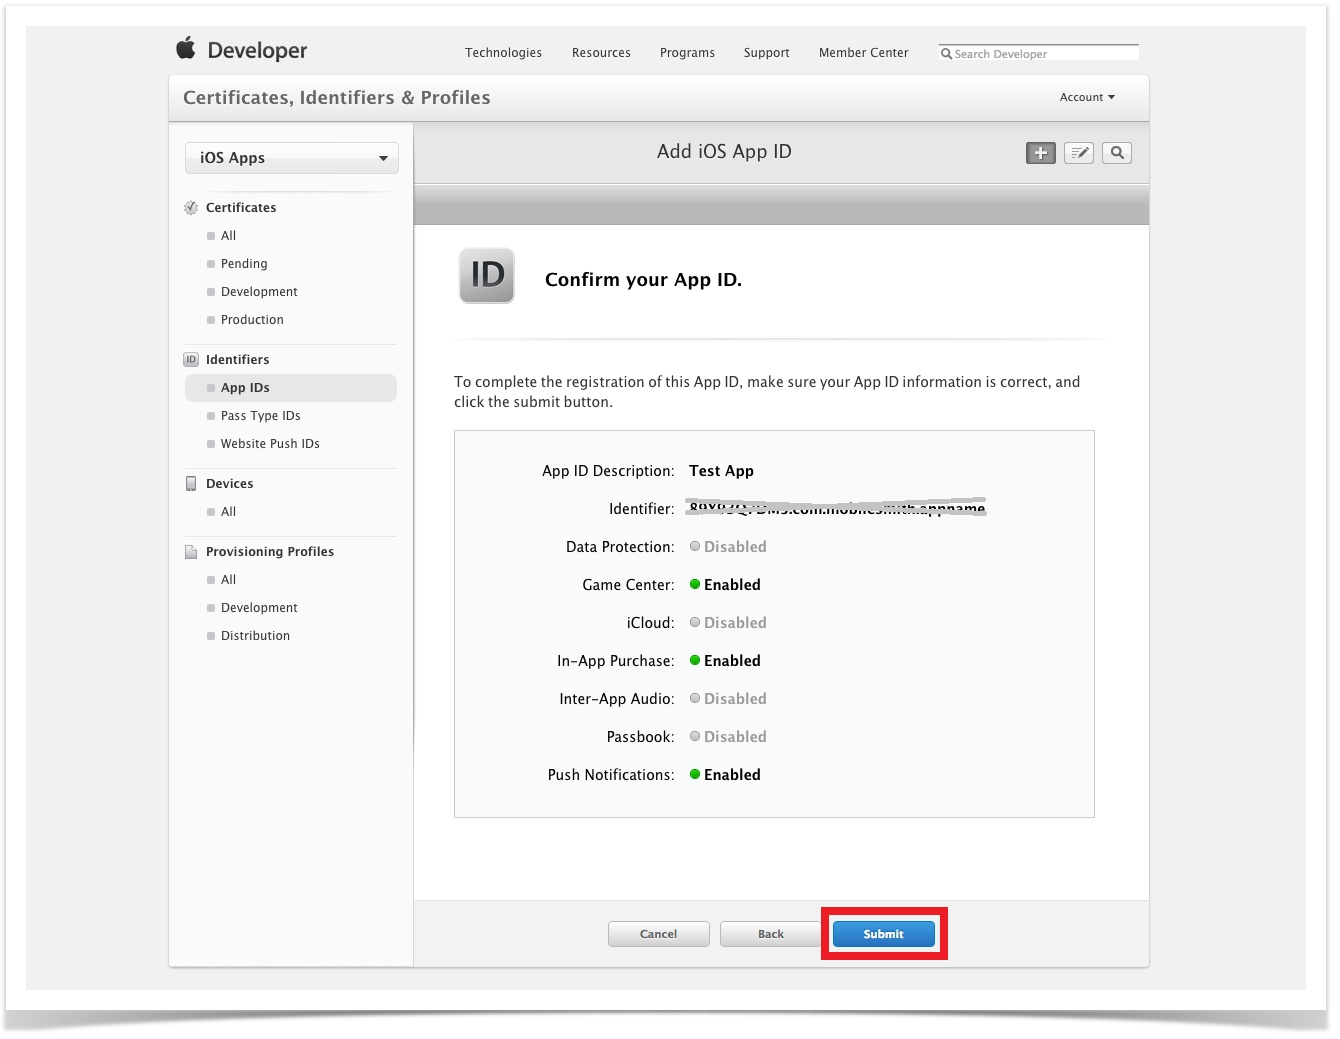
4. When registration of the App ID is complete click Done and you will now see your App ID listed in the right panel.
Sweet! Your App ID is official.
Push Notification Certificate
In order for the Push Notifications to work correctly you will need to create a push certificate for your App. It will be tied to the App ID you just created as well as the Global Distribution Certificate you created in the Global Account Level section. Remember if you have an iPad version of your app, you’ll need to create a separate Push Certificate for that version.
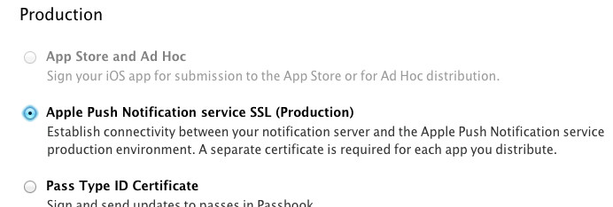
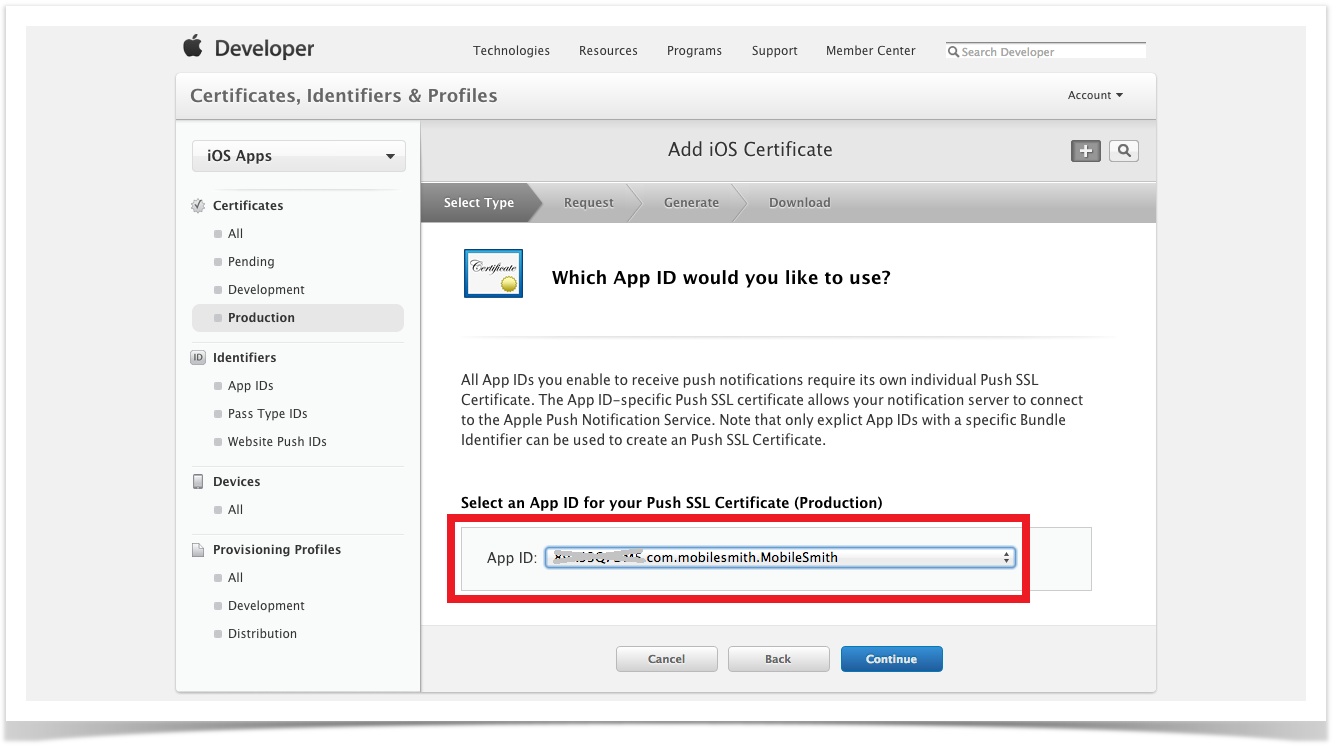
1. In the left nav bar under Certificates, select Production and then the ‘+’ in the right panel.
2. Scroll down to the Production section and select the radio button for ‘Apple Push Notification Service SSL (Production)’ and then click Continue.
3. Select your App ID from the drop down and then click Continue.
4. The next page asks for you to upload your CSR, which you learned how to create earlier in this document. Upload your CSR and then click continue to move to the next step.

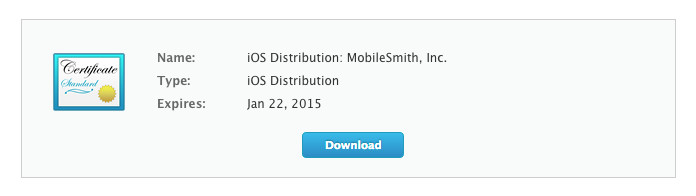
5. After you upload your CSR click the Generate button.
6. When the push certificate has been created, click Done and you will now see your push certificate in the right panel. Click the push certificate row and select ‘Download’.
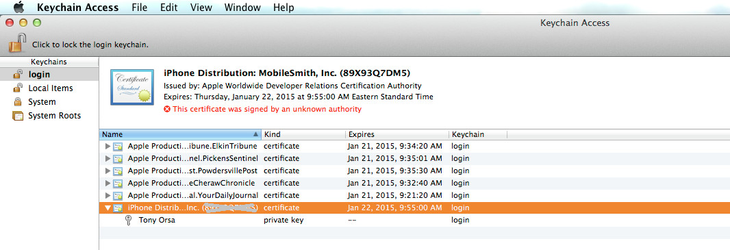
7. Navigate to this file in your Downloads folder and double click it so it will be added to your local keychain.
a. To validate this was done correctly open your Keychain Application and in the left page make sure ‘login’ is the selected Keychain and ‘Certificates’ is the selected Category. Your created certificate should say ‘Apple Production IOS Push Services: <bundle ID> and have an expandable carat arrow which will show your private key when expanded. It should look like the image below:
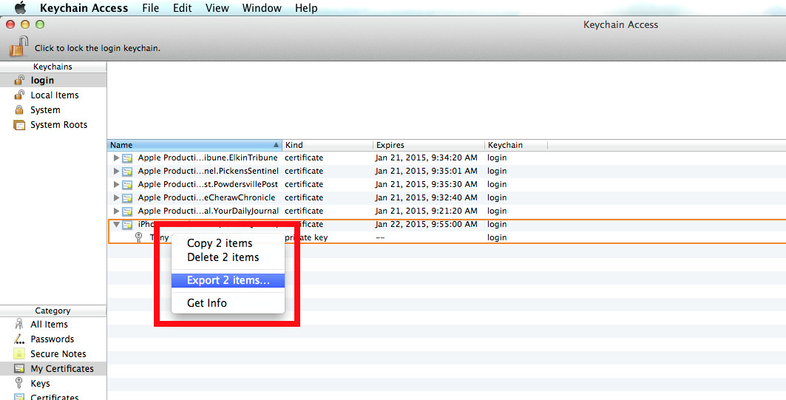
8. This certificate needs to be uploaded into the MobileSmith platform for your app. Therefore, you will need to export the certificate into a .p12 file using the following instructions.
a. In the Keychain Application, expand the carat so the private key portion is showing. Highlight both the certificate and the private key, right click and then select ‘Export 2 items…’
b. You will now be asked to save this file to your computer. The filename SHOULD NOT contain any spaces and ensure the file extension is .p12 (which is the default).
c. Finally after you click save you will be asked twice to supply a password to add security to your certificate. Take note of this password as it will be needed in the MobileSmith platform.
Great! Your Push Certificate is active.
Provisioning Profile
The final step for Apple is to create the provisioning profile for your application. Remember if you have an iPad version of your app, you’ll need to create a separate Provisioning Profile for that version.
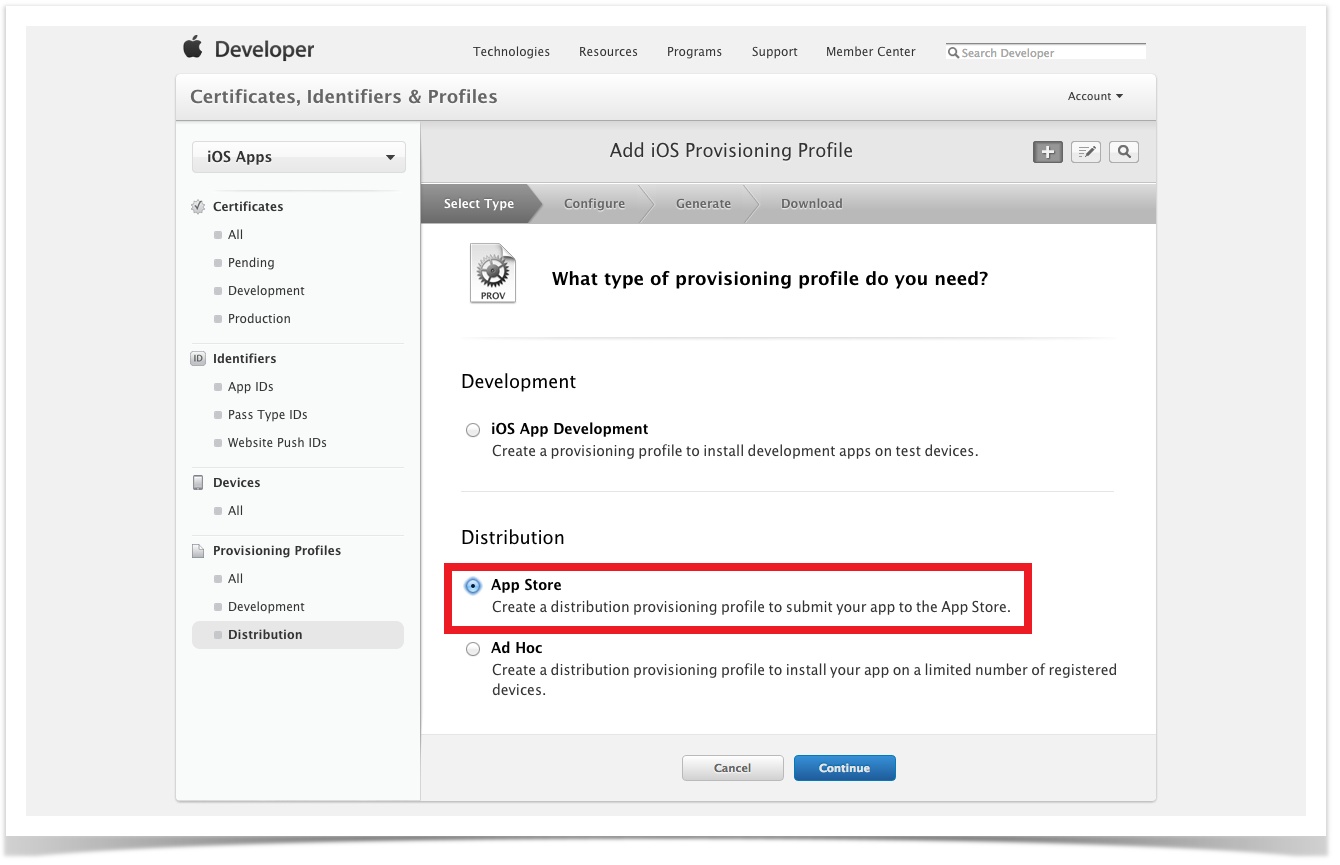
1. To create a new provisioning profile, select ‘Distribution’ under the Provisioning Profiles section in the left nav bar. Then click the ‘+’ in the right panel to start the process.
2. In the Distribution section on the page, you will have different options depending on whether you are creating the profile for the Apple App Store or for internal distribution:
a. For the Apple App Store (iOS Developer Program Account) select the radio button next to ‘App Store’ and then click Continue.
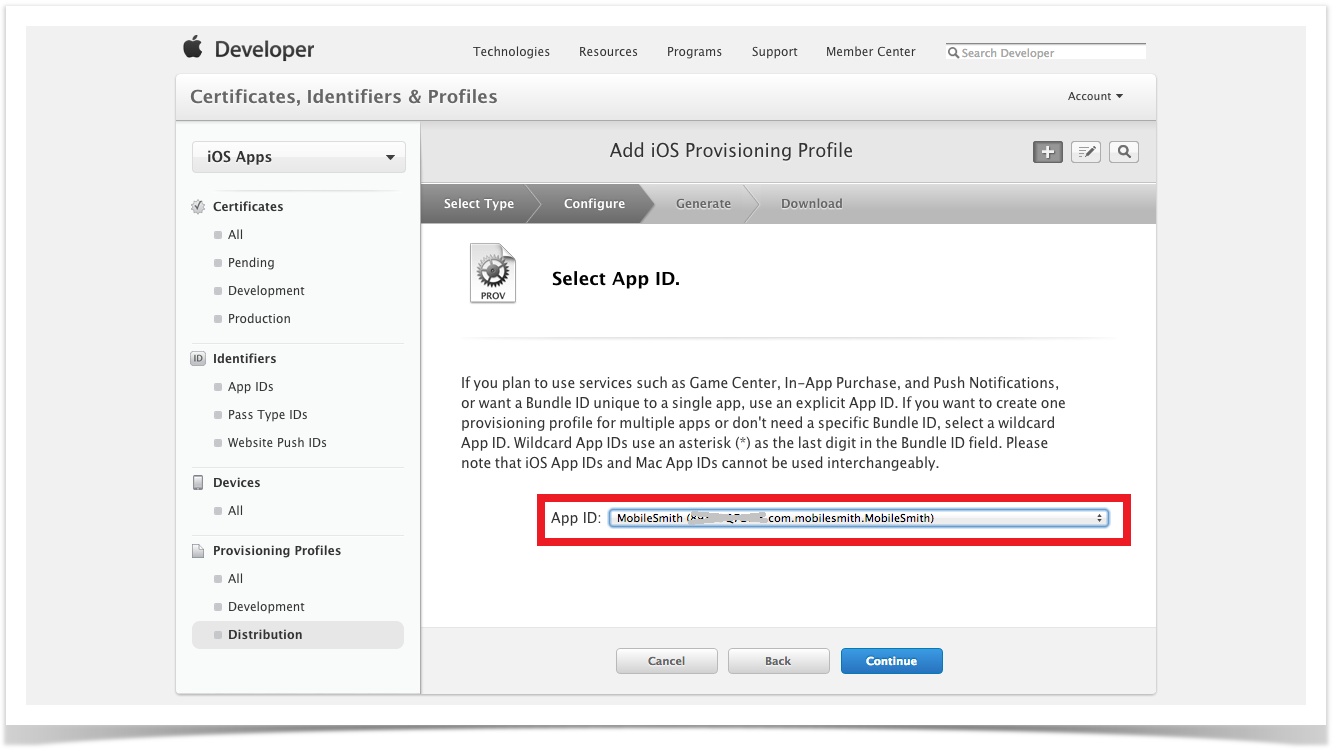
3. The next page displays your App ID for reference. Check to make sure it’s correct and then click Continue.
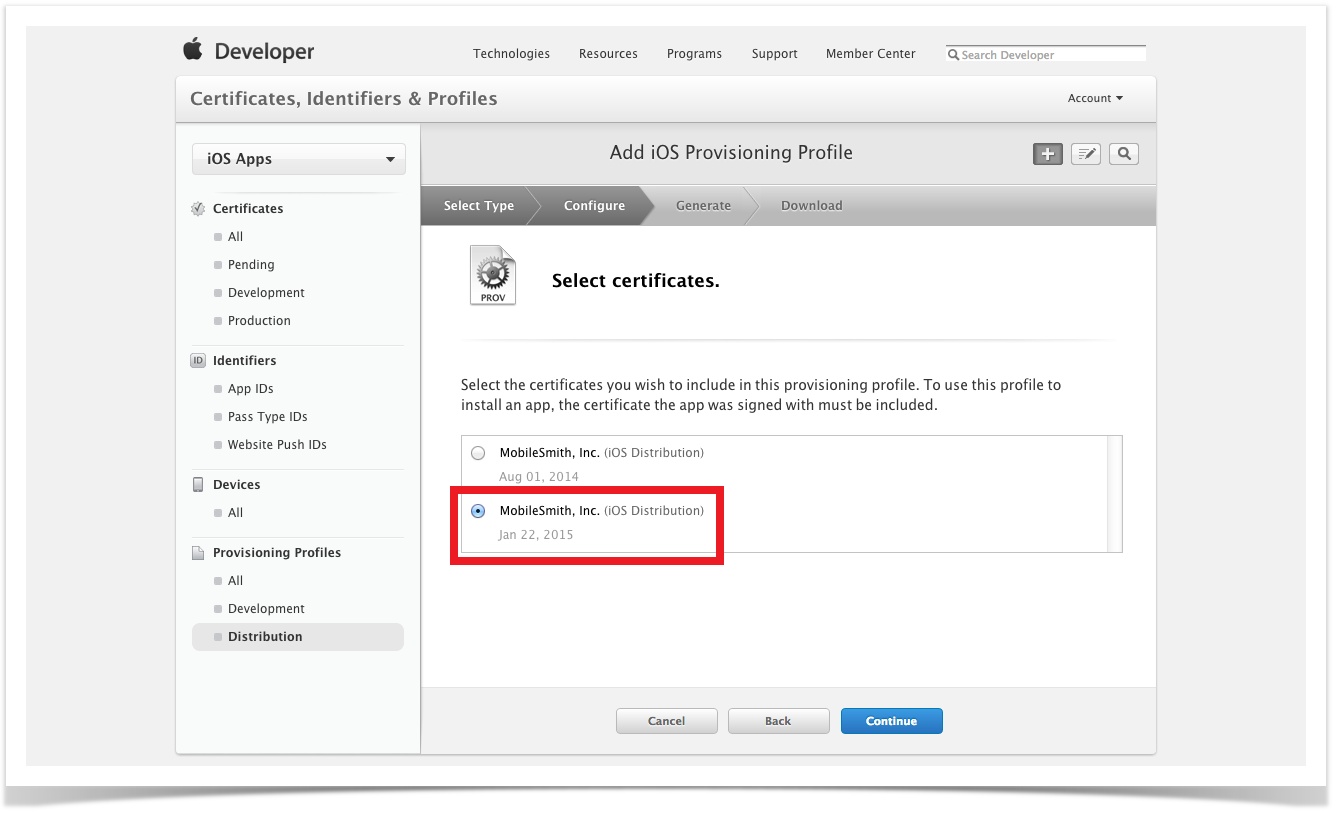
4. On the next page select the radio button next to your Global Distribution Certificate and then click Continue.
5. On the next screen enter a Profile Name, which is usually the App Name, and click Generate.
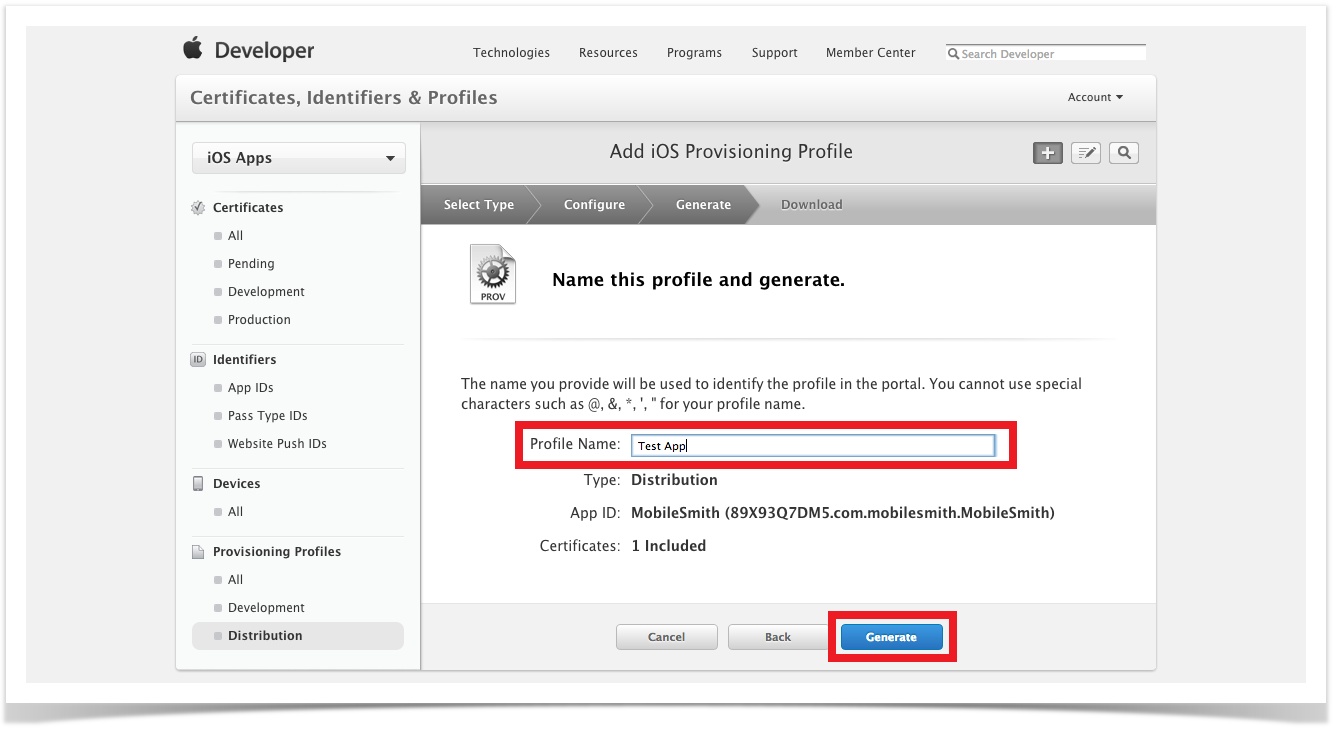
6. Download the Provisioning Profile when it is ready. It will have the following format: <ProfileName>.mobileprovision. Click Done and you will now see the Provisioning Profile in the right panel.
Super! Your Provisioning Profile is done.
Google Cloud Messaging
To receive push notifications on an Android device, an app must have the correct Google Cloud Messaging (GCM) credentials. Essentially, you need to take some data from the MobileSmith platform and put it into the GCM platform, as well as take some data from the GCM platform and put it into the MobileSmith platform.
You will need to have a Google account.
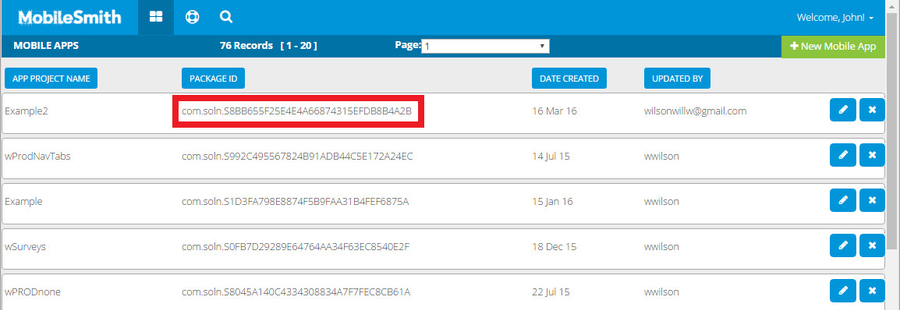
In the MobileSmith platform, login and look at your list of projects. Find the desired project and copy the Package ID.
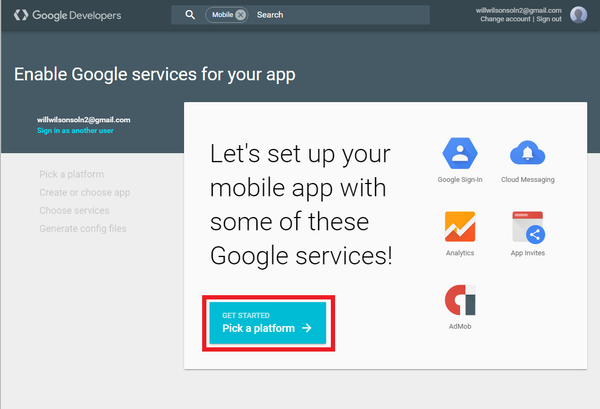
Go to this link: https://developers.google.com/mobile/add
Login with your Google account (if not already logged in).
Click "Pick a platform".
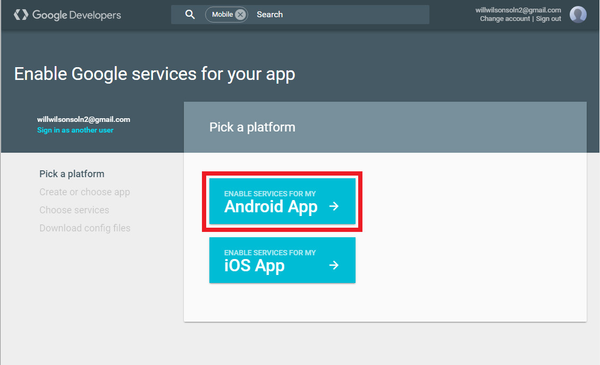
Click "Android App"
For "App name", you can enter whatever name you want, although it usually makes sense to name it the same or similar to your MobileSmith Project Name, especially if you have created or plan to create multiple projects in the MobileSmith platform.
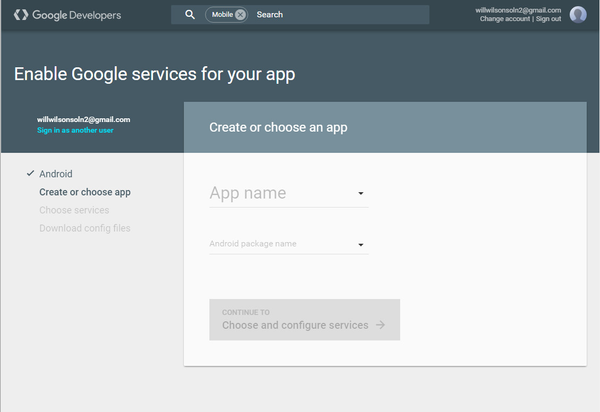
For "Android package name", paste in the Package ID you copied from the MobileSmith platform.
![]()
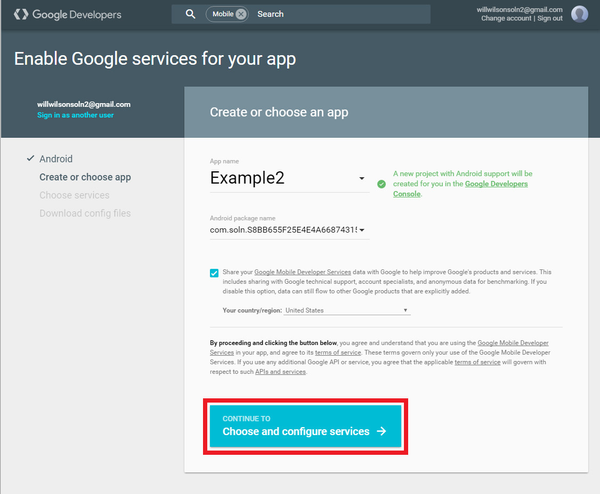
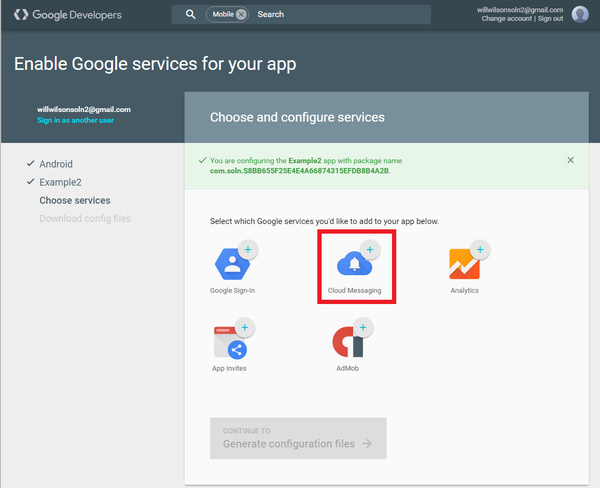
Click "Choose and configure services"
Click "Cloud Messaging".
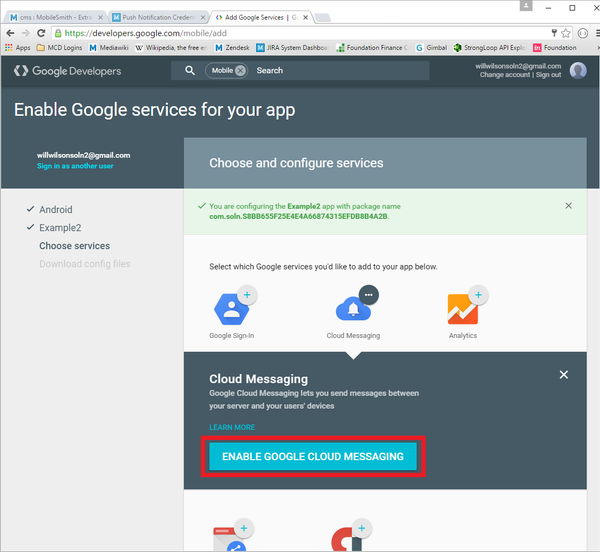
Click "ENABLE GOOGLE CLOUD MESSAGING".
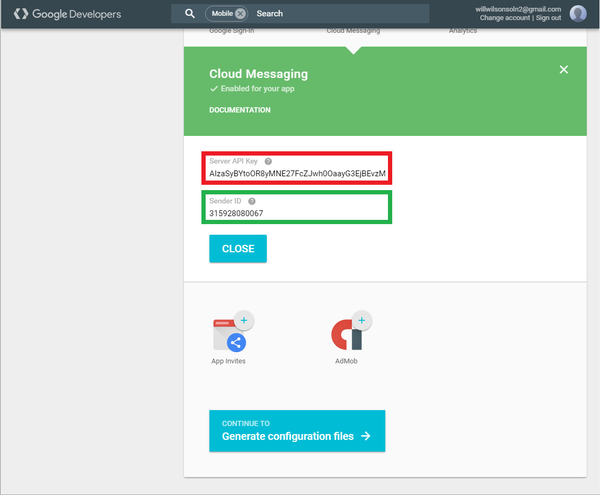
You should see a success message informing you that Cloud Messaging has been enabled for your app. Scroll down and find the "Server API Key" and the "Sender ID" - these are two of the three parts you will need to put into the MobileSmith platform.
Copy the "Server API Key" (red box)
Copy the "Sender ID" (green box)
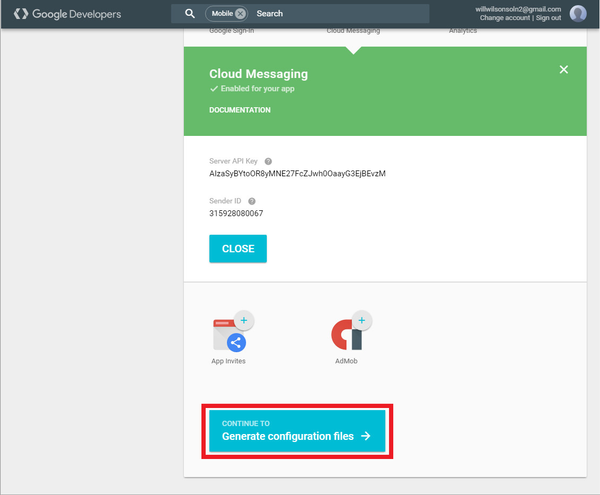
Click "Generate configuration files".
Click "Download google-services.json" and save the file.
**NOTE** Do not change the filename - it must be "google-services.json"

Now you have all three parts! Go back to the MobileSmith platform and edit your project.
Go to App Stores > Push Credentials.
For "Configuration file", click the "Add" button and select the file you just downloaded from Google. (the filename should be "google-services.json")
For "Server API Key" and "Sender ID", paste in the values you copied earlier from Google.
![]()
Click the green "Add" button to save your changes.
Your app is now ready to receive push notifications on Android devices!
MobileSmith Platform
The following information needs to be provided for each application in the MobileSmith platform.
App Stores -> Push Credentials
For Apple:
- Push Certificate: The .p12 push certificate exported from your keychain
- Push Certificate Password: The password used when creating the .p12 push certificate file
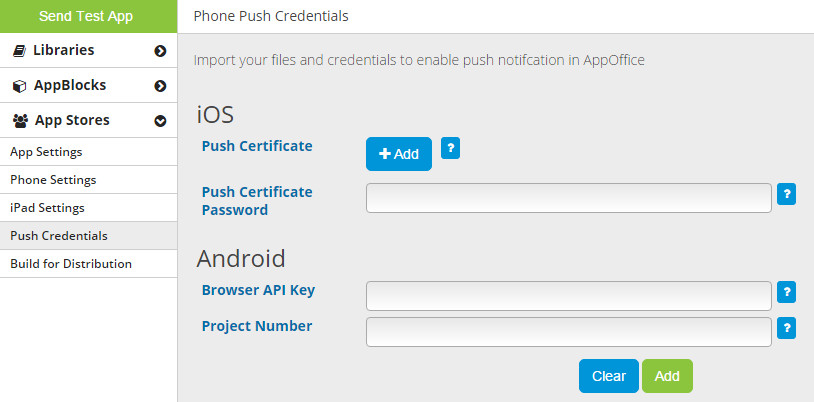
For Google:
- Browser API Key: The API Key created in the Google Developer Console
- Project Number: The Project number from the Google Developer Console
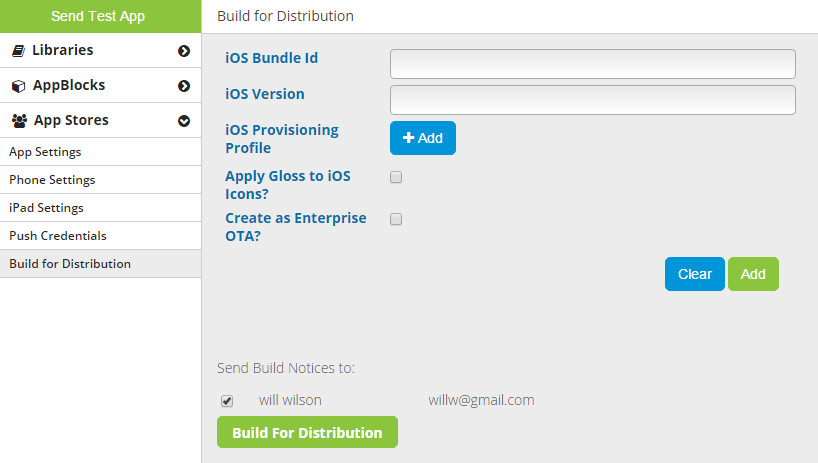
App Stores -> Build for Distribution
Enter the following information on the Submit tab and click the ‘Add’ button.
- iOS Bundle ID: The bundle ID created during the App ID step in the iOS Dev Center
- iOS Version: This number should always match the version you enter in your iTunes Connect account.
- iOSProvisioning Profile: The .mobileprovision file created in the iOS Dev Center
- Apply Gloss to iOS Icons?: Check this box if you want the gloss effect added to your app icon
- Create as Enterprise OTA?: Leave this unchecked if you want to submit your app to the Apple App Store.
Downloading your files
When all information has been entered and saved, click the Build For Distribution button at the bottom of the screen. When you receive your build email, click on the link to ‘Download the applications’. You will be redirected to your web browser where you can download the Android .apk file and the iPhone .zip file.
Yay! You're a few steps closer to having your live app.
Apple App Store Submission
Submitting an application for review is a simple and straightforward process. This section of the document assumes you will be uploading your build using the Application Loader.
iTunes Connect

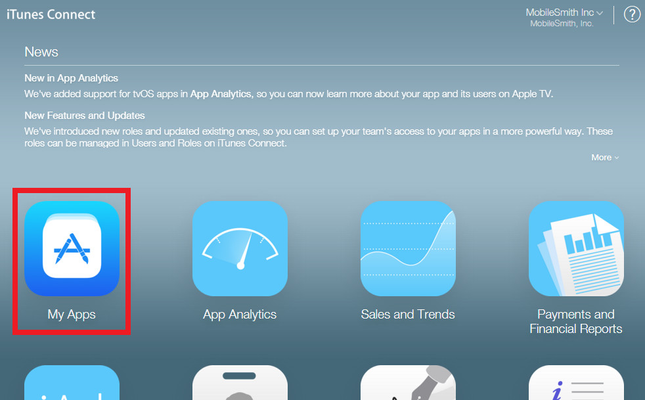
1. Browse to https://itunesconnect.apple.com/ and log in using your iOS Developer Program account credentials. On the dashboard click the My Apps link.
2. Once on the My Apps page, scroll to the bottom of the page and click the link ‘Download Application Loader’. This will download the install file so you can download the application loader to your computer.
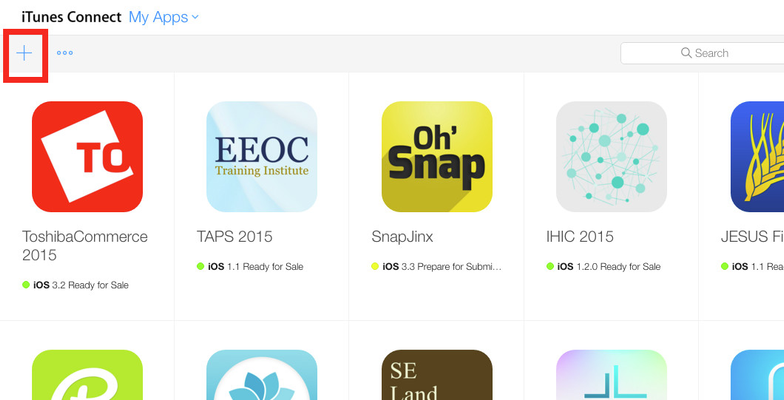
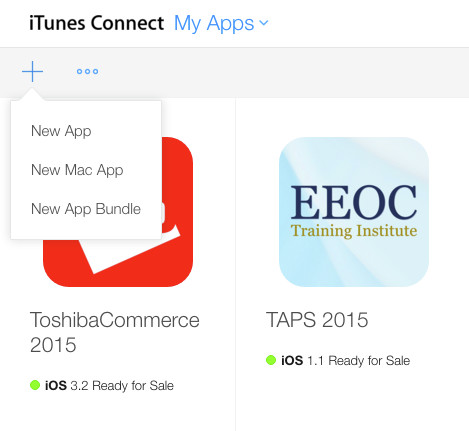
3. On the My Apps page, click the ‘Plus’ button in the top left corner of the page, then click "New App".
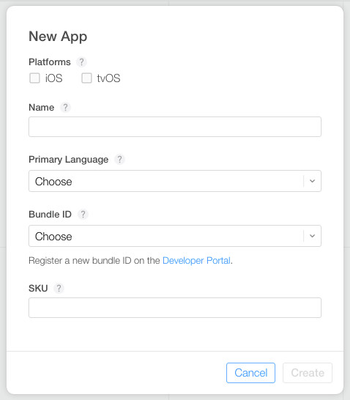
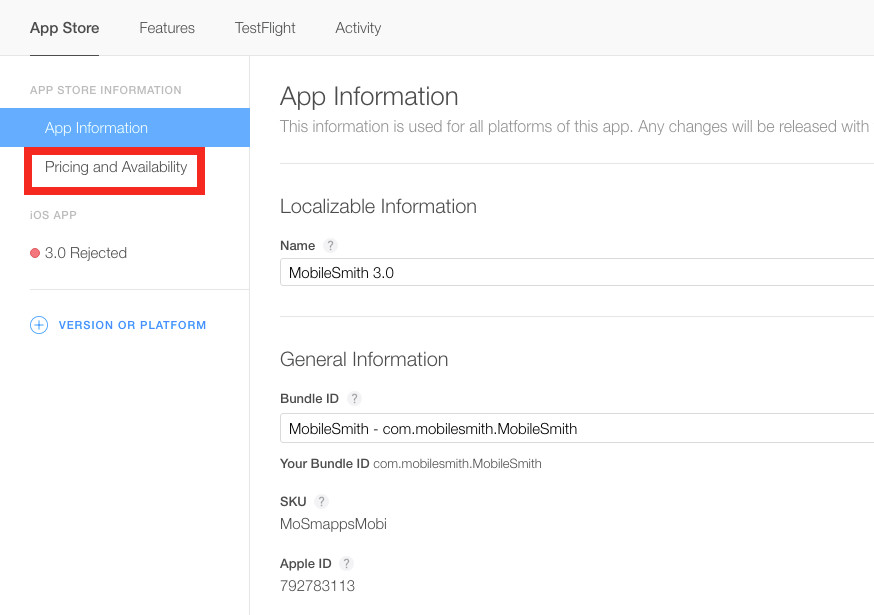
4. You will be presented with the App Information page where you will be asked to enter the following information and then click "Create":
- App Name: This is the name of the app that will be displayed in iTunes (not how it is displayed under the icon on the mobile device)
- SKU Number: Any unique SKU to identify your app (ex. Xxxxappsyyyy, with xxxx being the company acronym and yyyy being the shortened app name)
- Bundle ID: Select the bundle ID of the application for which you’re preparing submission
5. Click "Pricing and Availability".
6. On the next page you will be presented with the screen to select your pricing. Under "Availability", click the Edit button to select your app's availability.
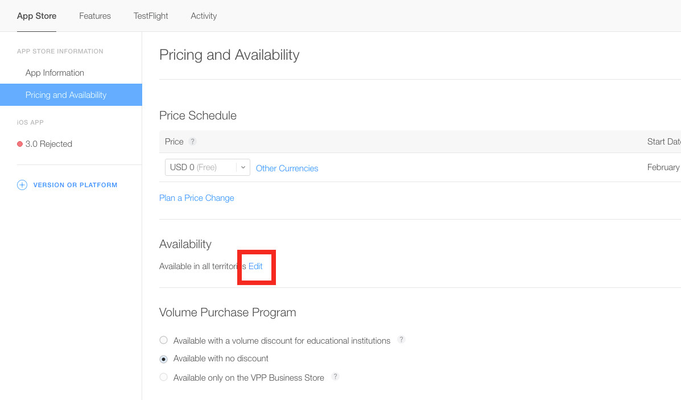
After making your selections, click the Save button in the upper right corner of each section.
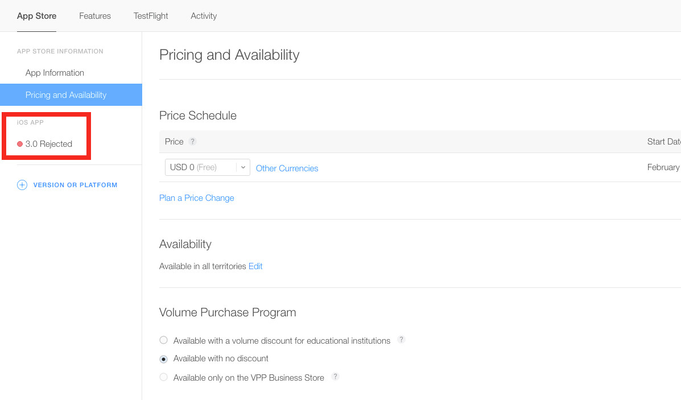
When you have completed both Pricing and Availability, look under "iOS APP" to find your app - it will display the version number and current status. Click it to go to the metadata page.
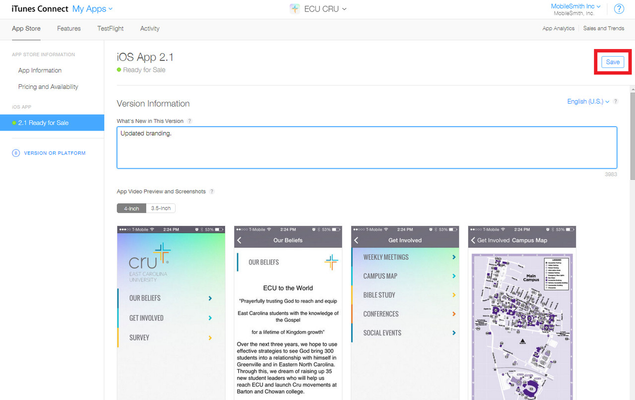
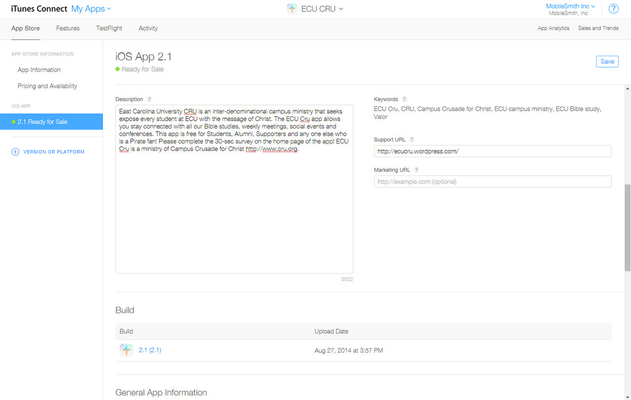
7. The metadata page is divided into sections, each of which is detailed below. When you finish completing the information, click the Save button in the upper right corner.
a. Version Information
- What's new in this version
- App Video Preview and Screenshots
- 3.5-Inch Retina Display Screenshots: Screenshots for 3.5-inch iPhone and iPod touch Retina display must be 960x640, 960x600, 640x960 or 640x920 pixels, at least 72 DPI, in the RGB color space, and in the JPG or PNG format.
- 4-Inch Retina Display Screenshots: Screenshots for 4-inch iPhone 5 and iPod touch (5th generation) Retina display must be 1136x640, 1136x600, 640x1136 or 640x1096 pixels, at least 72 DPI, in the RGB color space, and in the JPG or PNG format.
- iPad Screenshots: iPad Screenshots must be .jpeg, .jpg, .tif, .tiff, or .png file that is 1024x768, 1024x748, 768x1024, 768x1004, 2048x1536, 2048x1496, 1536x2048 or 1536x2008 pixels, at least 72 DPI, and in the RGB color space. **Note** If you are not submitting an iPad app you do not need to provide any screenshots in the iPad Screenshots section.
- Description for the app
- Keywords (no more than 100 chars)
- Support URL
- Marketing URL
b. General App Information
- App Icon
- A large version of your app icon that will be used on the App Store. It must be at least 72 DPI, in the RGB color space, and 1024 x 1024 pixels (it cannot be scaled up). The file type must be .jpeg, .jpg, .tif, .tiff, or .png. It must be flat artwork without rounded corners.
- Version **Note** Must match the version number entered in the MobileSmith Platform on the Build For Distribution page.
- Rating
- Copyright
- Trade Representative Contact Information
- Routing App Coverage File
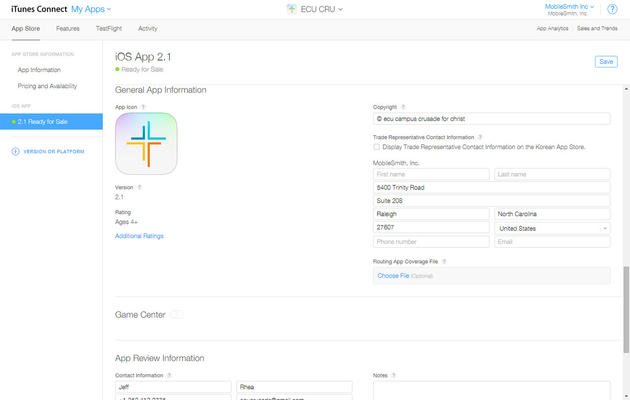
c. App Review Information
- Contact Information
- Demo Account
- Notes
8. Once this information is saved, the app status is set to ‘Prepare for Upload’.
a. Select the button ‘Prepare for upload’ in the upper right corner of the screen and answer the presented questions. At this point the status of the app changes to ‘Waiting for Upload’.
b. Click on the ‘Upload Binary’ button and answer the questions before opening Application Loader.
9. Once the status of the app is in ‘Waiting for Upload’, you will use the Application Loader to submit the binary.
Wonderful! You're almost there!
Application Loader
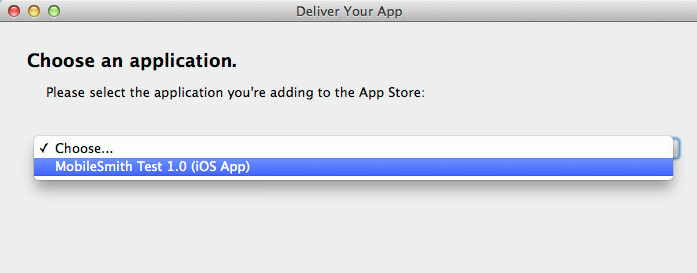
1. Open the Application Loader and log in with your iOS Developer Program account credentials. Then click on the button, ‘Deliver Your App’.
2. On the next page use the drop down to select the application you have prepared for upload.
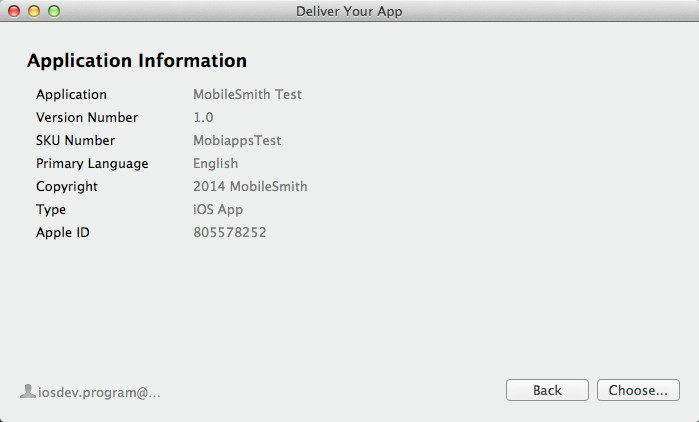
3. On the next page you will see Application Information and a ‘Choose’ button to upload your application.zip file.
4. After you choose the .zip file containing your application, the zip file will be validated to make sure it has been compiled properly; the code is signed correctly, and contains the proper assets as determined by Apple.
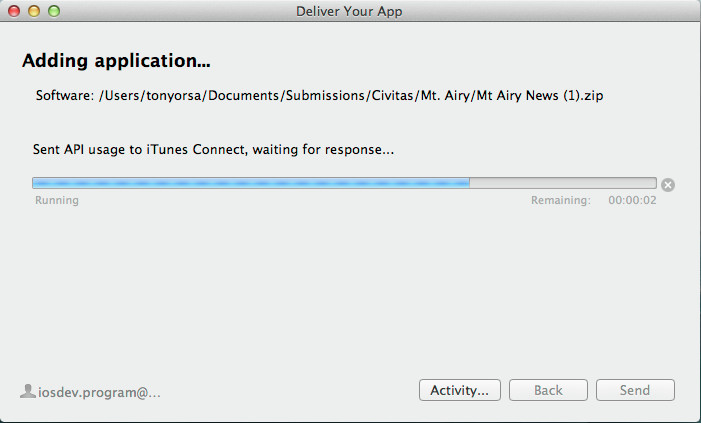
5. If this fails validation please alert your MobileSmith Account Manager. Otherwise, if your application uploaded successfully through Application Loader, you are almost done! Now you need to go back to iTunes Connect.
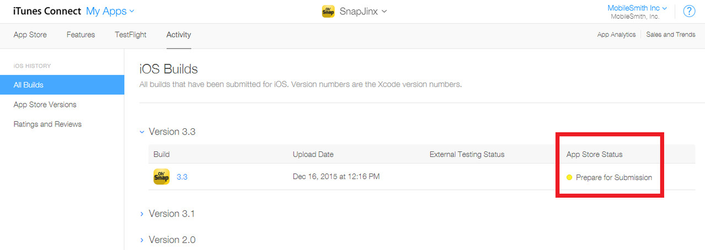
6. In iTunes Connect, once your build has been processed through Apple, you need to attach your builds to the actual submission.
- Check the Activity tab and look in the "App Store Status" column - this will show the status of your upload.
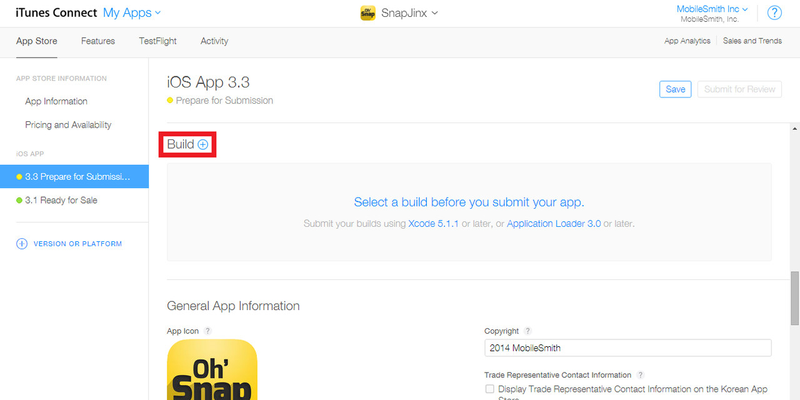
7. Once the processing has completed, you can go back to the App Store tab and look under the "iOS App" section (where your metadata and screenshots are).
a. Scroll down to the Build section and click the blue 'plus' button.
b. Select your app and click "Done".
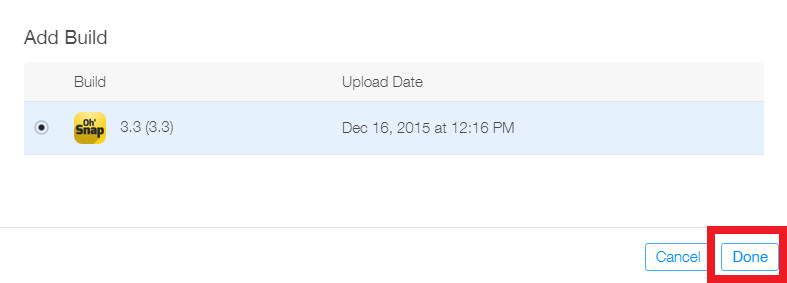
c. Click "Save", then click "Submit for Review".
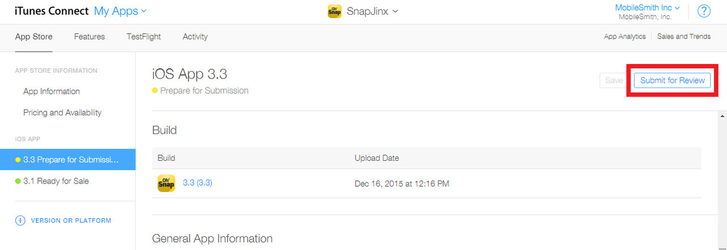
d. Select "No" for both questions, then click "Submit"
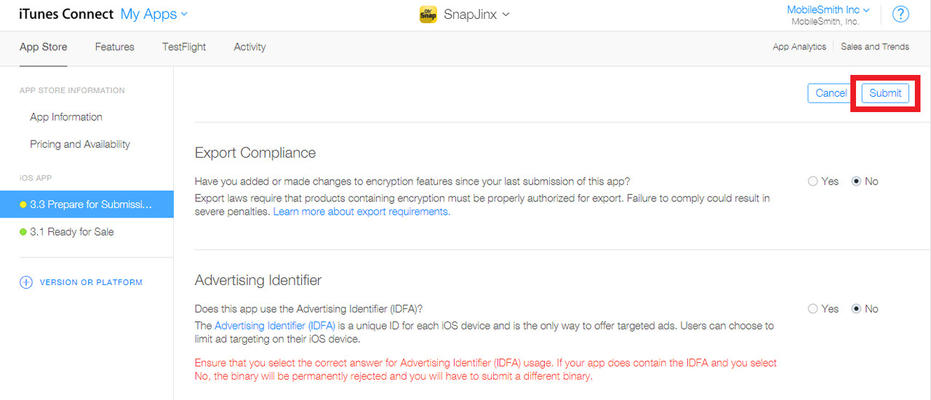
e. The status changes to "Waiting for Review".
The speed of app approval varies with Apple, however visiting your iTunes Connect account under Manage Your Apps will give you a little insight into the rate at which Apple is currently reviewing your app. This process generally takes 7-14 business days. Wondering about what each status signifies? About App Statuses
OMG! You've officially submitted your first app to Apple.
Google Play App Store Submission
The process for submitting an app to the Google Play store is easy and accomplished through a few quick steps.
1. Browse to the Google Play Android Developer Console:
https://play.google.com/apps/publish
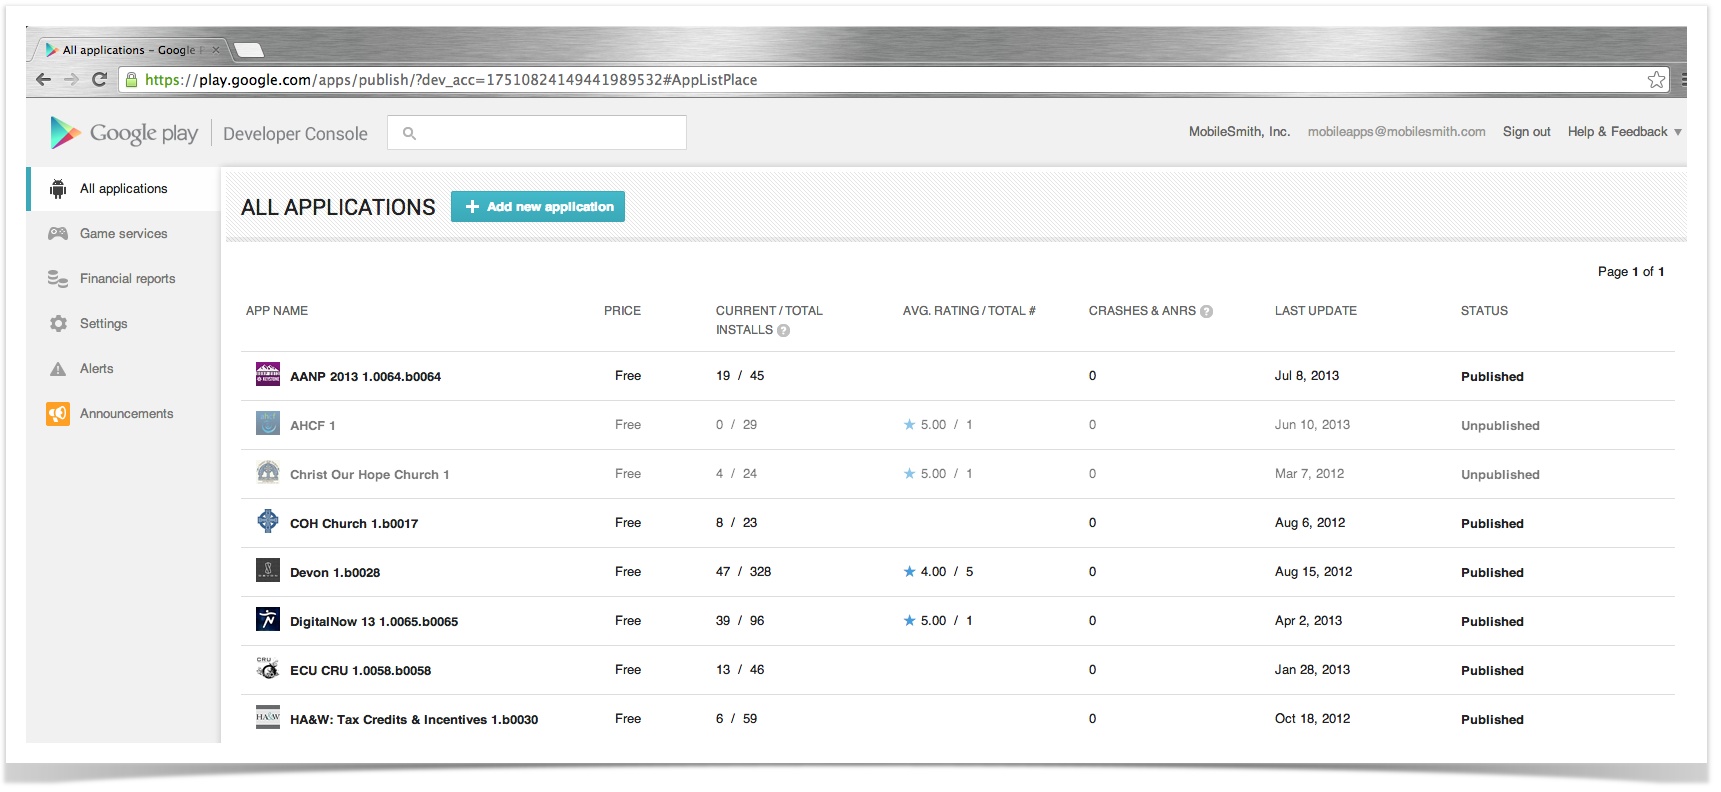
2. Log in with your Google Play account credentials. Upon access you will be brought to the ‘All applications’ view of the console.
3. To add a new application, click the ‘+ Add new application’ button in the right panel.
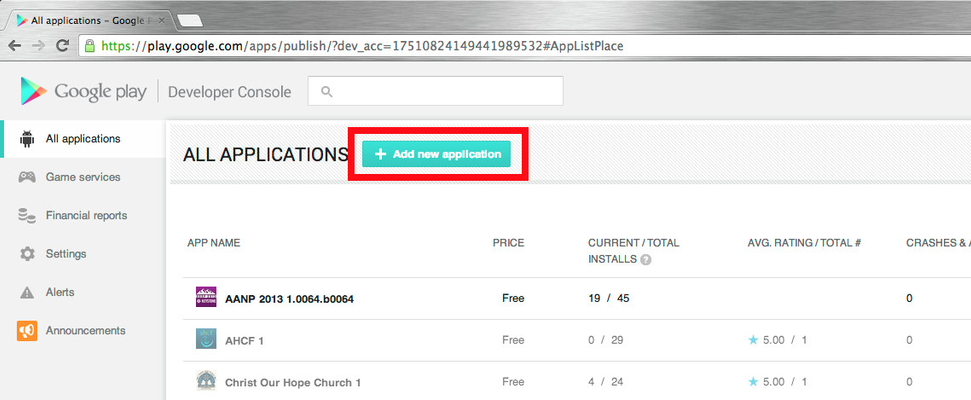
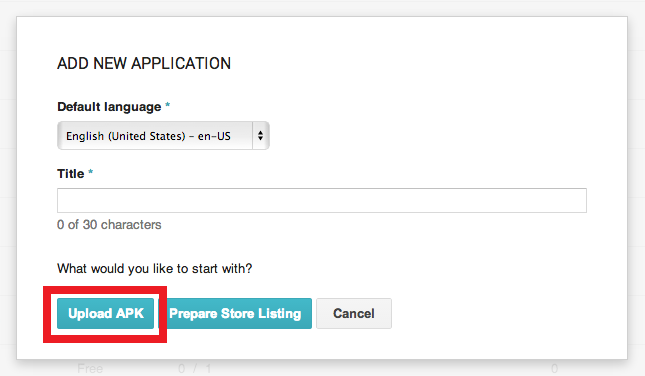
4. On the pop up window, you will be required to enter a Title for your app that will be displayed in the Google Play store. After entering the title select the Upload APK button.
5. On the next screen select the button ‘Upload your first APK’ and then follow the instructions to browse and then upload the .apk file you downloaded from the MobileSmith platform.
6. Following the upload you will now enter all of your Store Listing information (Store Listing option in the left nav bar).
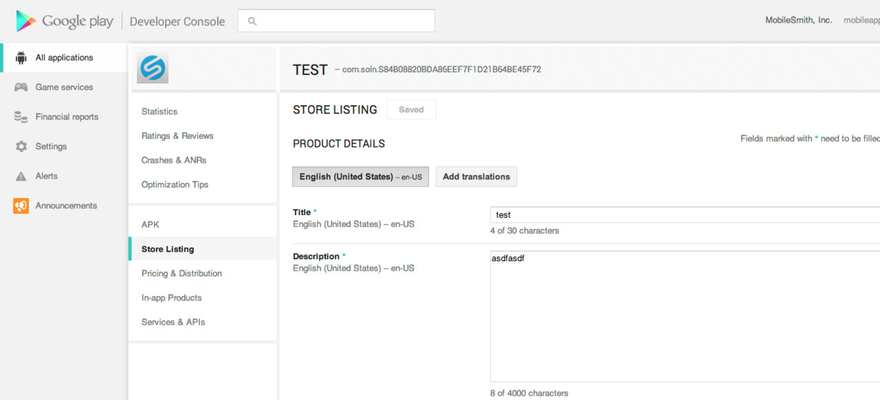
7. The store Listing page is broken into several different areas:
a. Product Details
i. Title: Already entered from the upload window
ii. Description of the app
iii. Recent changes: For first release enter ‘Initial release’. For updates enter the changes for the new version.
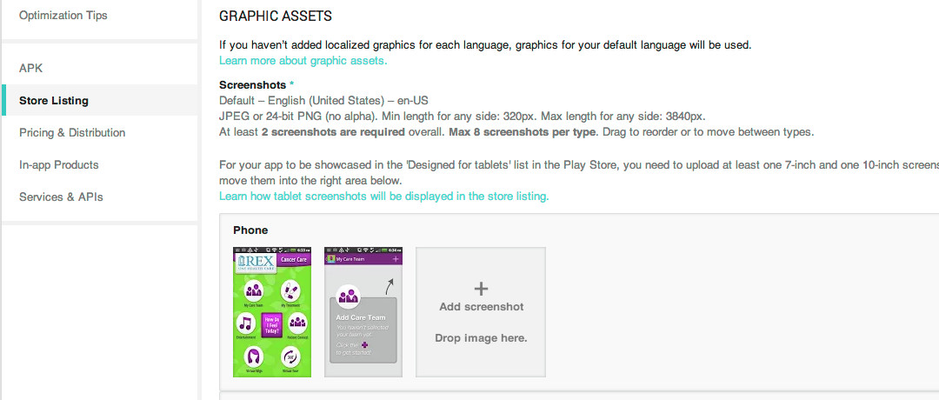
b. Graphic Assets
i. Screen Shots: Minimum of 2. JPEG or 24-bit PNG (no alpha). Minimum length for any side: 320px. Maximum length for any side: 3840px.
ii. High-res icon: 512x512px, 32-bit PNG (with alpha)
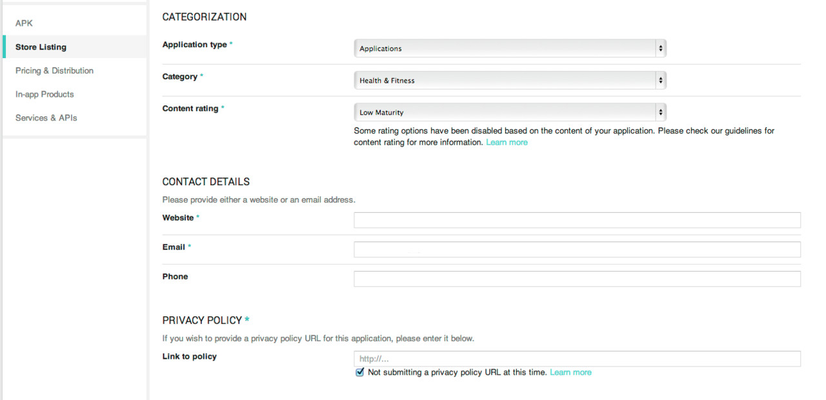
c. Categorization
i. Application type: Select either Applications or Games from the drop-down
ii. Category
iii. Content rating
d. Contact Details
i. Website
ii. Email
iii. Phone
e. Privacy Policy
i. If you are not submitting a privacy policy then select the checkbox next to ‘Not submitting a privacy policy URL at this time.’
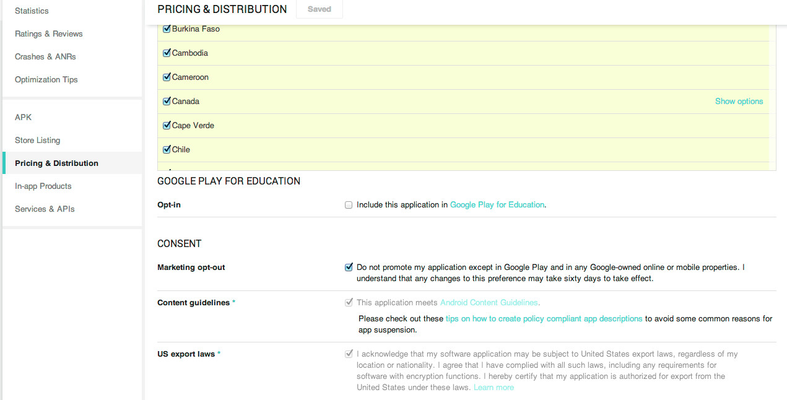
8. After saving the Store Listing information, select ‘Pricing and Distribution’ in the left nav bar. On this page you will enter the following information:
a. Pricing and Distribution
i. Select whether your app will be Paid or Free
b. Distribute in these countries
i. Select the checkbox next to ‘Select All Countries’ or select checkboxes for specific countries depending on where you want your app to be available
c. Consent
i. Place a check in each of the 3 checkboxes for Marketing opt-out, Content guidelines, US export laws.
9. At this point you are ready to publish your app. Select the ‘Publish’ button in the top right corner of the page to publish your app.
10. Google Apps can take up to 24 hours to become available in the Google Play store.
Amazing! Your app has now been submitted to both app stores.
Related articles
| Filter by label (Content by label) | ||||||||||||||||||
|---|---|---|---|---|---|---|---|---|---|---|---|---|---|---|---|---|---|---|
|
| Page Properties | ||
|---|---|---|
| ||
|