| Table of Contents |
|---|
Overview
The purpose of this document is to outline the steps and assets needed for submission to both App Store Connect and Google Play. This is a multi-part process as certain credentials need to be created and packaged with your app before it can be uploaded to the store. The flow of this document will be:
- Section 1: The Apple and Google accounts needed for store submission
- Section 2: The MobileSmith Platform files needed
- Section 3: Creating Apple and Google assets
- Section 4: Store submission steps
- Section 5: Store re-submit steps
Depending on your situation, you may need to start at a different section than the beginning. For example, if MobileSmith has previously submitted apps on your behalf, then assets created in section 3.1 have already been created. Therefore, you would need to start at section 3.2.
1 Apple and Google Accounts
1.1 Apple
To submit an app to Apple App Store Connect, you must be enrolled in the Apple Developer Program. The following steps will get you started on the process to create an Apple ID and then enroll that ID in the Apple Developer Program. Apple charges $99/year for membership to this program.
A few important items to note:
- Apple requires a separate Apple ID for each type of Developer Program they offer. Therefore, if you are enrolled in the Apple Developer Enterprise Program or Apple Business Manager, you will need a new Apple ID.
- The Apple ID will need to be enabled with two-factor authentication which will require you to have access to an Apple device, such as Mac, iPad, or iPhone.
- To enroll in the program, you will need the following:
- Legal Entity Status
- D-U-N-S Number
- A person who can legally bind your organization into an Apple agreement
- Your organization’s website
1.1.1 Create an Apple ID
Apple provides detailed instructions on how to create an Apple ID.
- Navigate to https://appleid.apple.com
- Click the ‘Create Your Apple ID’ link in the navigation bar.
- Follow the steps provided by Apple to create your Apple ID.
- You can either set up your two-factor authentication while you are creating your Apple ID, or you can come back and do it after the ID is created.
1.1.2 Enroll in the Developer Program
Instructions for enrolling in the developer program are as follows:
- Navigate to the following link: https://developer.apple.com/programs/
- Click the Enroll link in the top navigation bar.
- Read all information for what you will need for the program.
- Click the blue ‘Start Your Enrollment’ button at the bottom and follow the steps outlined by Apple.
1.2 Google
To submit an app to the Google Play store, you must have a Google Play Console account. There will be a one-time registration fee of $25.
1.2.1 Create a Google Account
- Navigate to https://accounts.google.com/signup
- Follow the steps provided by Google to create your Google Account.
1.2.2 Enroll in Google Play Console
Instructions for gaining access to your Developer Console are as follows:
- Navigate to https://play.google.com/apps/publish/signup/
- Sign in using your Google Account.
- Read all information for what you will need for the program.
- Click the blue ‘Continue to Payment’ button at the bottom and follow the steps outlined by Google.
2 MobileSmith Platform
The MobileSmith Platform requires different sets of files, some at the account level and others at the app level.
2.1 Account Level
The following is a list of all assets needed at the Account level to do a proper build for submission to both stores. Important note: These assets will need to be provided to MobileSmith as only your Service Delivery Representative has this level of access.
Apple
The iOS Global Distribution Certificate will need to be renewed annually and provided to MobileSmith each time.
- Global Distribution Certificate (.p12 file)
- Global Distribution Certificate Password
- Company Name
Android
Once the Keystore is created, this file and associated information should be stored in a safe place as it cannot change for the life of any apps submitted to the store using the keystore.
- Keystore (.keystore file)
- Keystore Password
- Keystore Alias
- Keystore Alias Password
2.2 App Level
The following is a list of assets which are needed on a per app basis.
Apple
- Push Certificate (.p12 file)
- Push Certificate Password
- iOS Bundle ID
- iOS Version
- iOS Provisioning Profile
Android
- Configuration file (google-services.json file)
- Server API Key
- Sender ID
The next section will walk you through how to create all these assets and where they are used in the MobileSmith platform.
3 Asset Creation
This section of the document walks through the steps of how to create all the assets needed for your account and mobile app. For those assets created for the mobile app, details of where those assets are needed in the MobileSmith Platform will also be included in the instructions.
3.1 Account Level
3.1.1 Apple
All Apple assets will need to be created using a Mac computer. In addition, you will need a Certificate Signing Request (CSR).
3.1.1.1 Certificate Signing Request (CSR)
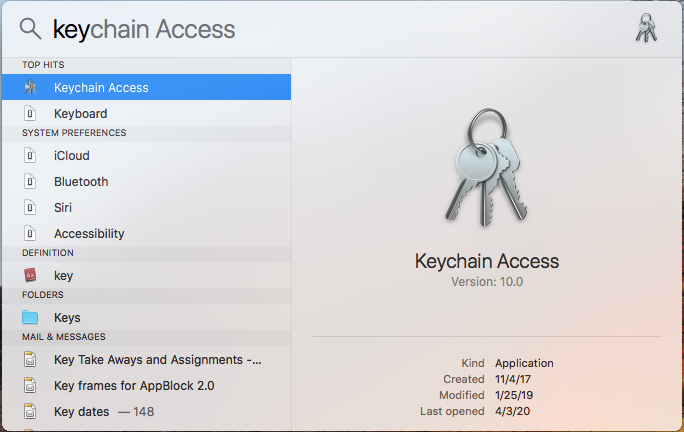
- Using the Search tool on your Mac, search for ‘keychain’ and click the Keychain Access application from the list.
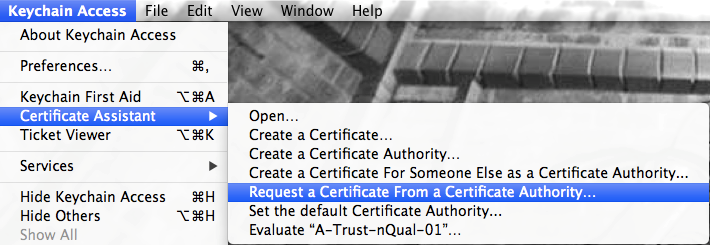
- Once the Keychain Access application starts, navigate to Keychain Access -> Certificate Assistant -> Request a Certificate From a Certificate Authority.
- Enter the User Email Address, Common Name and select the ‘Saved to disk’ radio button.
- Click the Continue button.

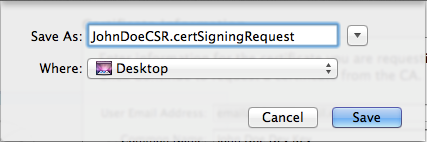
- Save the file as ‘some_unique_name.certSigningRequest’.
3.1.1.2 Global Distribution Certificate
The following steps will walk you through how to create your Global Distribution Certificate in the iOS Dev Center and then export it to create the .p12 file which MobileSmith requires.
- Navigate to the iOS Dev Center: https://developer.apple.com/devcenter/ios/index.action
- Enter your iOS Developer Program account credentials and sign in.
- Use the same Apple ID used to sign up for the Developer Program.
- Click ‘Account’ in the top navigation bar.
- Click the ‘Certificates, Identifiers & Profiles’ button in the middle of the screen.
- To create a Global Distribution Certificate, click the ‘+’ button next to the word Certificates.

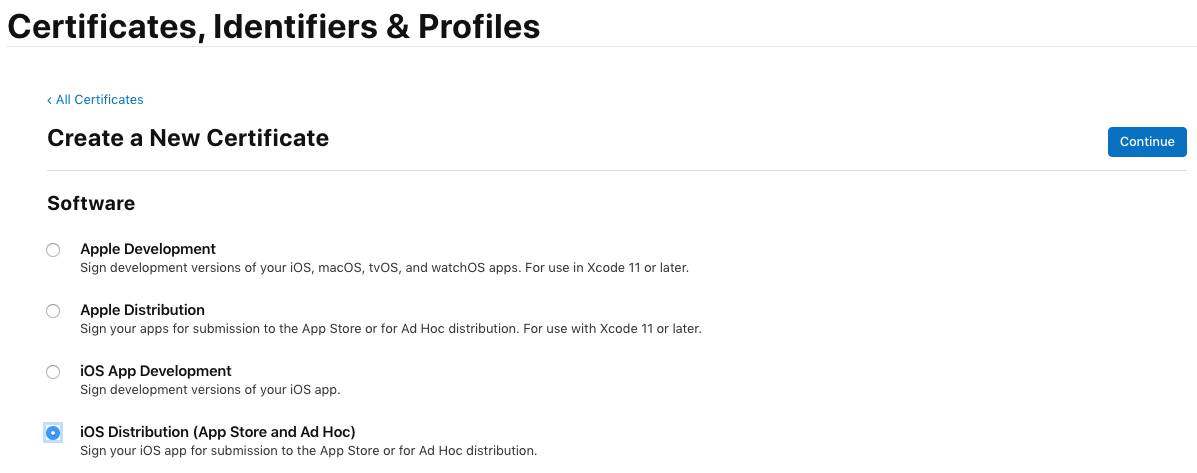
- On the next screen, in the Software section, select the radio button for iOS Distribution (App Store and Ad Hoc). Then click Continue at the top of the screen.
- The next screen asks you to upload your CSR, which you learned how to create in section 3.1.1.1. Click the Choose File link to select your CSR file and then click Continue to move to the next step.
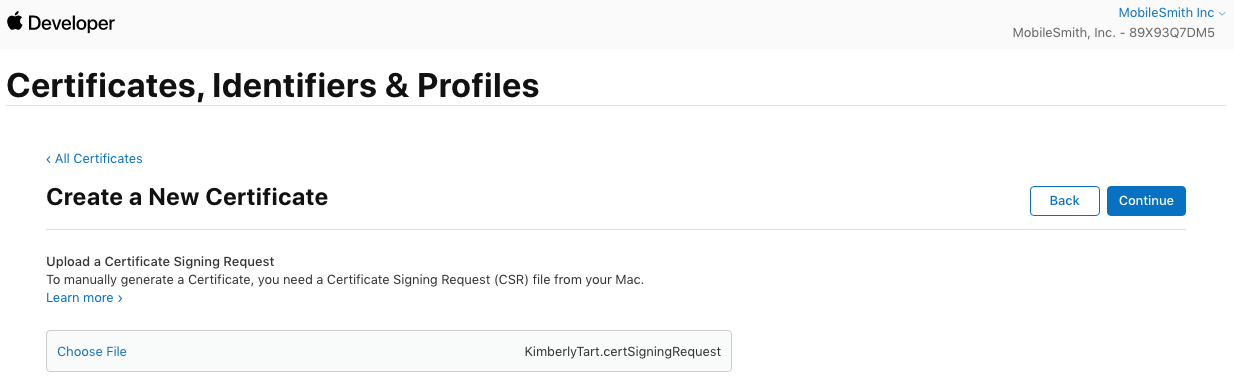
- At this point you have created your Global Distribution Certificate. Click the download button. You can click the < All Certificates link to return to the main screen.
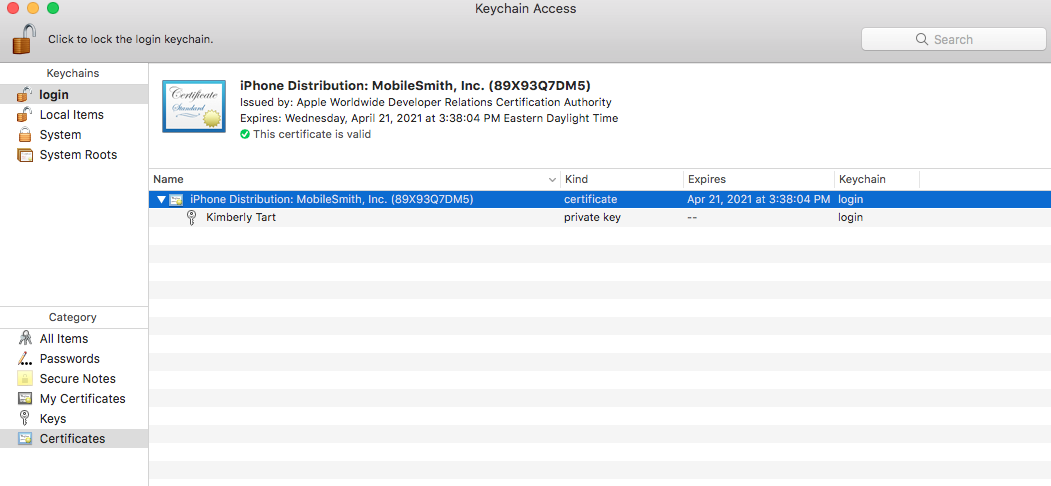
- Navigate to your Download folder and look for the ios_distribution.cer file. Open the file to add it to your local keychain (in your Keychain Access application).
- To validate this was done correctly, open your Keychain Access application and in the left nav bar, ensure ‘login’ is the selected Keychain and ‘Certificates’ is the selected Category. Your created certificate should read ‘iPhone Distribution: <your company name (Team ID)> and have an expandable carat arrow which will show your private key when expanded.
- The certificate will need to be exported into a .p12 file using the following instructions.
- In the Keychain Access application, expand the carat so the private key portion is showing. Highlight both the certificate and the private key, right click and then select ‘Export 2 items’.
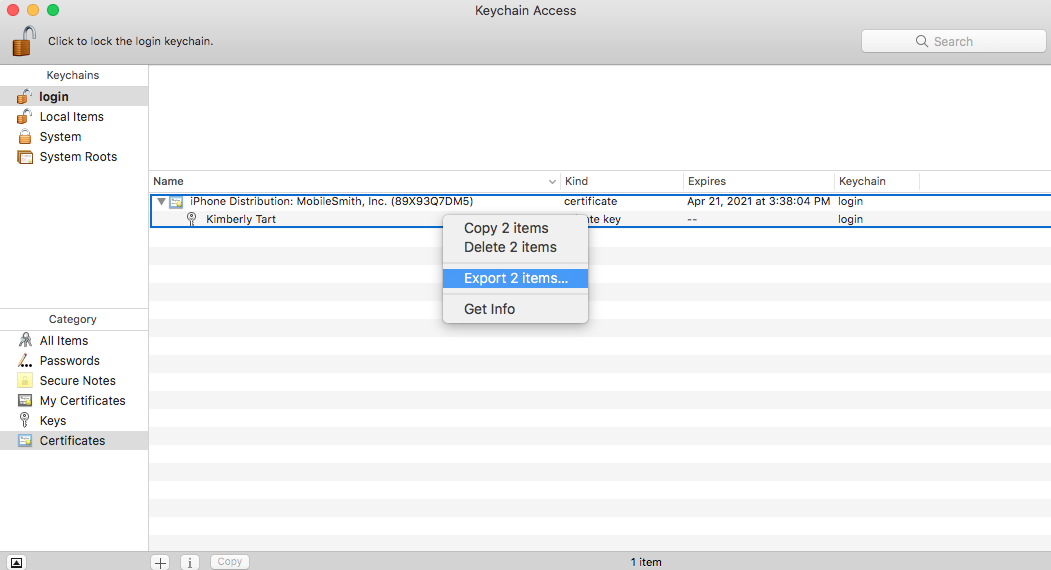
- You will be asked to save the file to your computer. The filename SHOULD NOT contain any spaces and ensure the file extension is .p12 (which is the default).
- Finally, after you click save, you will be asked to supply a password, and then confirm it. Make note of this password as it will be needed in the MobileSmith platform.
- After entering and confirming your password for the certificate, you will also be prompted to enter your keychain password twice to complete the export.
- Please send the .p12 file, it’s associated password and your company name to your MobileSmith Service Delivery Representative so it can be added to your platform account.
3.1.2 Android
3.1.2.1 Keystore
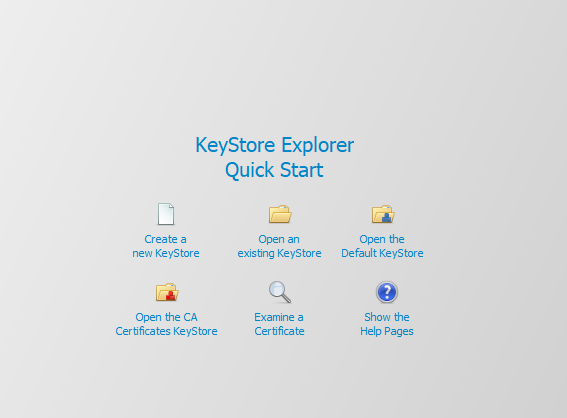
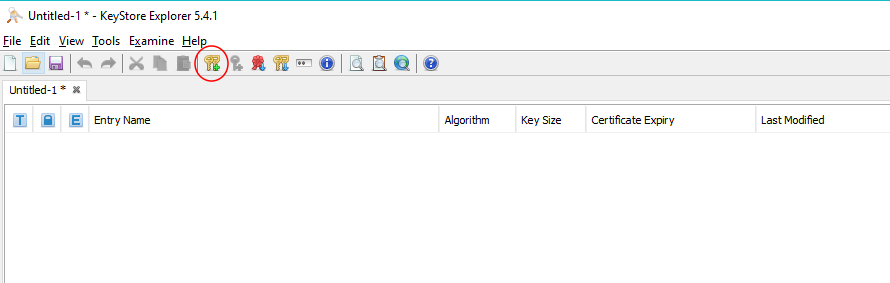
Each company should have an Android keystore which is used in the Android build process. The purpose of the keystore is to ensure each application is digitally signed with a certificate that is owned by the application developer. Android uses the certificate to identify the author of an application and establish trust relationships between applications. One of the easiest ways to manage your keystore is to use the KeyStore Explorer tool which can be downloaded here: https://keystore-explorer.org/
- Open the KeyStore Explorer tool and click ‘Create a new KeyStore’.
- Select PKCS #12 as the KeyStore Type.
- A new, Untitled, file will be created. On this screen, click the Generate Key Pair button.
- Select an Algorithm Selection of RSA and set a Key Size: 2,048.
- On the Generate Key Pair Certificate screen, complete the following:
- Select Version 3 radio button.
- Enter a Validity Period of at least 30 years and then click Apply to set the Validity End date.
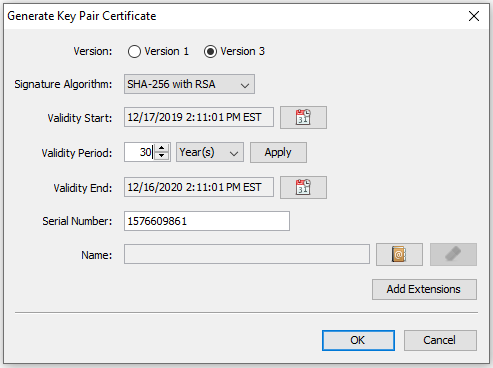
- Select the book icon at the end of the Name text box and enter the following information:
- Common Name (CN): First and Last name
- Organizational Unit (OU): Sales, Development, Marketing, etc.
- Organization Name (O): Name of your company
- Locality Name (L): City where your company is located
- State Name (ST): State where your company is located
- Country (C): 2 digits country code
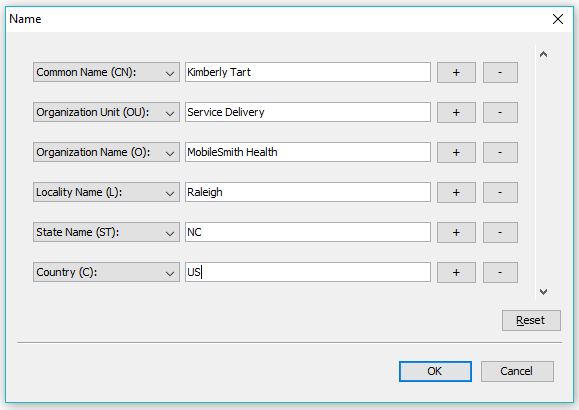
- Click OK on the Name screen and then again on Generate Key Pair Certificate screen.
- On the New Key Pair Entry Alias screen, enter the keystore alias name and click OK.
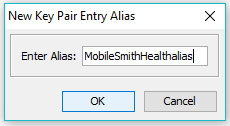
- Enter and confirm a password for the keystore alias.
- The keystore is now created and displays on the screen. Click the Save button to save the keystore.
- Enter and confirm a password for the keystore (Tip: Use the same password created in step #8).
- On the Save As screen, enter a name for the keystore and then change the file type to Keystore Files.
- This will automatically add the .ks extension to your filename. Change the .ks to .keystore and then click Save.
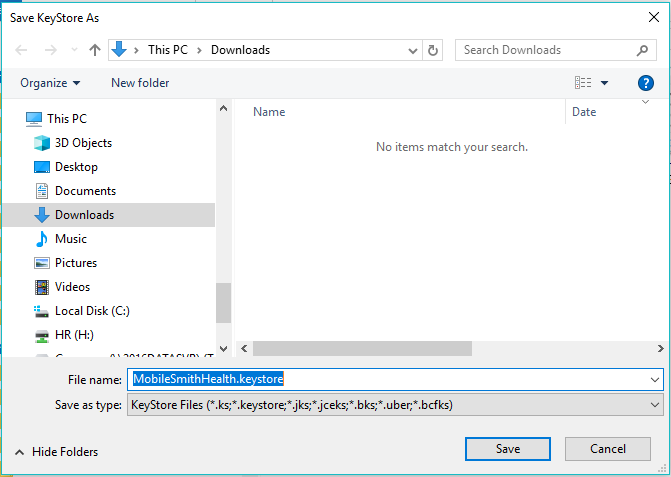
- The file is now saved to your computer and you have successfully created an Android Keystore.
- Please provide your .keystore file, associated password, keystore alias, and it’s associated password to your MobileSmith Service Delivery Representative so they can be added to your platform account.
3.2 Application Level
3.2.1 Apple
The following steps will need to be followed for each application created in the MobileSmith platform. Everything will be created in the iOS Dev Center.
- Navigate to the iOS Dev Center: https://developer.apple.com/devcenter/ios/index.action
- Enter your iOS Developer Program account credentials and sign in.
- Use the same Apple ID used to sign up for the Developer Program.
- Click ‘Account’ in the top navigation bar.
- Click the ‘Certificates, Identifiers & Profiles’ button in the middle of the screen.
3.2.1.1 App ID
- Click the ‘Identifiers’ option in the left nav bar to get to the Identifiers main page.
- Click the ‘+’ button next to the word Identifiers to register a new one.

- On the next screen, select the radio button next to App IDs and click Continue.

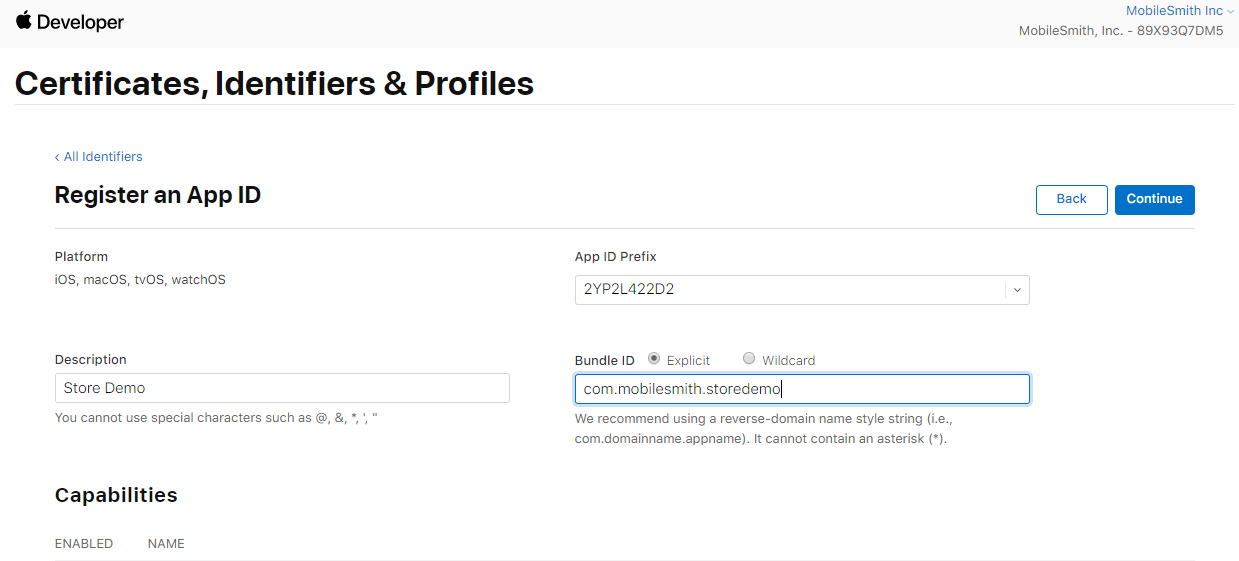
- On the next screen, enter the following information:
- Description: App Name
- Bundle ID: Leave the default option of Explicit selected and enter a Bundle ID using the recommended style of com.companyname.appname.
- Capabilities: Select the checkbox next to Push Notifications and any other capabilities your app may need (if applicable)
- Then click Continue

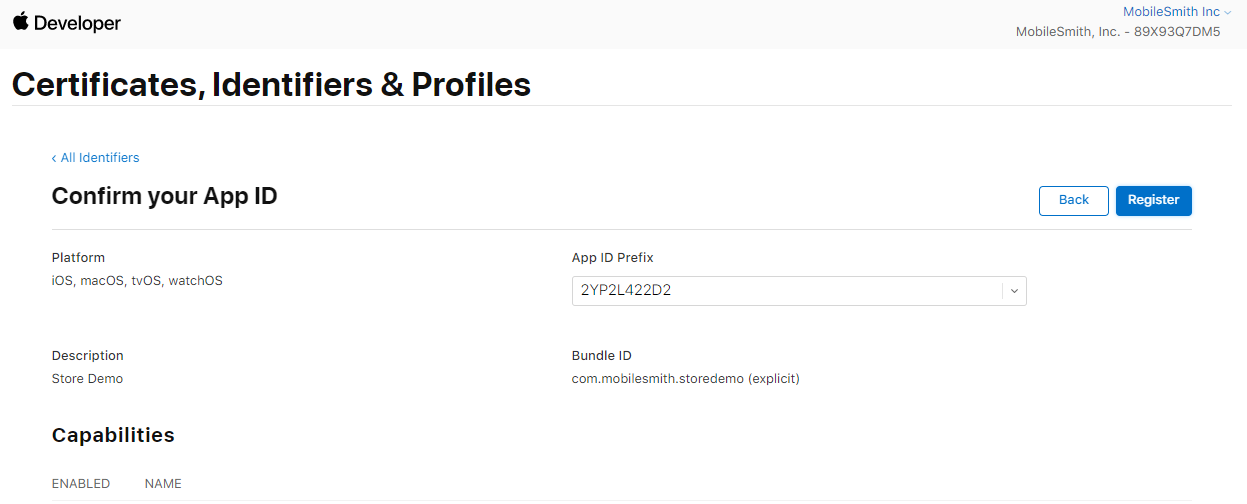
- You will now be able to register your App ID by clicking the Register button. You will automatically be returned to the Identifiers main screen.
3.2.1.2 Provisioning Profile
- Click ‘Profiles’ in the left nav bar to get to the Profiles main page.
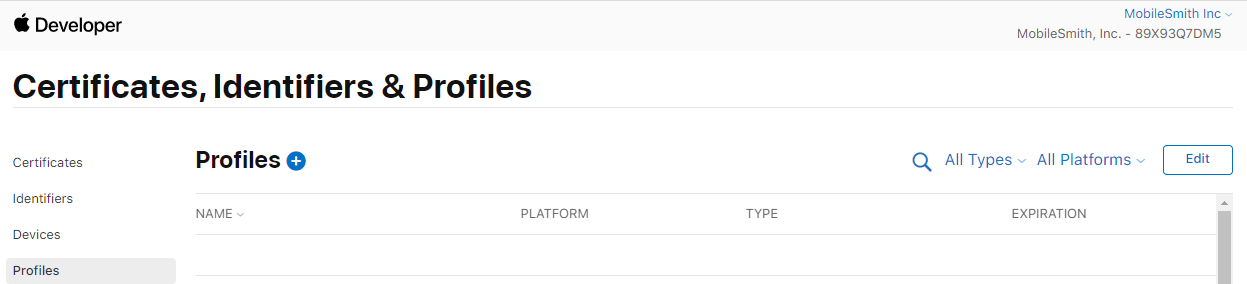
- Click the ‘+’ button next to the word Profiles to create a new profile.
- In the distribution section of the page, select the radio button for App Store and then click Continue.
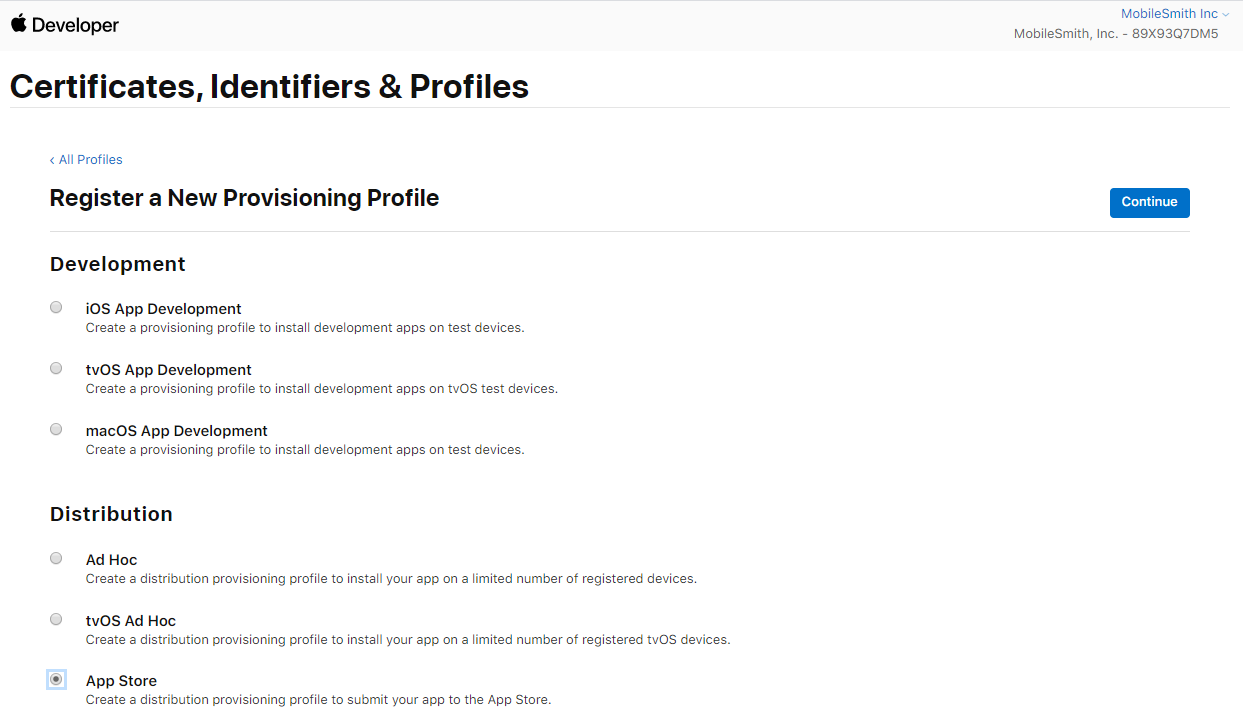
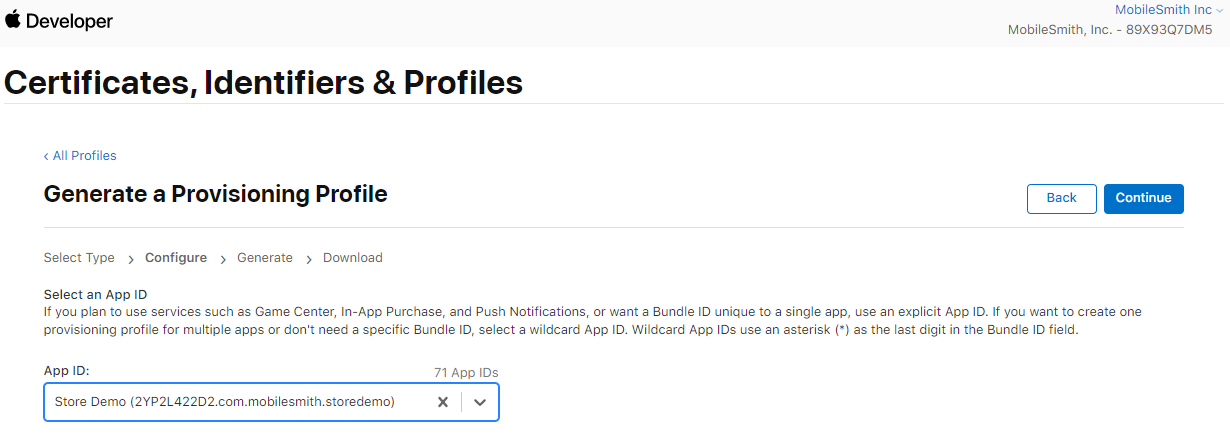
- On the next screen, select the App ID for which you want to register a provisioning profile and click Continue. (Note: You can start typing in the App Id field and the list will be narrowed down automatically).
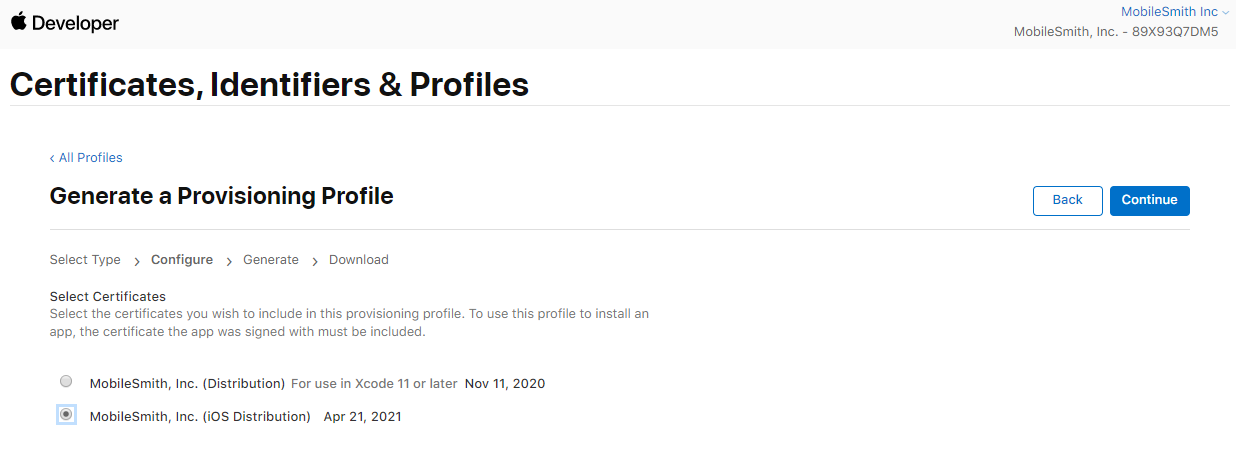
- On the next screen, select the appropriate Distribution Certificate you want to tie the provisioning profile to and then click Continue. (Important Note: This profile must be associated to the Global Distribution Certificate you have provided to MobileSmith for the account level assets.)
- Finally, enter a name for your provisioning profile (without including spaces) and then click Generate.
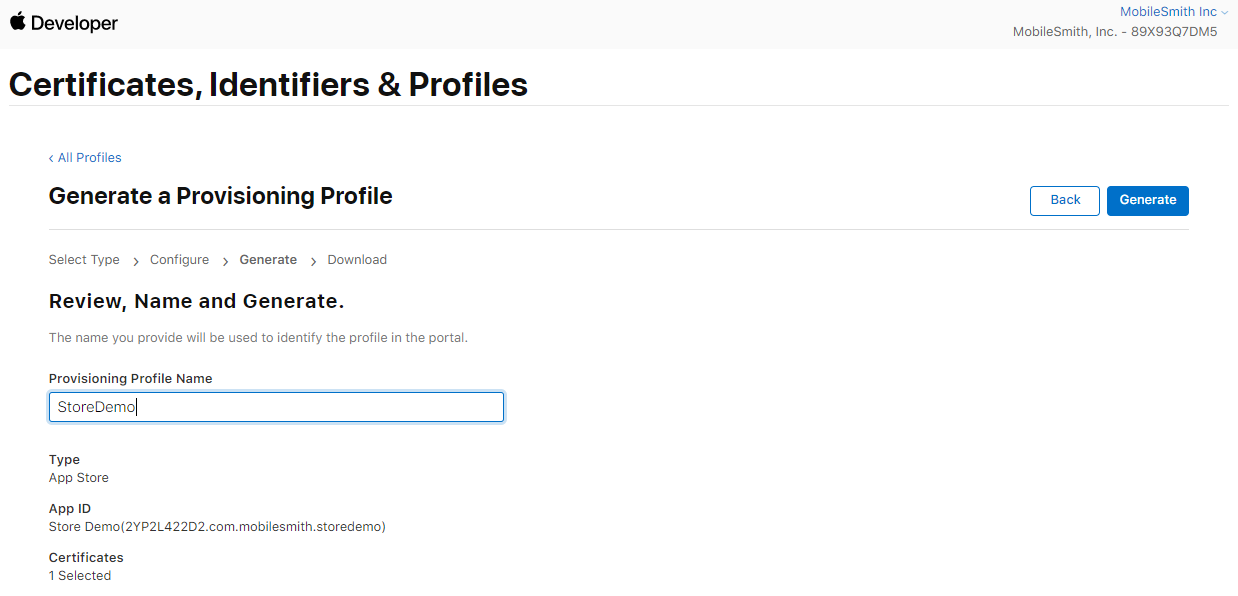
- On the next screen you will be able to click the Download button to download the provisioning profile. It will have the following file format: <ProfileName>.mobileprovision.
- Log into the MobileSmith platform: https://cms.mobilesmith.com/login.most
- Navigate to your mobile application.
- In the left nav bar, click App Stores, and then Build for Distribution.
- On this screen, provide the following information:
- iOS Bundle ID
- iOS Version (Note: This number will need to be incremented every time you do a new submission to the Apple store.)
- iOS Provisioning Profile by clicking the blue Add button and selecting your file
- You must click the green Add button to save your entries. After your entries are initially saved, the button will then change to a Save button which must be clicked for any changes made in this section.

3.2.1.3 Push Certificate
- To create a Push Certificate, click the ‘+’ button next to the word Certificates.
- On the next page, scroll down to the Services section and select the radio button for Apple Push Notification service SSL (Sandbox & Production) and click Continue.
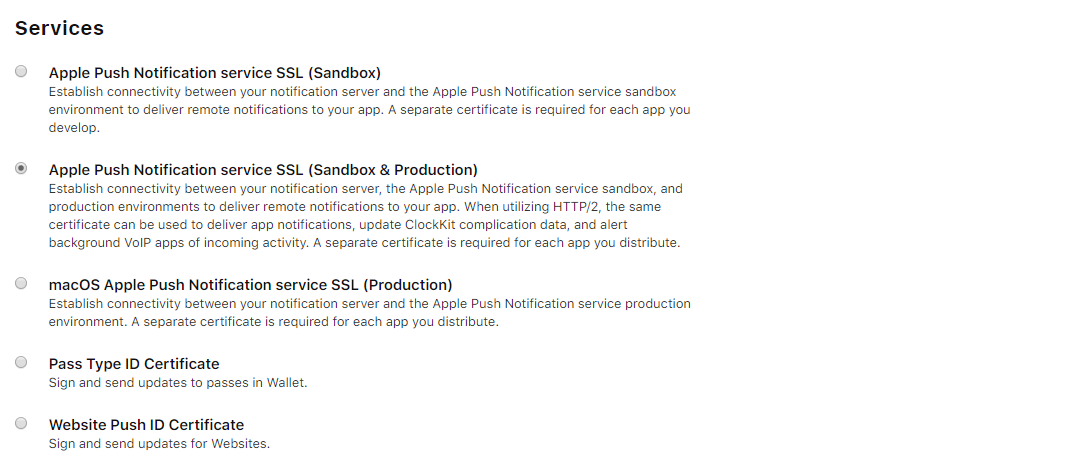
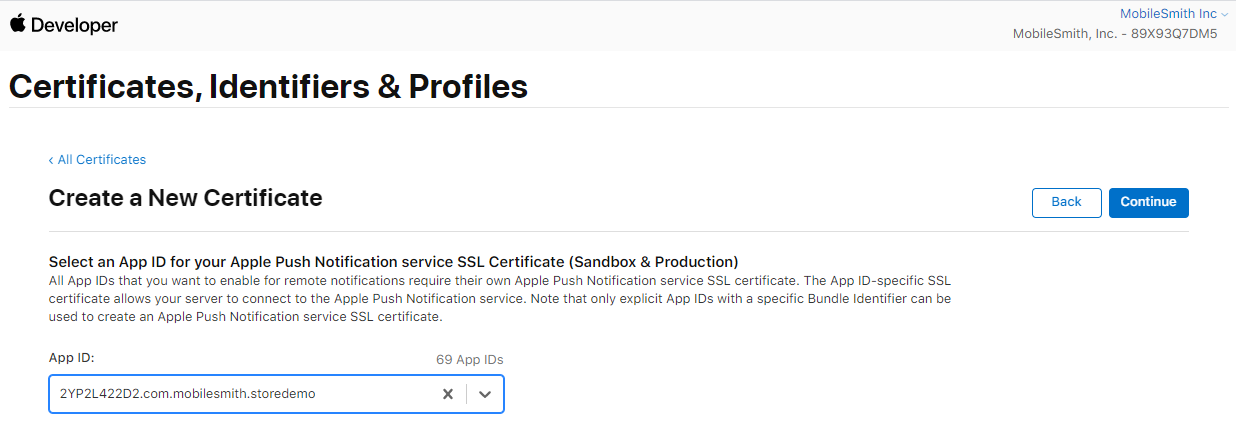
- On the next page, select the App ID for which you want to create a push certificate and then click Continue.
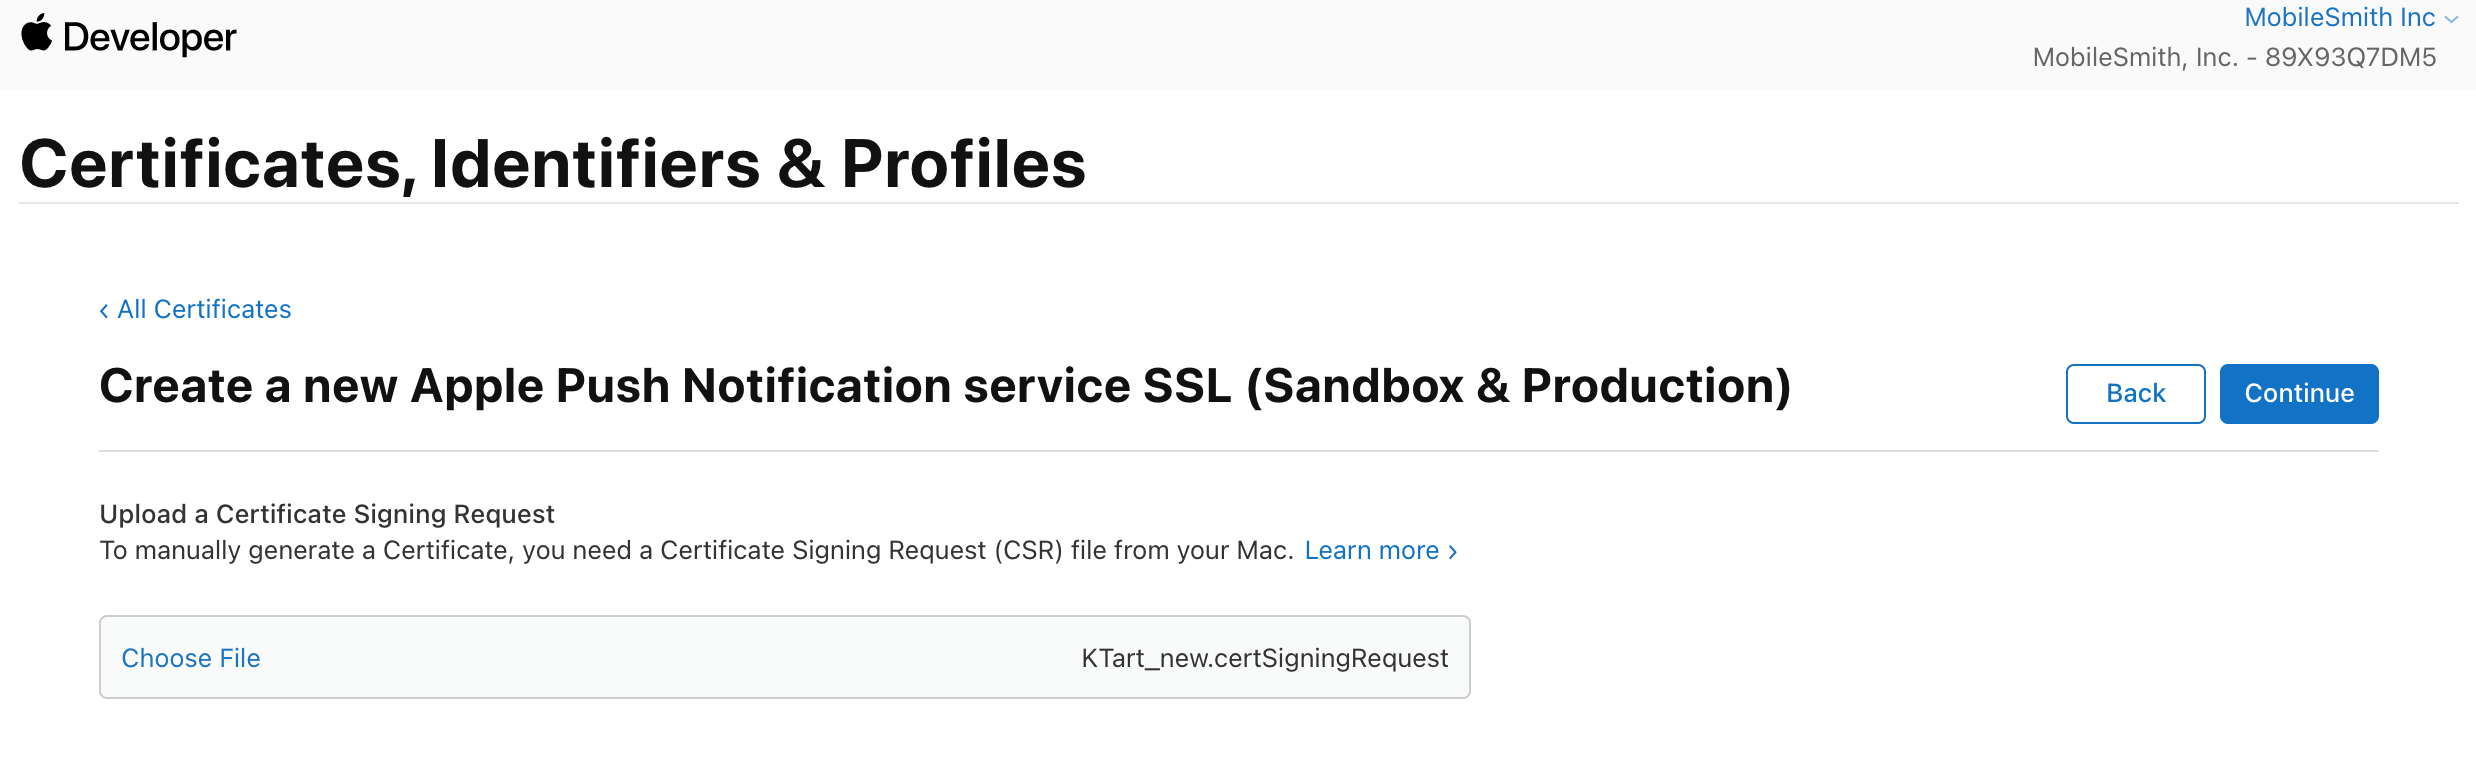
- You will then need to upload your CSR again on the next screen and then click Continue.
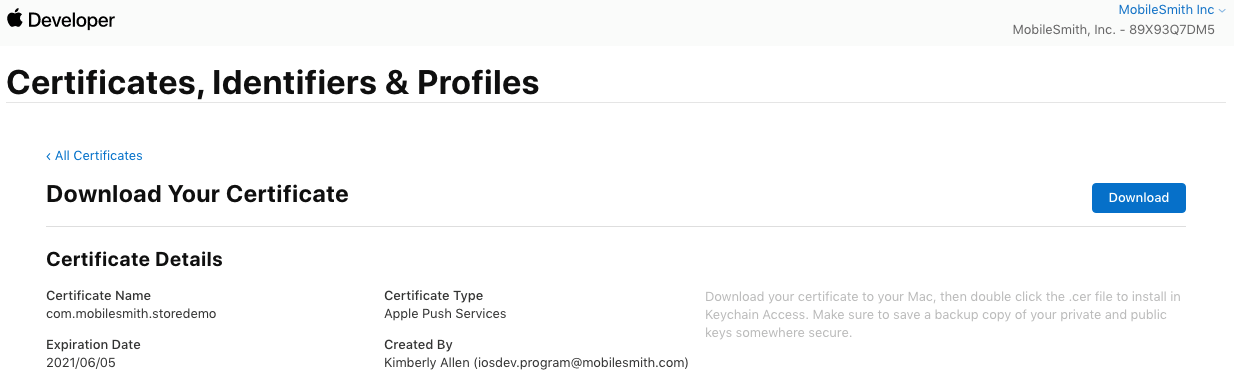
- At this point you have created your Push Certificate. Click the download button. You can click the < All Certificates link to return to the main screen.
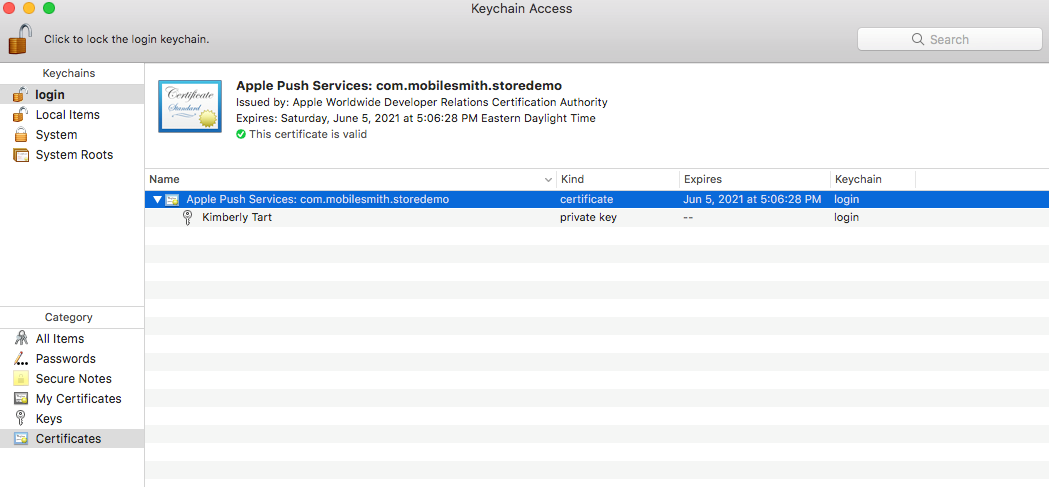
- Navigate to your Download folder and look for the aps.cer file. Open the file to add it to your local keychain (in your Keychain Access application).
- To validate this was done correctly, open your Keychain Access application and in the left nav bar, ensure ‘login’ is the selected Keychain and ‘Certificates’ is the selected Category. Your created certificate should read ‘Apple Push Services: <your bundle ID> and have an expandable carat arrow which will show your private key when expanded.
- The certificate will need to be exported into a .p12 file using the following instructions.
- In the Keychain Access application, expand the carat so the private key portion is showing. Highlight both the certificate and the private key, right click and then select ‘Export 2 items’.

- You will be asked to save the file to your computer. The filename SHOULD NOT contain any spaces and ensure the file extension is .p12 (which is the default).
- Finally, after you click save, you will be asked to supply a password, and then confirm it. Make note of this password as it will be needed in the MobileSmith platform.
- After entering and confirming your password for the certificate, you will also be prompted to enter your keychain password twice to complete the export.
- Log into the MobileSmith platform: https://cms.mobilesmith.com/login.most
- Navigate to your mobile application.
- In the left nav bar, click App Stores, and then Push Credentials.
- In the iOS section on the screen:
- Click the blue Add button and upload the .p12 file you just created for your push certificate.
- Enter the Push Certificate Password in the box.
- Click Save.

3.2.2 Android
Android app credentials are created in the Firebase console. At a minimum you will need to set up for use of push notifications which you get by default when you create an Android app for your project. Optionally you can enable Google Analytics if you would like to track your app analytics using Google. These instructions will include both.
3.2.2.1 Firebase Setup – Create a Project
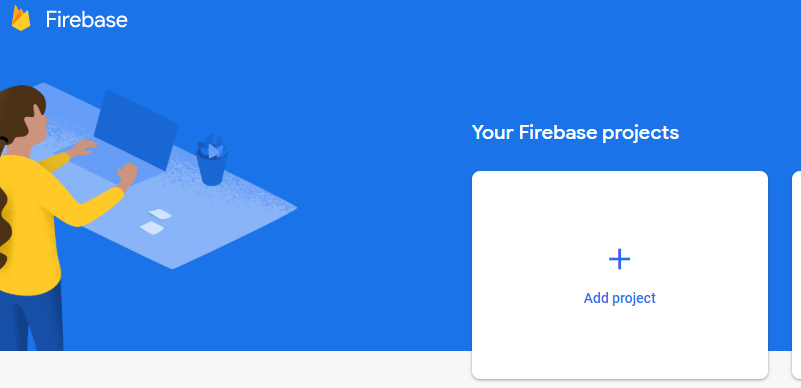
- Login to Google Firebase: https://console.firebase.google.com/
- Click the “Add Project’ button to start the 3-step process of creating a project.
- Step 1: Enter a name for your project and click Continue.
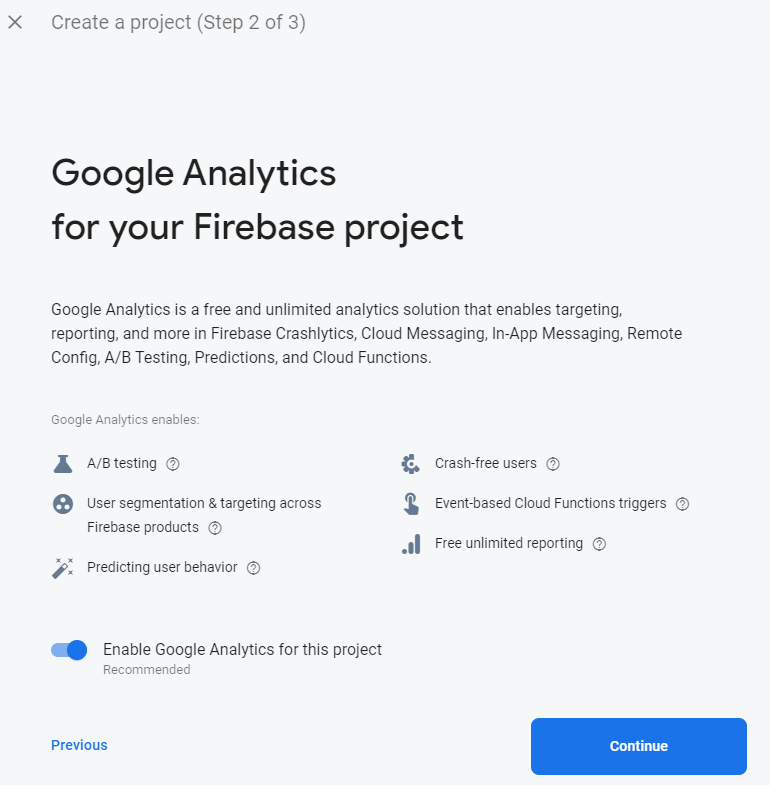
- Step 2: By default, Google Analytics will be enabled. Keep this setting toggled on if you would like to track analytics. Click Continue.
- Step 3: Configure the account for your Google Analytics. This is simply setting up how you will access your analytics, either through an existing project, or a new one.
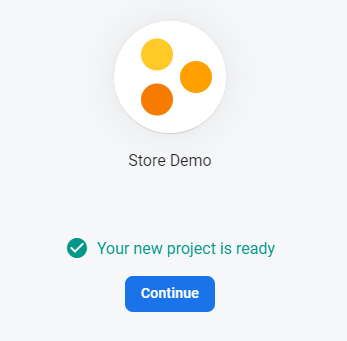
- Click the Create project button.
- When the project is provisioned, you will get a confirmation. Click Continue on this screen to be returned to the console.
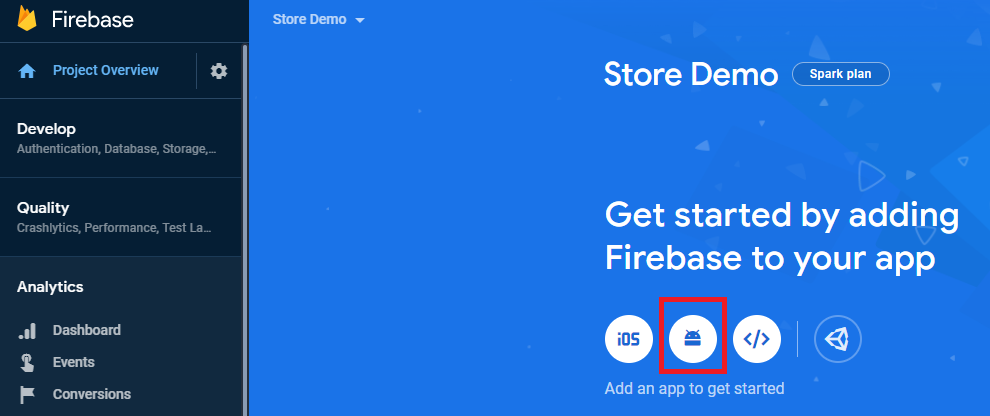
- You will be placed on the Project Overview screen of your new project. The next step is to add both iOS and Android apps to the project.
3.2.2.2 Create Android Push and Analytics file
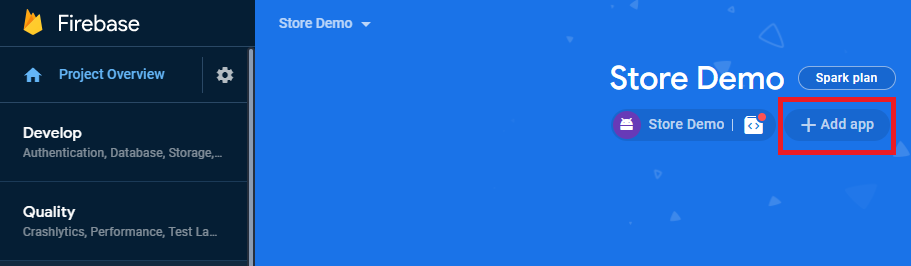
- From the Project Overview screen, click the Android icon to add an Android app to your project
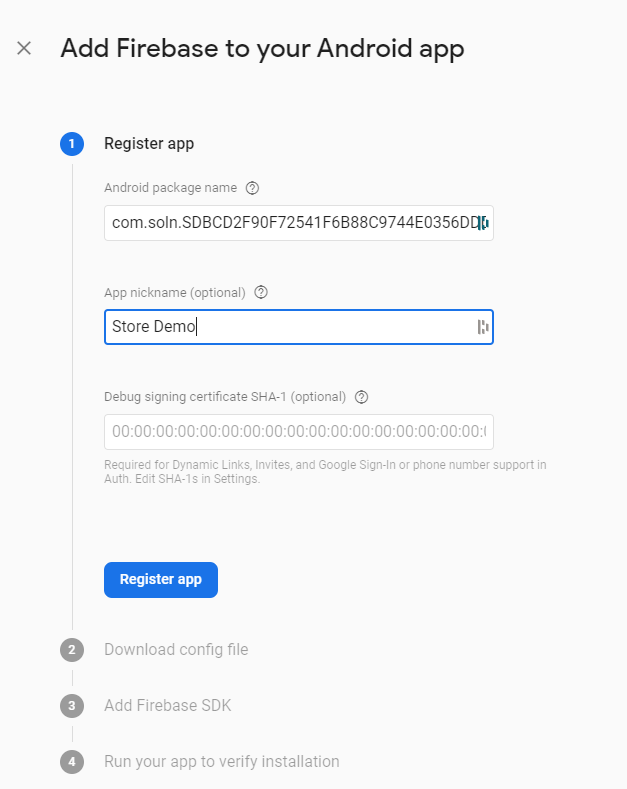
- On the first step, enter the Android package name which is the Package ID found in the MobileSmith Platform for your app (NOT the Apple Bundle ID). You can optionally enter a nickname for your app as well. Then click Register app.
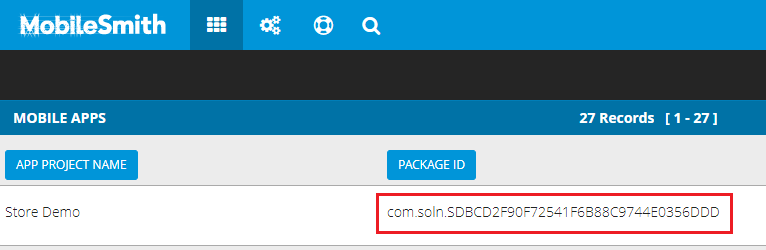
MobileSmith Platform app list screen
Firebase Console
- On step 2, click the blue Download google-services.json button to download the json file. Then click Next.
- For step 3, you do not need to do anything. Click the Next button.
- For step 4, you do not need to do anything. Click the ‘Skip this step’ hyperlink.
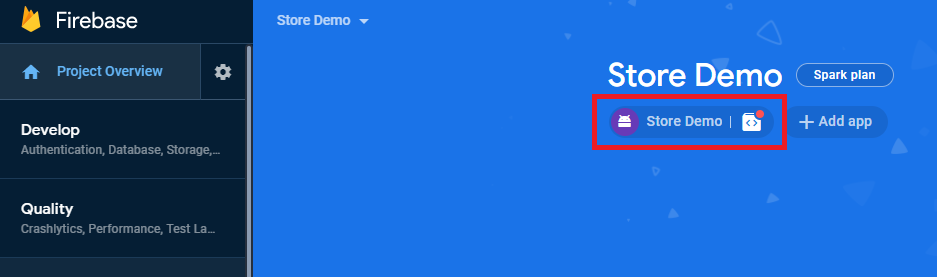
- You will now be returned to the Project Overview page of the console with your Android app successfully created.
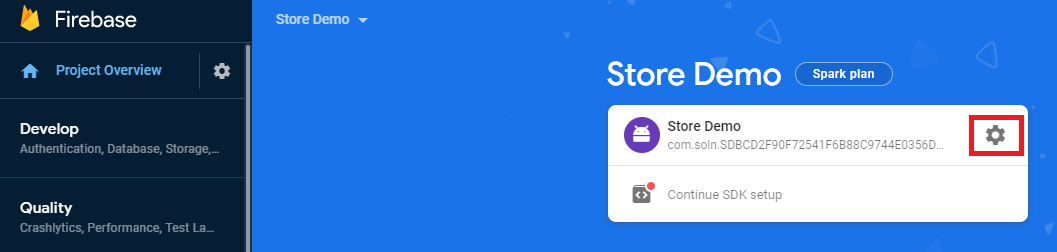
- To get the information needed for the push notifications, click the Android project on this screen.
- Then click the cog wheel to get to the details of the project.
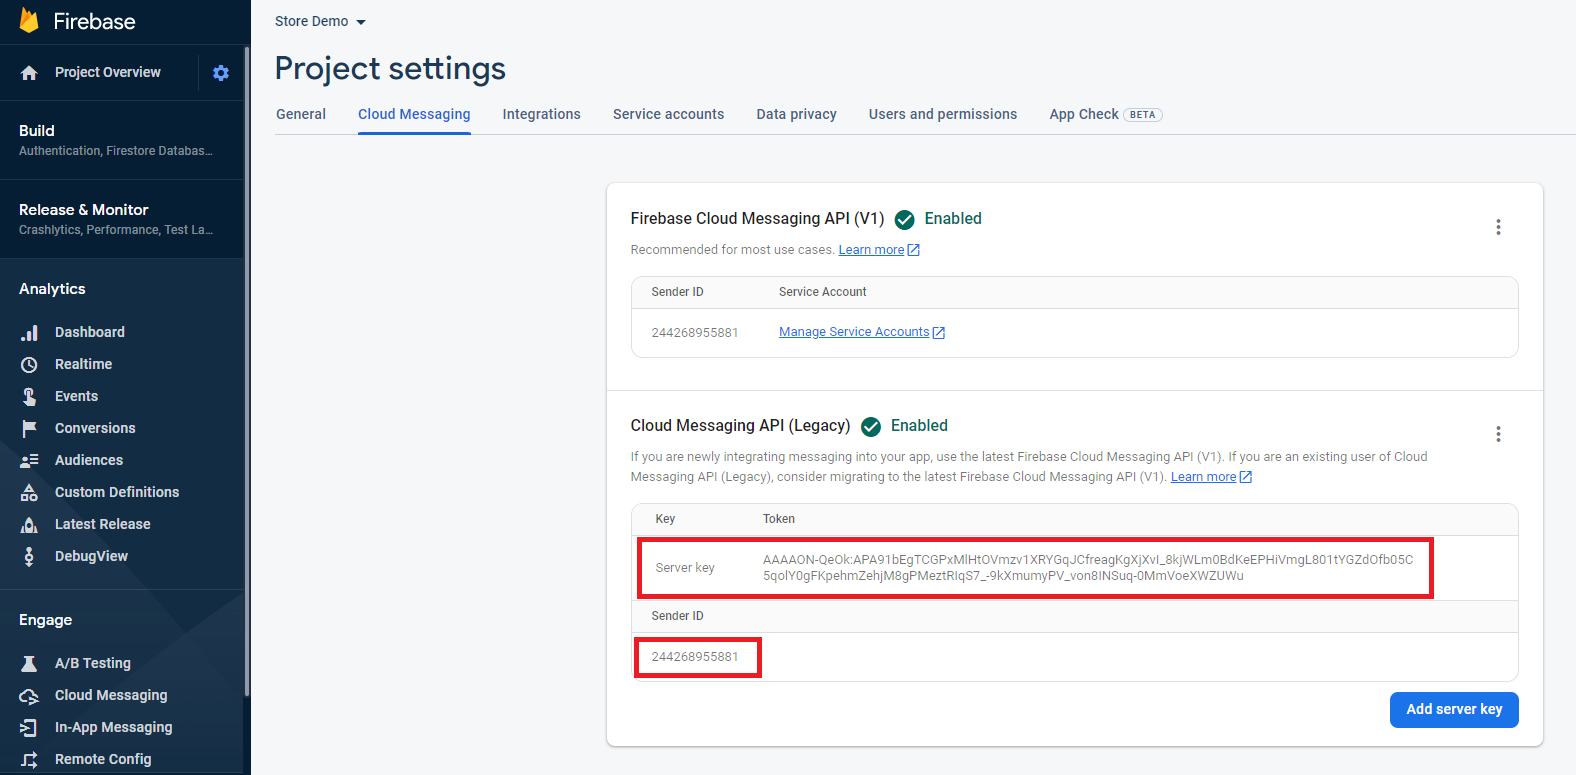
- In the Project settings section, click the Cloud Messaging tab.
- On the Cloud Messaging section capture the following information to be used in the MobileSmith Platform:
- Server Key
- Sender ID
- Log into the MobileSmith platform: https://cms.mobilesmith.com/login.most
- Navigate to your mobile application.
- In the left nav bar, click App Stores, and then Push Credentials.
- In the Android section of the screen:
- Click the blue Add button to upload the google-services.json you just generated.
- Enter the Web API Key value into the Server API Key field.
- Enter the number portion of the Public-facing name into the Sender ID field.
- Click Save.
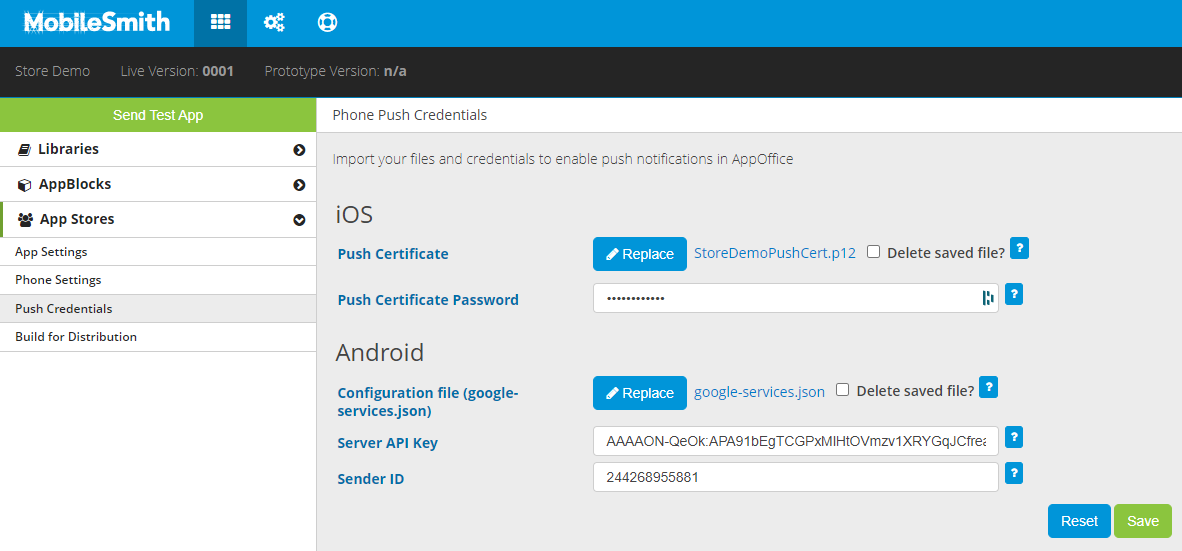
- By uploading your google-services.json file, both push and analytics are handled for Android.
3.2.2.3 Create iOS Analytics file (optional)
This step is optional. If you do not want to enable Google Analytics in your app, you do not need to proceed with this section.
- From the Project Overview screen, click the Add app button.
- Then click the iOS platform button
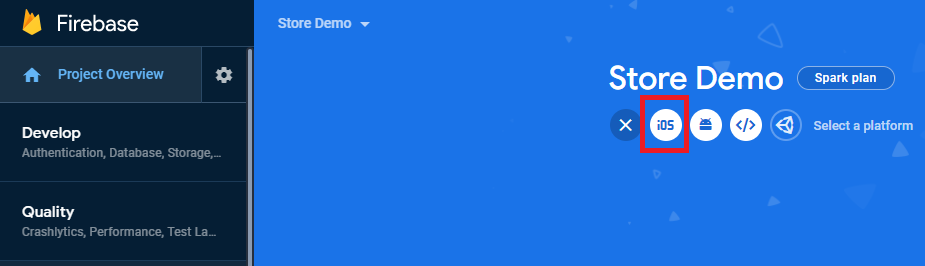
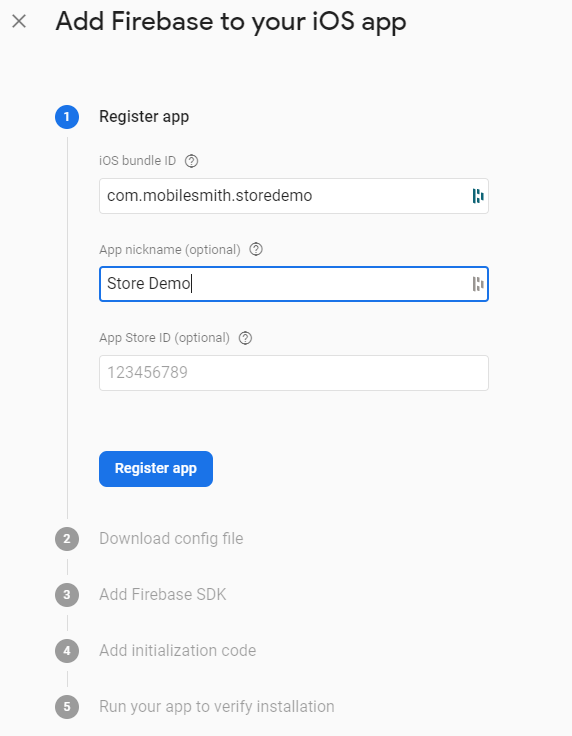
- On the first step, you will need to enter the following and then click Register app.
- iOS bundle ID – this must be the bundle ID you created in the iOS Dev Center for this app (see section 3.2.1.1).
- Optionally you can enter an App Nickname
- On step 2, click the blue Download GoogleService-Info.plist button to download the plist file. Then click Next.
- For step 3, you do not need to do anything. Click the Next button.
- For step 4, you do not need to do anything. Click the Next button.
- For step 5, you do not need to do anything. Click the ‘Skip this step’ hyperlink.
- You will now be returned to the Project Overview page of the console with your iOS app successfully created.
- Log into the MobileSmith platform: https://cms.mobilesmith.com/login.most
- Navigate to your mobile application.
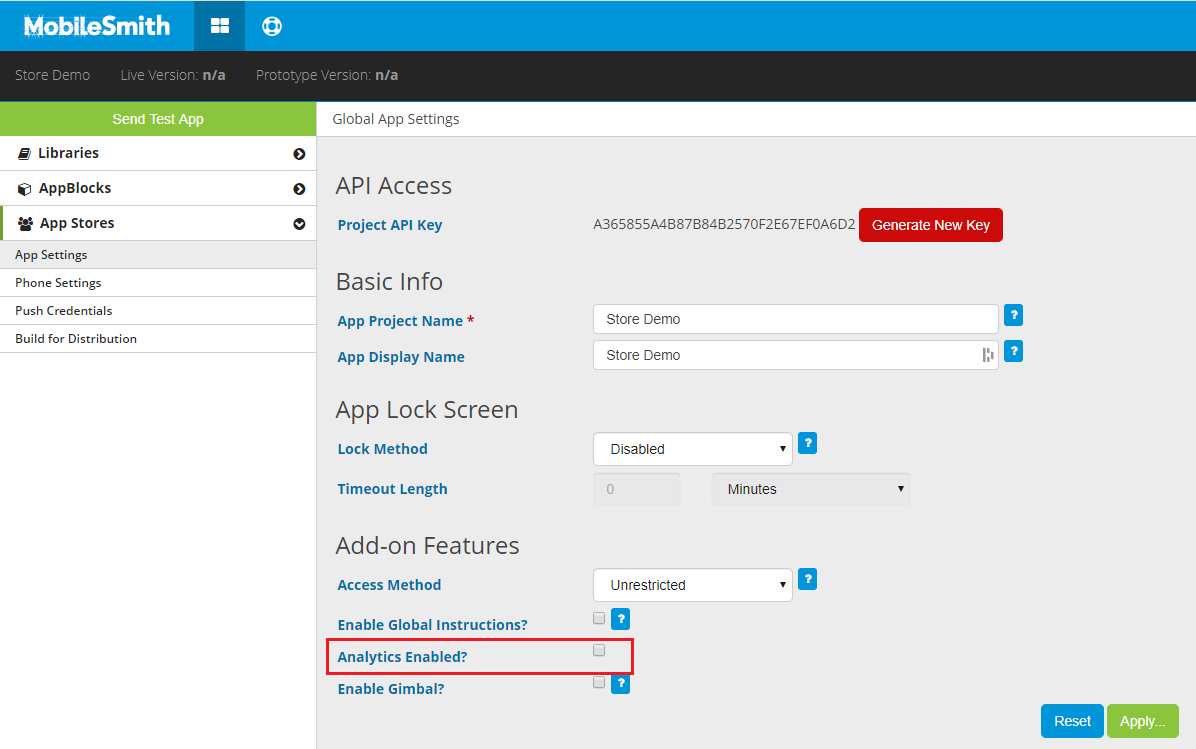
- In the left nav bar, click App Stores, and then App Settings.
- On the screen, in the Add-on Features, click the checkbox for Analytics Enabled? and then click Apply.
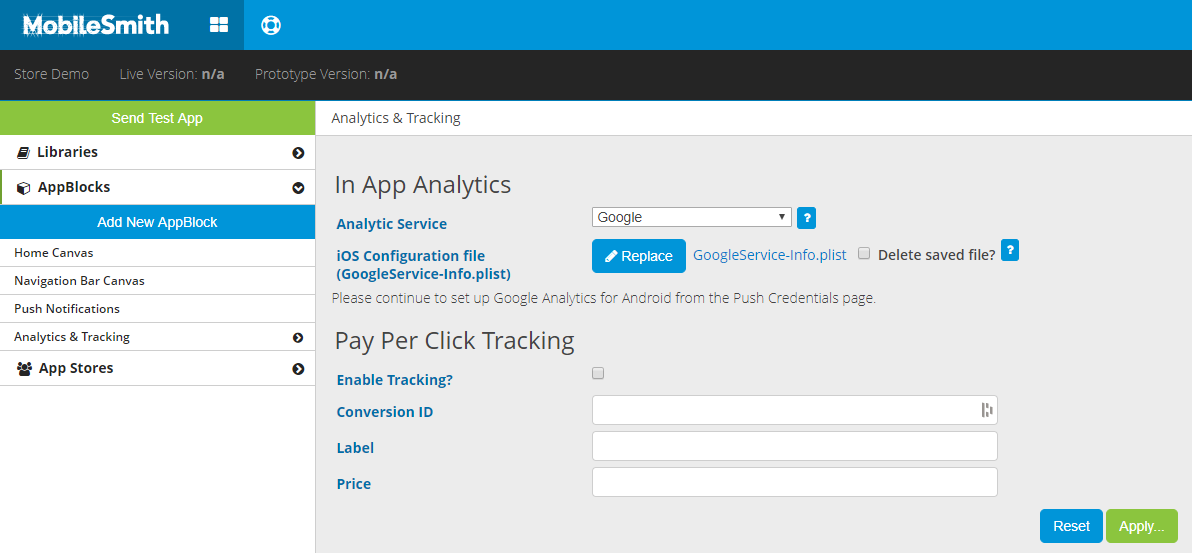
- This will automatically ad the Analytics & Tracking AppBlock to your app. Therefore, in the left nav bar, click AppBlocks, then Analytics & Tracking and then Configuration.
- On the screen, in the In App Analytics section, select Google from the drop down menu for the Analytic Service.
- Click the blue Add button to upload your iOS Configuration file you just created.
- Click Apply.
4 Store Submission
4.1 MobileSmith Platform Steps
At this point in the process, all account and app level assets have been created and uploaded into the MobileSmith platform. You are ready to do a build for distribution.- Log into the MobileSmith platform: https://cms.mobilesmith.com/login.most
- Navigate to your mobile application.
- In the left nav bar:
- Click App Settings.
- Ensure the App Display Name is the name you want for your app under the icon on the device. While the platform will not restrict the number of characters, Apple and Google will truncate the app name if too long.
- Click Phone Settings.
- Ensure you upload all Icon images and Loading images as these are required for a successful distribution build.
- Click Build for Distribution.
- Click the green Build for Distribution button to kick off a submission build.
- Click App Settings.
- When you receive your build email, click the link which will open up your desktop browser on your computer. Download both the iPhone and Android files to your computer.
- The Android file will be a .aab file.
- The iPhone file will be a .ipa file.
4.2 Store Information
Over the years both Apple and Google have made changes to their submission process. These changes have consisted of both workflow and UI updates. Therefore, this document will not provide the steps needed to create your app in the store. Instead, links have been provided to the respective store instructions provided by both Apple and Google. What this document has done is get you to the point that you have a distribution build ready to be uploaded into the stores. In addition, we have summarized the key information you will need when creating your app in the store.4.2.1 Apple App Store
All store submissions will need to be done on a Mac. Reference the App store Connect Help page to get started with creating an app in the store. Step 3 is a good place to start. When MobileSmith performs submissions for our clients, we use the Transporter app to upload the .ipa file. This app can be downloaded from the Mac App Store at https://apps.apple.com/us/app/transporter/id1450874784?mt=12. A few specific comments to note regarding the Submit for Review step. Apple will present a series of questions to answer during this process. For these questions, you will need to provide the following answers:- Export Compliance = No
- Content Rights = No
- Advertising Identifier = Yes
- Select the 3rd checkbox for “Attribute an action taken within this app to a previously served advertisement”
- Then select the confirmation checkbox under Limit Ad Tracking setting in iOS
4.2.1.1 App Information
- Name: The name of your app as it will appear on the App Store. 30-character limit.
- Subtitle (Optional): A summary of your app that will appear under your app’s name on the App Store. 30-character limit.
- Privacy Policy URL: A URL that links to your organization's privacy policy.
- Category: The category that best describes this app. For more information, see the App Store Category Definitions.*Note: For Apple, you must choose a Primary category but a Secondary category is optional.
4.2.1.2 Pricing & Availability
Price: The price determines the App Store price and your proceeds. If your app is free, choose Free.
Availability: Choose where your app is available to download. Note: We recommend making your app available only in the United States.
4.2.1.3 App Store Listing
- App Previews and Screenshots: Apple allows up to 10 screenshots and 3 app previews of your app. Screenshot sizes for the 6.5” Display need to be 1242 x 2688 pixels. Screenshots for the 5.5” Display need to be 1242 x 2208 pixels. Screenshots must be in the JPG or PNG format, and in the RGB color space. App previews must be in the M4V, MP4, or MOV format and can’t exceed 500 MB. (https://help.apple.com/app-store-connect/#/devd274dd925 for specific image sizes)
- Promotional Text (Optional): Promotional text lets you inform your App Store visitors of any current app features without requiring an updated submission. This text will appear above your description on the App Store for customers with devices running iOS 11 or later. 170-character limit.
- Description: A description of your app, detailing features and functionality. It will also be used for your Apple Watch app. 4000-character limit.
- Keywords: One or more keywords that describe your app. Keywords make App Store search results more accurate. Separate keywords with a comma. 100-character limit including commas and spaces.
- Support URL: A URL with support information for your app. This URL will be visible on the App Store.
- Marketing URL (Optional): A URL with marketing information about your app. This URL will be visible on the App Store.
- Copyright: The name of the person or entity that owns the exclusive rights to your app, preceded by the year the rights were obtained (for example, "2008 Acme Inc."). Do not provide a URL.
- App Review Contact Information: The person in your organization who should be contacted if the App Review team has any questions or needs additional information. First Name, Last Name, Phone Number, and Email Address required.
4.2.2 Google Play
Reference the Google Play Launch checklist for detailed steps on creating an app in Google Play. Step 9 is a good place to start.
4.2.2.1 Store Presence
Title: The name of your app as it will appear on the App Store. 50-character limit.
Short Description: This is what is listed before you click for the full description on the app page. 80-character limit.
Full Description: This is what is listed if they click to get the full description. 4,000-character limit.
Screenshots: JPEG or 24-bit PNG (no alpha). Min length for any side: 320px. Max length for any side: 3840px. At least 2 screenshots are required overall. Max 8 screenshots per type. Note: If you are creating modified screenshots, the submission sizes need to be 1440 x 2560 pixels.
App Icon: 512 x 512 px. 32-bit PNG (with alpha)
Feature Graphic: 1024 x 500 px. JPGor 24-bit PNG (no alpha)
Promo Graphic (Optional): 180 x 120 px. JPG or 24-bit PNG (no alpha)
4.2.2.2 Categorization
- Category: The category that best describes this app. For more information, see the full list of Google Play App Categories.
4.2.2.3 Contact Details
Website: A URL with marketing information about your app. This URL will be visible on the App Store.
Email: Please provide an email address where you may be contacted. This address will be publicly displayed with your app.
Phone (Optional): Please provide a phone number where you may be contacted.
4.2.2.4 Privacy Policy
Privacy Policy URL: We will need a link to your privacy policy on your website to be used in the app store and the app itself. Please provide me with this URL.
4.2.2.5 Pricing & Distribution
Price: The price determines the App Store price and your proceeds. If your app is free, choose Free.
Availability: Choose where your app is available to download. Note: We recommend making your app available only in the United States.
5 App re-submission guidelines
Submitting a new version of an existing app to the app store is very similar to the steps taken in the initial submission.
5.1 MobileSmith Platform Steps
Submitting a new version to the app store will require a build with an incremented iOS Version number.
- Log into the MobileSmith platform: https://cms.mobilesmith.com/login.most
- Navigate to your mobile application.
- In the left nav bar click App Stores and then Build for Distribution.
- In the iOS Version field on the screen, increment your build number.
- Important Note: If you do not increment your build number, your build will fail validation in the Transporter app.
- Click the Save button.
- Click the green Build for Distribution button to kick off a submission build.
- When you receive your build email, click the link which will open up your desktop browser on your computer. Download both the iPhone and Android files to your computer.
- The Android file will be a .aab file.
- The iPhone file will be a .ipa file.
5.2 Store Information
5.2.1 Apple App Store
To submit an update, follow these steps:
- Log in to App Store Connect: https://appstoreconnect.apple.com/login
- Click the My Apps icon.
- Click the icon for the app you would like to update.
- In the App Store section, click the + button in the left nav bar to add a new version of your iOS App.
- Enter the same version number that you updated the app to in the MobileSmith Platform (section 5.1).
- In the Version Information section, complete:
- What’s New in This Version: Describe what’s new in this version of your app, such as new features, improvements, and bug fixes. 4,000-character limit.
- Update any other metadata (ex: App Preview and Screenshots, Keywords, Description, etc.) that may need to change because of this resubmission.
- Click the Save button.
- Open your Transporter app on your Mac and follow the same steps as you would in a new submission to upload your ipa file to the store.
- Note: Your build number must match the build number in the MobileSmith Platform, and the build number set in Step 4 above. Otherwise, the build will fail validation in the Transporter app.
- When your build is available, click on your new version in the left nav bar, scroll down and click the + in the Build section to select your new build.
- Click the Save button.
- Click the Submit for Review button.
- Apple will then present 2 questions which must be answered in this way:
- Export Compliance = No
- Advertising Identifier = Yes
- Select the 3rd checkbox for “Attribute an action taken within this app to a previously served advertisement”
- Then select the confirmation checkbox under Limit Ad Tracking setting in iOS
- Your app will then be put into Waiting for Review status where it will then get reviewed by Apple.
5.2.2 Google Play
To submit an update, follow these steps:
- Log in to Google Play Console: https://play.google.com/apps/publish
- Click your app in the list shown.
- In the left nav bar, expand the Release management section and select App releases.
- On the screen in the first section is the Production track.
- Click the MANAGE button in the top right corner of the Production box.
- Click the blue Create Release button.
- Upload your apk file by clicking the Browse Files button in the Android App Bundles and APKs to add box.
- Note: The new apk file build number must be higher than the current version already in production. This version number can be seen in the Android App Bundles and APKs to deactivate box located below the below the Android App Bundles and APKs to add box.
- Scroll to the bottom of the screen to the ‘What’s new in this release?’ box down and enter all information about what is changing in this version.
- Click the Save button.
- Click the Review button.
- Note: There will be a warning following the review but MobileSmith is aware of it. This warning will not keep you from being able to submit your updated app.
- Click the Start Rollout to Production button.