| Table of Contents |
|---|
Overview
The MobileSmith Applet is a way to bring a little bit of the web to your native application. Unlike a simple link to a web page, Applets can run offline, interact with the native platform, and be configured through our web interface.
This page will take you through the process of creating a custom Applet, including how to host it, what features are supported, and where you can get the resources you need.
Tools
Applets are based on web technologies, so you can develop them in something as simple as Notepad or use more advanced tools such as Aptana Studio.
Applets and Hosting
Applets need to be hosted online at a location that can be publicly accessed. Applets must be packaged in a certain way and while the format is simple, we also provide a PHP script (appletManager.php) that can easily update packages from a directory. Using a server with PHP installed will allow you to easily use this script to package the Applets. Any server side technology that supports zip archiving and JSON operations may be effectively used to automate the packaging process.
Inside an Applet
A Local Applet can be viewed as a special kind of HTML5-based package that is executed in a device’s web-view that has been enhanced with additional functionality. The additional functionality allows the HTML5 application to operate without an Internet connection, control the devices history behavior, and apply updates to functionality and options transparent to the app user.
In order for an Applet to work, certain files need to be present. You will be provided with helper scripts that make it easier to access the extra functionality the platform allows. At a minimum you need two files, an index and a config file. To use special features you will need additional files. These files interact with the MobileSmith Platform telling the devices when they need to update, where to find the package, and how to present customization options.
The Applet directory must be made available on your server. However you must provide a zip file that contains the contents of the directory. This compressed version is what will be downloaded by the device.
Folders
Applets Root
If you want to use the script provided to aid in managing Applets, create a directory that will serve as your Applets root. This area will contain the following: the Applet indexing and packaging script, an optional index that wraps the script, and folders representing the categories of Applets on your Applet server. Though not required, it is recommended that the Applets root directory be relatively short with no spaces in the path and easy to access from the Internet on a server that supports PHP.
Category Directory
A category directory contains multiple Applets. The purpose is to help organize your Applets so that ones with a similar theme can be grouped together. Each category directory must be writeable by the server in order for the packaging script to work. Although the final location of the Applet package is user configurable, the packaging script by default will generate the package next to the actual Applet directory. Though not necessarily required, it is highly recommended that a category directory not contain spaces.
Applet Directory
The Applet directory contains the actual Applet code. You can usually visit the Applet directory in a web browser to help test the functionality and use your web browser’s inspection and debugging tools, though not all features that have been added by the MobileSmith Platform are available. Though not necessarily required, it is highly recommended that an Applet directory not contain spaces.
Files
AppletManager.php
The Applet Manager is one of the helper scripts we provide to aid in creating and maintaining Applets. You may optionally include or use this file as an index in your Applets Root. The Applet
Manager provides several pieces of functionality provided the directory structure is as indicated above. You are free to modify the Applet Manager script but any updates made to the script will be based on the default directory structure.
First, the Applet Manager provides quick links to the directories for each Applet. You may use these links to look at the Applets in the web browser or to paste into the MobileSmith Platform.
Second, the Applet Manager provides automated packaging for the Applets. As long as the Category Directory is writeable, the script will read the Applet structure, write the file used to check package integrity, and appropriately compress the Applet for distribution.
Third, it provides links to the generated packages.
Fourth, it provides an “Update All” feature that can be used to refresh the packages for all recognized Applets.
[Applet].zip
You may create the Applet package file manually, provide it any name and store it anywhere accessible to the target device. However, by default, these are generated next to the Applet Directory by the Applet Manager. They have the same name as the directory with .zip appended to the name and are automatically updated by the script. In the configuration file, these are easily pointed to by using the “up a level” indicator, “..”. I will discuss how to indicate the location of these files later.
The zip itself is in standard .zip format. We do not support other archive formats such as bzip or RAR, and are instead aiming for maximum compatibility. The file contains an exact copy of the Applet Directory contents but by decreasing the number of requests that have to be made we make the process more efficient.
Because this is what is actually downloaded by the target device, you must make sure that whenever you update the Applet itself, you update this file to match those changes. If you forget to update this file, the device will detect a version change and download the old package and an additional indication will be required to apply the update.
Please note, if you create the Applet package file manually, make sure the applet files are located at the root of the zip file, not contained in a parent directory inside the zip file. Including the parent directory in the zip file will prevent the target device from successfully unzipping and accessing the applet files.
mostConfig.json
This is the configuration file that indicates when an Applet has been updated. The information here is essentially the descriptor that makes the whole Applet work with the MobileSmith Platform. The file contains a single JSON formatted object of Key-Value pairs. There are currently several properties supported, some of which are absolutely important to the functionality of the Applet.
- Required Items:
- Title
- Indicates the Applet name, appropriately formatted and user-readable. This is displayed in the MobileSmith Platform.
- Publisher
- Indicates who created the Applet.
- Version
- This is the attribute that controls when the devices update the Applet. By incrementing the version number you signal a code change and the device will download the new .zip file containing the updated code.
- Remember, the updates are not packaged automatically; you should either use the Applet Manager script or manually update the zip whenever you increment the version.
- The version must be a simple “double”. The values 0, 0.1, 1.2, 35.286, are all valid version numbers. Invalid versions, such as v1, v2.3, 4.2.5, etc. will be treated by the device as “infinity” and will cause poor performance as the Applet package is updated every time.
- Zipfile
- Indicate the path where the zipped package of the Applet can be found. If this is an absolute path, begin with http:// or https://. If this is a relative path, it is in relation to the location of this file. To indicate one directory up, or at the same level as the Applet directory itself, precede the name of the package with “../” indicating “up one level”.
- Title
- Optional Items:
- Description
- Describe the functionality of the Applet.
- Author
- This may provide contact information on who created or last updated the Applet. A full name or email address is recommended.
- Hasrequiresdata
- This is a simple boolean value that is reserved for use in Applets that require an Internet connection to fully function. For Applets that are completely capable of running in an offline mode, set this to boolean “false”.
- Changelog
- String or array of strings containing information about recent updates. This item is again reserved for future use.
- Description
The items should be keys with their corresponding values represented in JSON. Remember to escape special characters such as the single quote. This is a standard JSON file, not just ECMAScript notation, so please remember to use appropriate quotes when needed.
| Code Block |
|---|
{
	“title” : “Repayments”,
	“description” : “Repayment Calculator”,
	“version” : 1.0,
	“publisher” : “MobileSmith”,
	“changelog” : “Initial Release.”,
	“hasrequiresdata” : false,
	“author” : “name@company.com”,
	“zipfile” : “../Repayments.zip”
} |
mostFileList.js
In order to improve the integrity of the Applets, mostFileList.js should include a JSON array of all files relative to the Applet directory that are required for the Applet to function completely. If you are using the Applet Manager, it will update this file for you when you generate the Applet package.
iOSBridge.js
This file is required for iOS native integration. Include it in any HTML files that will be using iOS integration. This file is also required to be loaded before the helper script mostHelp.js, which is covered below.
mostHelp.js
This file contains helper scripts for integrating with native device functionality. These functions include identifying the device as Android or iOS, and pulling in the configuration and customization contained in the mostConfig.json and mostCustomizations.json files. Three key functions will help provide a native app experience when users interact with your applet. These functions depend on methods in
- ‘mostSetBack’ integrates with the app navigation bar back button, and the Android physical back button.
- ‘mostDialog’ allows you to route any alert messages you may wish to display through the app. It is possible to simply use the JavaScript ‘alert’ function, but this alert message will identify itself as originating from the file path of the JavaScript file where the alert is defined. By using the mostDialog function, you will be able to define a title for your alert dialog, as well as the message text and the text for the alert dismissal button.
- ‘mostComfirm’ serves a similar purpose as the mostDialog function, but replaces the ‘confirm’ JavaScript function, for example, allowing the applet to perform a different function depending on whether the applet user taps the ok or cancel buttons. App integration for this function works slightly differently for Android and iOS devices, warranting a description of the function arguments – ‘title’, ‘message’, ‘okButtonText’, ‘cancelButtonText’, ‘cancelable’, ‘callbackFn’, and ‘callbackString’. As an example, think about an applet where the applet user can add and delete items from a list. When a user taps a delete button, you want to confirm that the button wasn’t accidentally tapped and they really want to delete the item. In this case, tapping the delete button would call the mostConfirm function as follows: mostConfirm(‘Delete Item’, ‘Are you sure you want to delete this item?’, ‘Yes’, ‘Nope’, true, doDelete, ‘doDelete’);
- The first four arguments – ‘title’, ‘message’, ‘okButtonText’, and ‘cancelButtonText’ – allow you to set the dialog title, message text, and button texts, respectively.
- The argument ‘cancelable’ is a Boolean value used exclusively by Android devices to determine whether the phone’s physical back button can dismiss (cancel) the confirmation dialog if the argument is true, or if the argument is false the applet user must tap the cancel button. In the example above, cancelable is true, so an Android user could tap the back button and their item would still be in the list.
- The argument ‘callbackFn’ is used by iOS devices, which require that the JavaScript function be passed directly to the native code for execution if the applet user taps the confirm button.
- The argument ‘callbackString’ is used by Android devices, which cannot accept the JavaScript function, but require a string value of the function name.
mostCustomizations.json
This file is actually generated by the MobileSmith Platform and loaded by the device, but you can create it manually in order to test customization options. This file is a JSON object of key-value pairs indicating the customization “name” and “value” fields.
| Code Block |
|---|
{
	“calcTitle” : “Borrowing Capacity Calculator”,
	“disclaimer” : “Whilst every effort has been made to ensure the accuracy of the calculators, the results should be used as an indication only.”
} |
mostCustomizationOptions.json
If you want your Applet to be customized from the MobileSmith Platform, you may provide a mostCustomizationOptions.json file. This file is interpreted by the platform and used to generate the final mostCustomizations that is delivered to the device. This file is a JSON array, containing JSON objects that describe the customization options.
Name
- This will serve as the option key when mostCustomizations.json is generated. It is recommended that you do not use spaces in this value.
Value
- This is not the final value! This is the default value which is used if the MobileSmith Platform user has not specified a custom value. Once the user has customized this value it does not reset unless a new Local Applet is created.
Title
- When the options are displayed in the MobileSmith Platform the title is used instead of the name. This way you can create a more user-friendly way of referring to the option. You may change this text without changing the name to preserve customizations and improve the user experience as you update the Applet.
helpText
- When the user hovers over the title this text is displayed to assist the user in determining what the option changes. You may use this to guide the user or qualify the title so that it is clearer.
Type
- The type is used to determine what sort of value editing experience is presented to the user. In this way, if you wish to provide customization of longer text fields, toggleable boolean values, or colors, the MobileSmith Platform will display a control that is designed to aid the user in that value generation.
- Textbox
- Displays a single line input field.
- Textarea
- Displays a multiple line text entry area suitable for descriptions, addresses, or other longer text based values.
- Boolean
- Displays two radio buttons indicating on and off positions. If you have an option that may be represented by a yes-or-no question, you may use this to make it easy to select.
- Color
- If you wish to provide visual customization of colors, this displays a color picker that results in a hex-code representation of the color. This color picker is the same one used in the rest of the MobileSmith Platform, meaning that it may be used to help visually match the Appet to the rest of the application. Because this is inserted into mostCustomizations.json, these colors must be parsed out and applied via JavaScript. Therefore, be sure to create appropriate CSS classes if you intend to make use of custom color themes.
- Textbox
| Code Block |
|---|
[
 {
	“value” : “#000000”,
	“helpText” : “Select a color to be used as the main text color in your Applet.”,
	“title” : “Text Color”,
	“name” : “foreground”,
	“type” : “color”
 },
 {
	“value” : “My Awesome Firm”,
	“helpText” : “Enter your firm name to be displayed in the title of your Applet.”,
	“title” : “Firm Name”,
	“name” : “firmname”,
	“type” : “textbox”
 },
 {
	“value” : “#000000”,
	“helpText” : “Select a color to be used for the title of your Applet.”,
	“title” : “Title Color”,
	“name” : “titlecolor”,
	“type” : “color”
 },
 {
	“value” : “The calculations are for estimation purposes only and do not assure that you will get a loan at this rate.”,
	“helpText” : “Enter a text message to your app users.”,
	“title” : “Disclaimer Text”,
	“name” : “disclaimertext”,
	“type” : “textarea”
 },
 {
	“value” : true
	“helpText” : “Check this box to include or exclude something.”,
	“title” : “Set Boolean”,
	“name” : “setBoolean”,
	“type” : “boolean”
 }
] |
Sending an Email or Text Message
You can send an email or text message from an applet using the default email or text messaging app on the user’s device with a simple “mailto” or “sms” link. Remember to URL encode the link string if you are setting a subject or body which could contain spaces, line breaks, or reserved characters. You can include the link in an HTML anchor element like so:
| Code Block |
|---|
<a href=“mailto:noreply@myawesomecompany.com?subject=Hello%20World”>Mail</a> |
or
| Code Block |
|---|
<a href=“sms:?Hello%20World”>Text Message</a> |
You can also trigger the link from Javascript like so:
| Code Block |
|---|
window.location.href = 'mailto:?subject='+encodedSubject+'&body='+encodedBody; |
or
| Code Block |
|---|
window.location.href = 'sms:'+phoneNumber+'?body='+encodedBody; |
[See Email Checklist Test Applet http://applets.mobilesmith.com/forms/emailChecklistTest.zip]
Services
Email Service
If your applet needs to send an email, but you cannot reply on the phone’s native email app, you can make use of a MobileSmith service to send the email. To make use of the service, you will need to acquire certain information from the mostCustomizations.json file as sent to the device when the app is built. These values are:
projectUrl : the URL of the MobileSmith platform where the app was built.
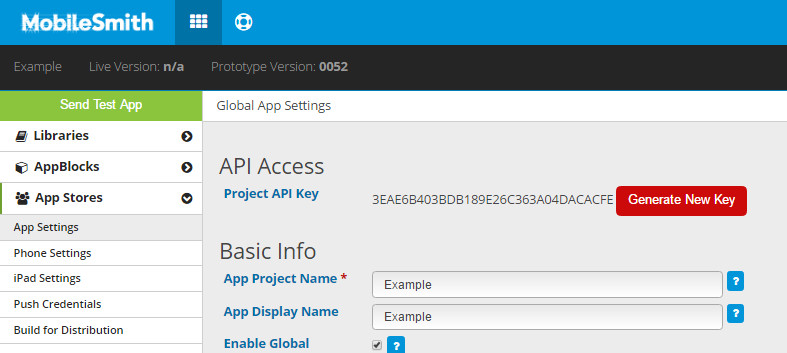
projectAPIKey: a unique identifier that ties the applet to a specific app on the MobileSmith platform.
You can find the Project API Key from the MobileSmith platform on the App Settings page of your project, which can be helpful during the development phase, but you should always look up these values using the mostHelp.getCustomizationsObject() helper method in the mostHelp.js file when you release your applet for use. The Project API Key can be reset from the App Settings page, and your applet will only get the updated key if it using the mostCustomizations.json file to look up the key. Please note: if the Project API Key is reset, you will not need to rebuild the app, but you will need to close the app (including running in the background) before the device will look up the new key.
To submit your request to the email service, you will need to make an ajax call similar to the following:
| Code Block |
|---|
$.ajax({
        method:'POST',
        headers: {
            'projectAPIKey': mostData.projectAPIKey
        },
        data:JSON.stringify(jsonData),
        contentType:'application/json',
        url:mostData.projectUrl + '/api/email/projectemail',
        complete: function(){
            // Actions to take on completion.
        },
        error:function(data, textStatus, errorThrown) {
            // Actions to take on failure, such as informing the user why their email could not be sent.
            var retVal = JSON.parse(data && data.responseText ? data.responseText : '{}');
            var msg = (retVal.message || 'Could not send message');


            mostHelp.mostDialog('Error sending email', msg, 'Okay');
        },
        success:function() {
            // Actions to take on success, such as informing the user that their email has been sent.
            mostHelp.mostDialog('Email Sent', 'Your email has been sent', 'Okay');
        }
}); |
*The request should be sent to the projectUrl + “/api/email/projectemail”
*The Project API Key must be submitted as the header “projectAPIKey”
*The content type and data must be JSON. The data should contain the following:
| Code Block |
|---|
{
  "fromAddress”:senderEmailAddress,
  "toAddress”:recipientEmailAddress,
  "subject”:emailSubject,
  "messageType”:plainTextOrHTML,
  "message”:messageBody
} |
*The fromAddress and toAddress are both required and should be valid email format.
*The subject is required, and can be any string with length greater than zero.
*The messageType is not required; if you do not include the message type, it will be assumed to be HTML. Accepted values are:
** “plaintext”: the message will be sent as plain text and line breaks, denoted for example by “\n”, should be displayed by the recipient email client.
** “html”: the message will be sent as HTML. HTML markup will render, but “\n” line breaks will not display.
*The message is required, and can be either plain text or HTML string with length greater than zero.
If the email is not sent successfully, the service will respond with an appropriate status code and JSON (serialized in the responseText) containing a status of failure and a message explaining the error. For example:
| Code Block |
|---|
{
   "message": “Invalid sender email address“,
   "status": “failure”
} |
*403: The Project API Key is invalid. If you are using the mostCustomizations.json file to look up the projectAPIKey and the projectUrl, you might want to instruct the user to completely close their app and then try again, as they most likely need to refresh an out-of-date key.
*400: The Project API Key was valid, but the data was not valid, perhaps because of a missing value or invalid email address format. You can identify the error by parsing the responseText JSON string.
*500: You have submitted a valid request with a valid Project API Key, but an error has occurred with the email service.
If the email is sent successfully, the service will respond with a 200 status code and JSON such as the following:
| Code Block |
|---|
{
   "message": "",
   "status": "success"
} |
[See Email Service Example Applet http://applets.mobilesmith.com/forms/emailServiceExample.zip]
Related articles
| Filter by label (Content by label) | ||||||||||||||||||
|---|---|---|---|---|---|---|---|---|---|---|---|---|---|---|---|---|---|---|
|
| Page Properties | ||
|---|---|---|
| ||
|
| Table of Contents |
|---|
Overview
The MobileSmith Applet is a way to bring a little bit of the web to your native application. Unlike a simple link to a web page, Applets can run offline, interact with the native platform, and be configured through our web interface.
This page will take you through the process of creating a custom Applet, including how to host it, what features are supported, and where you can get the resources you need.
Tools
Applets are based on web technologies, so you can develop them in something as simple as Notepad or use more advanced tools such as FileZilla FTP or Aptana Studio.
Applets and Hosting
Applets need to be hosted online at a location that can be publicly accessed. Applets must be packaged in a certain way and while the format is simple, we also provide a PHP script (appletManager.php) that can easily update packages from a directory. Using a server with PHP installed will allow you to easily use this script to package the Applets. Any server side technology that supports zip archiving and JSON operations may be effectively used to automate the packaging process.
Inside an Applet
A Local Applet can be viewed as a special kind of HTML5-based package that is executed in a device’s web-view that has been enhanced with additional functionality. The additional functionality allows the HTML5 application to operate without an Internet connection, control the devices history behavior, and apply updates to functionality and options transparent to the app user.
In order for an Applet to work, certain files need to be present. You will be provided with helper scripts that make it easier to access the extra functionality the platform allows. At a minimum you need two files, an index and a config file. To use special features you will need additional files. These files interact with the MobileSmith Platform telling the devices when they need to update, where to find the package, and how to present customization options.
The Applet directory must be made available on your server. However you must provide a zip file that contains the contents of the directory. This compressed version is what will be downloaded by the device.
Folders
Applets Root
If you want to use the script provided to aid in managing Applets, create a directory that will serve as your Applets root. This area will contain the following: the Applet indexing and packaging script, an optional index that wraps the script, and folders representing the categories of Applets on your Applet server. Though not required, it is recommended that the Applets root directory be relatively short with no spaces in the path and easy to access from the Internet on a server that supports PHP.
Category Directory
A category directory contains multiple Applets. The purpose is to help organize your Applets so that ones with a similar theme can be grouped together. Each category directory must be writeable by the server in order for the packaging script to work. Although the final location of the Applet package is user configurable, the packaging script by default will generate the package next to the actual Applet directory. Though not necessarily required, it is highly recommended that a category directory not contain spaces.
Applet Directory
The Applet directory contains the actual Applet code. You can usually visit the Applet directory in a web browser to help test the functionality and use your web browser’s inspection and debugging tools, though not all features that have been added by the MobileSmith Platform are available. Though not necessarily required, it is highly recommended that an Applet directory not contain spaces.
Files
AppletManager.php
The Applet Manager is one of the helper scripts we provide to aid in creating and maintaining Applets. You may optionally include or use this file as an index in your Applets Root. The Applet
Manager provides several pieces of functionality provided the directory structure is as indicated above. You are free to modify the Applet Manager script but any updates made to the script will be based on the default directory structure.
First, the Applet Manager provides quick links to the directories for each Applet. You may use these links to look at the Applets in the web browser or to paste into the MobileSmith Platform.
Second, the Applet Manager provides automated packaging for the Applets. As long as the Category Directory is writeable, the script will read the Applet structure, write the file used to check package integrity, and appropriately compress the Applet for distribution.
Third, it provides links to the generated packages.
Fourth, it provides an “Update All” feature that can be used to refresh the packages for all recognized Applets.
[Applet].zip
You may create the Applet package file manually, provide it any name and store it anywhere accessible to the target device. However, by default, these are generated next to the Applet Directory by the Applet Manager. They have the same name as the directory with .zip appended to the name and are automatically updated by the script. In the configuration file, these are easily pointed to by using the “up a level” indicator, “..”. I will discuss how to indicate the location of these files later.
The zip itself is in standard .zip format. We do not support other archive formats such as bzip or RAR, and are instead aiming for maximum compatibility. The file contains an exact copy of the Applet Directory contents but by decreasing the number of requests that have to be made we make the process more efficient.
Because this is what is actually downloaded by the target device, you must make sure that whenever you update the Applet itself, you update this file to match those changes. If you forget to update this file, the device will detect a version change and download the old package and an additional indication will be required to apply the update.
Please note, if you create the Applet package file manually, make sure the applet files are located at the root of the zip file, not contained in a parent directory inside the zip file. Including the parent directory in the zip file will prevent the target device from successfully unzipping and accessing the applet files.
mostConfig.json
This is the configuration file that indicates when an Applet has been updated. The information here is essentially the descriptor that makes the whole Applet work with the MobileSmith Platform. The file contains a single JSON formatted object of Key-Value pairs. There are currently several properties supported, some of which are absolutely important to the functionality of the Applet.
- Required Items:
- Title
- Indicates the Applet name, appropriately formatted and user-readable. This is displayed in the MobileSmith Platform.
- Publisher
- Indicates who created the Applet.
- Version
- This is the attribute that controls when the devices update the Applet. By incrementing the version number you signal a code change and the device will download the new .zip file containing the updated code.
- Remember, the updates are not packaged automatically; you should either use the Applet Manager script or manually update the zip whenever you increment the version.
- The version must be a simple “double”. The values 0, 0.1, 1.2, 35.286, are all valid version numbers. Invalid versions, such as v1, v2.3, 4.2.5, etc. will be treated by the device as “infinity” and will cause poor performance as the Applet package is updated every time.
- Zipfile
- Indicate the path where the zipped package of the Applet can be found. If this is an absolute path, begin with http:// or https://. If this is a relative path, it is in relation to the location of this file. To indicate one directory up, or at the same level as the Applet directory itself, precede the name of the package with “../” indicating “up one level”.
- Title
- Optional Items:
- Description
- Describe the functionality of the Applet.
- Author
- This may provide contact information on who created or last updated the Applet. A full name or email address is recommended.
- Hasrequiresdata
- This is a simple boolean value that is reserved for use in Applets that require an Internet connection to fully function. For Applets that are completely capable of running in an offline mode, set this to boolean “false”.
- Changelog
- String or array of strings containing information about recent updates. This item is again reserved for future use.
- Description
The items should be keys with their corresponding values represented in JSON. Remember to escape special characters such as the single quote. This is a standard JSON file, not just ECMAScript notation, so please remember to use appropriate quotes when needed.
| Code Block |
|---|
{
	“title” : “Repayments”,
	“description” : “Repayment Calculator”,
	“version” : 1.0,
	“publisher” : “MobileSmith”,
	“changelog” : “Initial Release.”,
	“hasrequiresdata” : false,
	“author” : “name@company.com”,
	“zipfile” : “../Repayments.zip”
} |
mostFileList.js
In order to improve the integrity of the Applets, mostFileList.js should include a JSON array of all files relative to the Applet directory that are required for the Applet to function completely. If you are using the Applet Manager, it will update this file for you when you generate the Applet package.
iOSBridge.js
This file is required for iOS native integration. Include it in any HTML files that will be using iOS integration. This file is also required to be loaded before the helper script mostHelp.js, which is covered below.
mostHelp.js
This file contains helper scripts for integrating with native device functionality. These functions include identifying the device as Android or iOS, and pulling in the configuration and customization contained in the mostConfig.json and mostCustomizations.json files. Three key functions will help provide a native app experience when users interact with your applet. These functions depend on methods in
- ‘mostSetBack’ integrates with the app navigation bar back button, and the Android physical back button.
- ‘mostDialog’ allows you to route any alert messages you may wish to display through the app. It is possible to simply use the JavaScript ‘alert’ function, but this alert message will identify itself as originating from the file path of the JavaScript file where the alert is defined. By using the mostDialog function, you will be able to define a title for your alert dialog, as well as the message text and the text for the alert dismissal button.
- ‘mostComfirm’ serves a similar purpose as the mostDialog function, but replaces the ‘confirm’ JavaScript function, for example, allowing the applet to perform a different function depending on whether the applet user taps the ok or cancel buttons. App integration for this function works slightly differently for Android and iOS devices, warranting a description of the function arguments – ‘title’, ‘message’, ‘okButtonText’, ‘cancelButtonText’, ‘cancelable’, ‘callbackFn’, and ‘callbackString’. As an example, think about an applet where the applet user can add and delete items from a list. When a user taps a delete button, you want to confirm that the button wasn’t accidentally tapped and they really want to delete the item. In this case, tapping the delete button would call the mostConfirm function as follows: mostConfirm(‘Delete Item’, ‘Are you sure you want to delete this item?’, ‘Yes’, ‘Nope’, true, doDelete, ‘doDelete’);
- The first four arguments – ‘title’, ‘message’, ‘okButtonText’, and ‘cancelButtonText’ – allow you to set the dialog title, message text, and button texts, respectively.
- The argument ‘cancelable’ is a Boolean value used exclusively by Android devices to determine whether the phone’s physical back button can dismiss (cancel) the confirmation dialog if the argument is true, or if the argument is false the applet user must tap the cancel button. In the example above, cancelable is true, so an Android user could tap the back button and their item would still be in the list.
- The argument ‘callbackFn’ is used by iOS devices, which require that the JavaScript function be passed directly to the native code for execution if the applet user taps the confirm button.
- The argument ‘callbackString’ is used by Android devices, which cannot accept the JavaScript function, but require a string value of the function name.
mostCustomizations.json
This file is actually generated by the MobileSmith Platform and loaded by the device, but you can create it manually in order to test customization options. This file is a JSON object of key-value pairs indicating the customization “name” and “value” fields.
| Code Block |
|---|
{
	“calcTitle” : “Borrowing Capacity Calculator”,
	“disclaimer” : “Whilst every effort has been made to ensure the accuracy of the calculators, the results should be used as an indication only.”
} |
mostCustomizationOptions.json
If you want your Applet to be customized from the MobileSmith Platform, you may provide a mostCustomizationOptions.json file. This file is interpreted by the platform and used to generate the final mostCustomizations that is delivered to the device. This file is a JSON array, containing JSON objects that describe the customization options.
Name
- This will serve as the option key when mostCustomizations.json is generated. It is recommended that you do not use spaces in this value.
Value
- This is not the final value! This is the default value which is used if the MobileSmith Platform user has not specified a custom value. Once the user has customized this value it does not reset unless a new Local Applet is created.
Title
- When the options are displayed in the MobileSmith Platform the title is used instead of the name. This way you can create a more user-friendly way of referring to the option. You may change this text without changing the name to preserve customizations and improve the user experience as you update the Applet.
helpText
- When the user hovers over the title this text is displayed to assist the user in determining what the option changes. You may use this to guide the user or qualify the title so that it is clearer.
Type
- The type is used to determine what sort of value editing experience is presented to the user. In this way, if you wish to provide customization of longer text fields, toggleable boolean values, or colors, the MobileSmith Platform will display a control that is designed to aid the user in that value generation.
- Textbox
- Displays a single line input field.
- Textarea
- Displays a multiple line text entry area suitable for descriptions, addresses, or other longer text based values.
- Boolean
- Displays two radio buttons indicating on and off positions. If you have an option that may be represented by a yes-or-no question, you may use this to make it easy to select.
- Color
- If you wish to provide visual customization of colors, this displays a color picker that results in a hex-code representation of the color. This color picker is the same one used in the rest of the MobileSmith Platform, meaning that it may be used to help visually match the Appet to the rest of the application. Because this is inserted into mostCustomizations.json, these colors must be parsed out and applied via JavaScript. Therefore, be sure to create appropriate CSS classes if you intend to make use of custom color themes.
- Textbox
| Code Block |
|---|
[
 {
	“value” : “#000000”,
	“helpText” : “Select a color to be used as the main text color in your Applet.”,
	“title” : “Text Color”,
	“name” : “foreground”,
	“type” : “color”
 },
 {
	“value” : “My Awesome Firm”,
	“helpText” : “Enter your firm name to be displayed in the title of your Applet.”,
	“title” : “Firm Name”,
	“name” : “firmname”,
	“type” : “textbox”
 },
 {
	“value” : “#000000”,
	“helpText” : “Select a color to be used for the title of your Applet.”,
	“title” : “Title Color”,
	“name” : “titlecolor”,
	“type” : “color”
 },
 {
	“value” : “The calculations are for estimation purposes only and do not assure that you will get a loan at this rate.”,
	“helpText” : “Enter a text message to your app users.”,
	“title” : “Disclaimer Text”,
	“name” : “disclaimertext”,
	“type” : “textarea”
 },
 {
	“value” : true
	“helpText” : “Check this box to include or exclude something.”,
	“title” : “Set Boolean”,
	“name” : “setBoolean”,
	“type” : “boolean”
 }
] |
Sending an Email or Text Message
You can send an email or text message from an applet using the default email or text messaging app on the user’s device with a simple “mailto” or “sms” link. Remember to URL encode the link string if you are setting a subject or body which could contain spaces, line breaks, or reserved characters. You can include the link in an HTML anchor element like so:
| Code Block |
|---|
<a href=“mailto:noreply@myawesomecompany.com?subject=Hello%20World”>Mail</a> |
or
| Code Block |
|---|
<a href=“sms:?Hello%20World”>Text Message</a> |
You can also trigger the link from Javascript like so:
| Code Block |
|---|
window.location.href = 'mailto:?subject='+encodedSubject+'&body='+encodedBody; |
or
| Code Block |
|---|
window.location.href = 'sms:'+phoneNumber+'?body='+encodedBody; |
[See Email Checklist Test Applet http://applets.mobilesmith.com/forms/emailChecklistTest.zip]
Services
Email Service
If your applet needs to send an email, but you cannot reply on the phone’s native email app, you can make use of a MobileSmith service to send the email. To make use of the service, you will need to acquire certain information from the mostCustomizations.json file as sent to the device when the app is built. These values are:
projectUrl : the URL of the MobileSmith platform where the app was built.
projectAPIKey: a unique identifier that ties the applet to a specific app on the MobileSmith platform.
You can find the Project API Key from the MobileSmith platform on the App Settings page of your project, which can be helpful during the development phase, but you should always look up these values using the mostHelp.getCustomizationsObject() helper method in the mostHelp.js file when you release your applet for use. The Project API Key can be reset from the App Settings page, and your applet will only get the updated key if it using the mostCustomizations.json file to look up the key. Please note: if the Project API Key is reset, you will not need to rebuild the app, but you will need to close the app (including running in the background) before the device will look up the new key.
To submit your request to the email service, you will need to make an ajax call similar to the following:
| Code Block |
|---|
$.ajax({
        method:'POST',
        headers: {
            'projectAPIKey': mostData.projectAPIKey
        },
        data:JSON.stringify(jsonData),
        contentType:'application/json',
        url:mostData.projectUrl + '/api/email/projectemail',
        complete: function(){
            // Actions to take on completion.
        },
        error:function(data, textStatus, errorThrown) {
            // Actions to take on failure, such as informing the user why their email could not be sent.
            var retVal = JSON.parse(data && data.responseText ? data.responseText : '{}');
            var msg = (retVal.message || 'Could not send message');


            mostHelp.mostDialog('Error sending email', msg, 'Okay');
        },
        success:function() {
            // Actions to take on success, such as informing the user that their email has been sent.
            mostHelp.mostDialog('Email Sent', 'Your email has been sent', 'Okay');
        }
}); |
*The request should be sent to the projectUrl + “/api/email/projectemail”
*The Project API Key must be submitted as the header “projectAPIKey”
*The content type and data must be JSON. The data should contain the following:
| Code Block |
|---|
{
  "fromAddress”:senderEmailAddress,
  "toAddress”:recipientEmailAddress,
  "subject”:emailSubject,
  "messageType”:plainTextOrHTML,
  "message”:messageBody
} |
*The fromAddress and toAddress are both required and should be valid email format.
*The subject is required, and can be any string with length greater than zero.
*The messageType is not required; if you do not include the message type, it will be assumed to be HTML. Accepted values are:
** “plaintext”: the message will be sent as plain text and line breaks, denoted for example by “\n”, should be displayed by the recipient email client.
** “html”: the message will be sent as HTML. HTML markup will render, but “\n” line breaks will not display.
*The message is required, and can be either plain text or HTML string with length greater than zero.
If the email is not sent successfully, the service will respond with an appropriate status code and JSON (serialized in the responseText) containing a status of failure and a message explaining the error. For example:
| Code Block |
|---|
{
   "message": “Invalid sender email address“,
   "status": “failure”
} |
*403: The Project API Key is invalid. If you are using the mostCustomizations.json file to look up the projectAPIKey and the projectUrl, you might want to instruct the user to completely close their app and then try again, as they most likely need to refresh an out-of-date key.
*400: The Project API Key was valid, but the data was not valid, perhaps because of a missing value or invalid email address format. You can identify the error by parsing the responseText JSON string.
*500: You have submitted a valid request with a valid Project API Key, but an error has occurred with the email service.
If the email is sent successfully, the service will respond with a 200 status code and JSON such as the following:
| Code Block |
|---|
{
   "message": "",
   "status": "success"
} |
[See Email Service Example Applet http://applets.mobilesmith.com/forms/emailServiceExample.zip]
Related articles
| Filter by label (Content by label) | ||||||||||||||||||
|---|---|---|---|---|---|---|---|---|---|---|---|---|---|---|---|---|---|---|
|
| Page Properties | ||
|---|---|---|
| ||
|