POST Input Page (Component REST)
Add New Item - POST
If you choose POST, you will need to add the input fields you want - this is because the platform/app is not pulling any data from the REST server.
URL
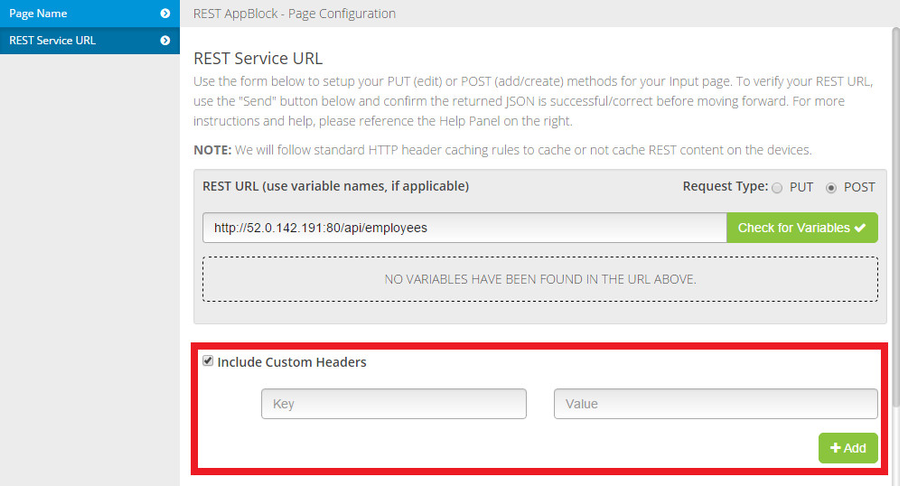
On the REST Service URL step of the wizard, after choosing POST, you can enter your REST URL.
Check "Include Custom Headers" if needed and you can add as many key/value pairs as necessary. (If you're not sure if you need this, check with your REST database administrator)
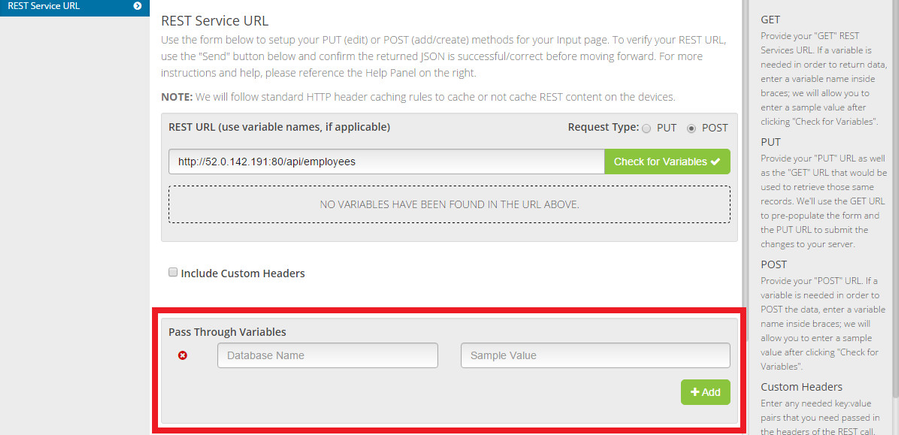
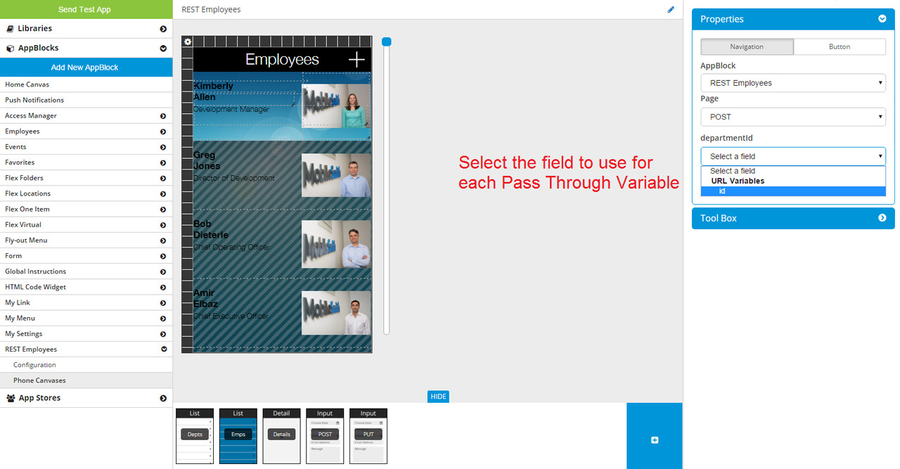
Pass Through Variables
The Pass Through Variables section allows you to include data from other pages in your POST. For example, let's say you are creating an employee directory separated by department. The app user will see a list of departments, tap one, and then see a list of employees in that department. From here, you want the app user to be able to add a new employee. You could let the app user select the department by adding it as a Form Field (see below), or you could set the department automatically by using a Pass Through Variable. In this case, you could name the variable something like "departmentId". Enter a valid sample value, which will be used if you do a test POST (see below). You can add as many Pass Through Variables as you want.
**NOTE** When you are targeting your POST page, you will need to specify a variable to use for each Pass Through Variable.
Form Fields
The Form Fields section is where you can add your input fields - these are the fields the app user will enter.
![]()
Be sure to enter the Database Name correctly for each field. Enter a Sample Value for each field - these are the values used if you click the blue "Send" button to do a test POST. Below that, you will see the response from the REST server - if everything is correct, you should see "200: The request has succeeded." Depending on the REST server, it might also return the data you just entered.
You do not have to do a test POST, but it can be a useful check to make sure everything is working correctly and all variable names have been entered correctly.

Data Mapping
On the Data Mapping step of the wizard, you can set the input type for each input field, both Form Fields and Pass Through Variables.
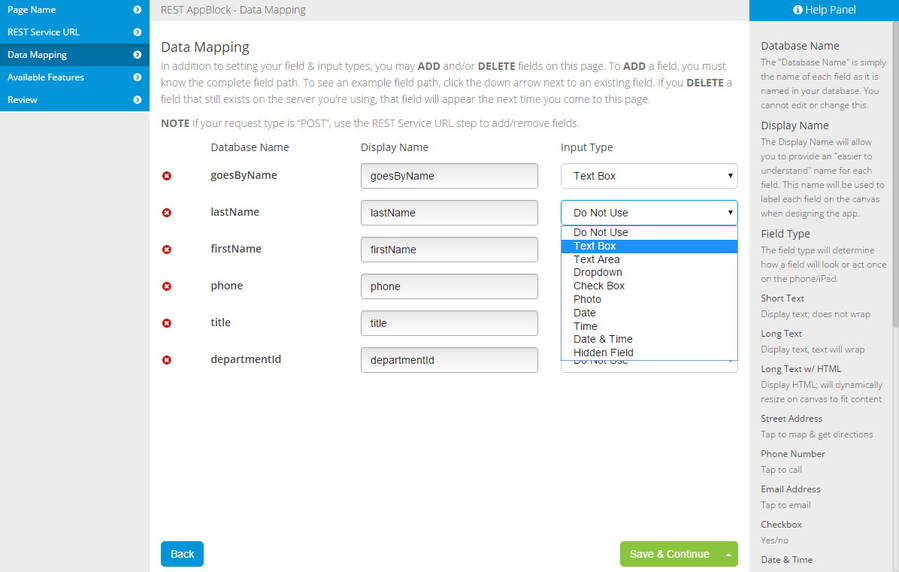
In our example, we are using the Pass Through Variable departmentId to set the department of a new employee. If you don't want your app user to be able to choose a different department, then you would set departmentId to Hidden Field - this means you will not be able to add departmentId to the canvas, and the app user will not have a way to change the department.
If you do want the app user to be able to choose a different department, then you can set departmentId to a normal input type, such as Text Box or Dropdown, and then you will be able to add it to the canvas. When the app user gets to this Input page, the departmentId field will be pre-populated but the app user can change it if he wants.
If you select Dropdown for one or more fields, the wizard will have a Dropdown Menu step.
Dropdown Menu
For each field you set to "Dropdown" on the Data Mapping step, you can enter all the options. For each option, you must enter a Database Name and a Display Name.
![]()
The Database Name is what gets sent to your REST server. The Display Name is what the app user will see.
For example, let's say that when a new employee is added, she can only have one of four titles: "Tester", "Manager", "Developer", or "Sales Associate". If your REST server stores those titles as "test", "mgr", "dev", and "sales", respectively, then you would fill out the Dropdown Menu step like this:
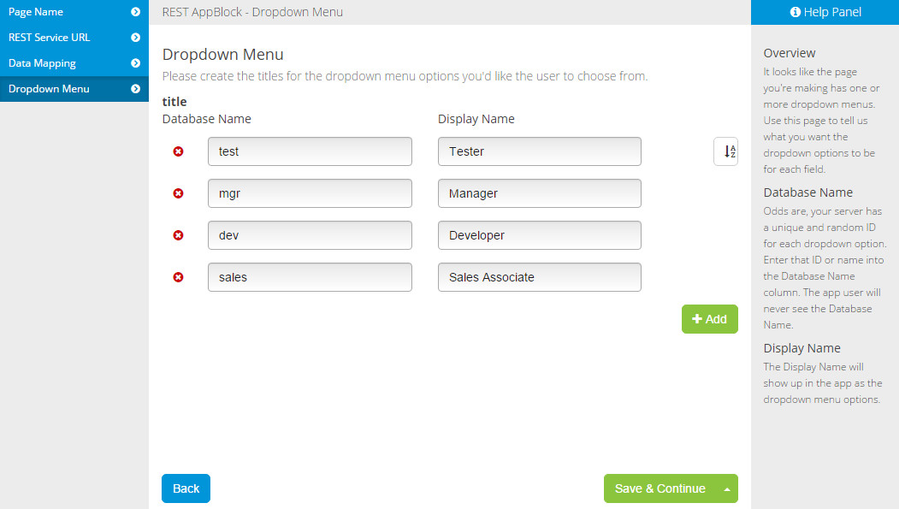
When an app user is adding a new employee, there will be a dropdown field for the title field. The app user will see four options: "Tester", "Manager", "Developer", and "Sales Associate". If he chooses "Manager", when he submits the page the app will send "mgr" as the value of the title field.
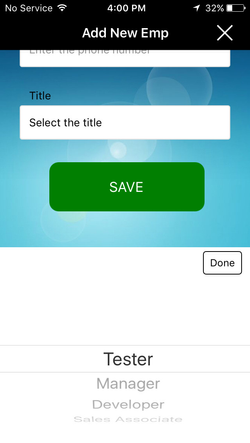
Dropdown menu on iPhone
Canvas
After finishing the wizard, go to your new page and design the canvas.
Inputs
In the Tool Box on the right, under the Inputs tab, you will find the input fields - these are the ones you added as Form Fields on the REST Service URL step of the wizard, except for any you marked as "Do Not Use" on the Data Mapping step of the wizard. You can drag an input field onto the canvas and configure it. You can only put one of each input field on the canvas.
![]()
Generic Tools
Under the Generic Tools tab, you will find the standard generic tools: Text Label, Image, Plain Button, Button w/ Image, Fly-out Trigger, and HTML Snippet.
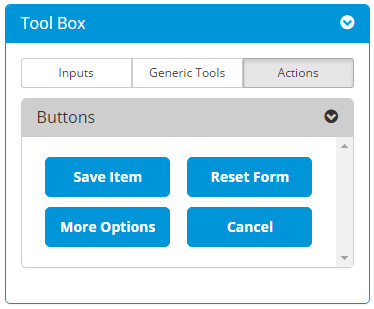
Action Buttons
In the Tool Box on the right, under the Actions tab, you will find the action buttons:
- Save Item - when the app user taps this button, the app submits the form (if all required fields have been filled in).
- **NOTE** Be sure to add the Save Item action button to the canvas or navbar - otherwise the app user will not be able to submit the form!
- Cancel - when the app user taps this button, the app leaves the page (without submitting the form) and returns to the page it came from (the page where you added the Add Item action button and targeted this POST page).
- Reset Form - when the app user taps this button, the app resets all the fields to empty.
- More - when the app user taps this button, it opens the More menu.
When designing your Input canvas, you could simply use the input fields by themselves. You could also use the Text Label and Image tools to enhance the appearance. The following video shows one way you can do that. Click here to download the image used in the video. Of course, you can always design your own image!
Once you have all your fields on the canvas, be sure to add your action buttons. You can add an action button to the navbar or to the canvas. In the navbar, the button can be displayed as a default icon, text, or an image. On the canvas, the button can be displayed as text or an image. For an Input page, you should always add a Save Item button. Most of the time, you will want to add a Cancel button as well. This video shows how you can do that:
Targeting
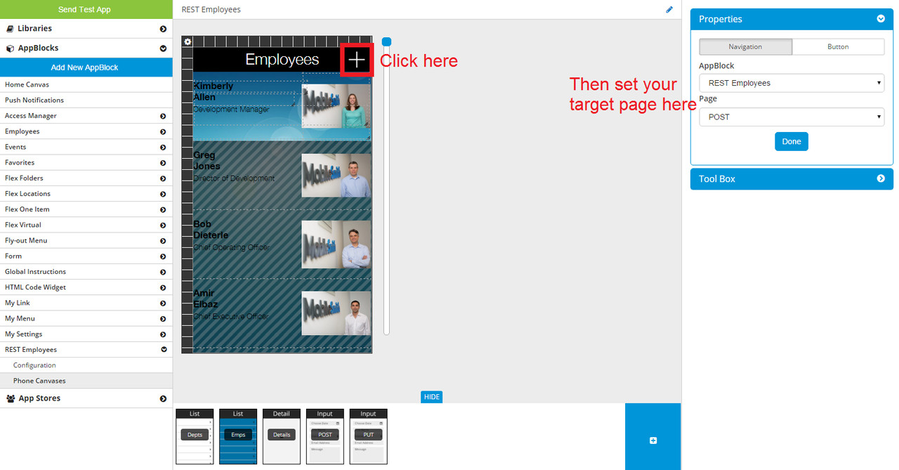
When you have finished designing your page, be sure to give the app user a way to get to the page. On a List page, under the Actions tab in the Tool Box, there is an Add Item action button. Grab this and drop it on the navbar,
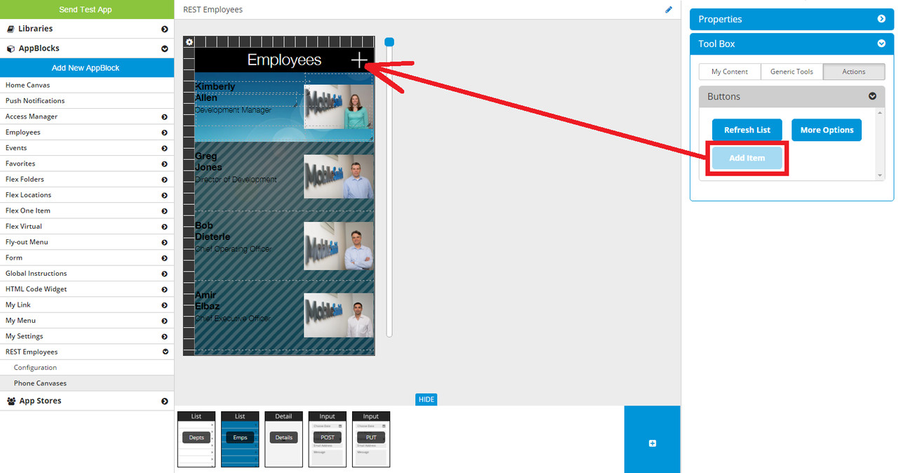
then set the target as your POST Input page:
If your targeted Input page includes any Pass Through Variables, you can then specify the field used to populate each one. In this example, there is a List page of departments which leads to a List page of employees. To make this happen, the employees page has a URL variable "id" which is populated with the id of the department tapped by the user on the departments page. When you put the Add button on the employees page and target the POST Input page, the id field can be used to populate the departmentId Pass Through Variable.
This video shows how you can target your POST Input page from a List page:
Device Behavior
From a List page, the app user taps the Add Item action button and is taken to the Input page. Each input field shows the Placeholder Text.
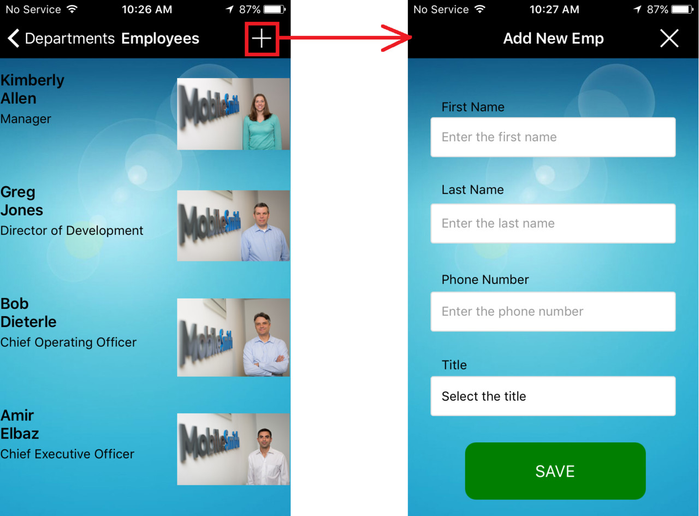 iPhone: List View to Input View