Gimbal 2.0
The purpose of this page is to highlight the changes to the general setup that need to take place for the Gimbal enablement with the release of Gimbal 2.0 SDK.
Definitions
New for SDK 2.0
Places
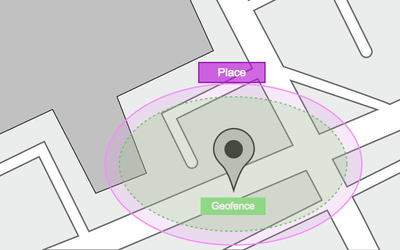
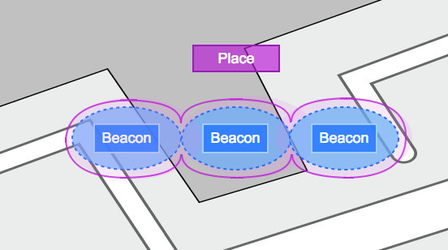
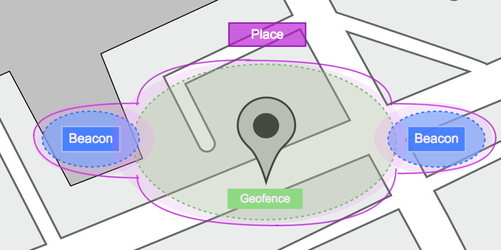
Gimbal SDK 2.0 introduces the concept of PLACES. A Place can be represented by a single geofence and/or a series of beacons. There can only be one geofence per place. Thus, when you create a Place in Gimbal Manager you can draw a geofence and/or choose a set of beacons to define the Place. A Place represents both Geofence and Proximity.
For example, a Place can be represented by a geofence (circular or polygonal), a series of beacons, or a combination of a geofence and beacon[s].
Place Entry: Generated when a user enters the Geofence.
Place Exit: Generated when a user exits the Geofence.
NOTE: The behavior is the same as Geofences in Version 1.x of Gimbal.
Place Entry: Generated when a user comes into proximity of any of the beacons in the Place.
Place Exit: Generated when a user leaves proximity of all of the beacons in the Place.
NOTE: If the Place contains only one beacon the behavior is somewhat similar to Visits in Proximity Version 1.x of Gimbal.
Place Entry: Generated when a user enters the geofence or proximity of any of the beacons in the Place.
Place Exit: Generated when a user exits the geofence and proximity of all of the beacons in the Place.
Previous Definitions
Gimbal Beacon
Refers to either the physical devices (small white box or smaller blue tag), or the signal that they emit. Beacons do not connect to the internet, they just send out a unique signal used to identify the beacon.
New for SDK 2.0: MobileSmith applications can now send Gimbal Beacon notifications to Android devices.
Proximity
A type of interaction between the phones and Gimbal Beacons. This primarily deals with sightings, which are broken up into arrive, dwell, and depart events.
Geofence
A region of space (typically GPS location with a radius, but polygonal shapes are allowed too) which are set up on the Gimbal server. These are not tied to any physical beacons.
Communication
A more general (and repeatable) version of an instant communication. By design these are not specifically tied to a particular beacon, but they can be due to MobileSmith extensions. This notification will be sent to the app under certain circumstances. When created, you specify the window of time that the communication will be active.
RSSI range
For proximity, the signal strength of the beacon that would constitute an “arrive” visit and a “depart” visit. Values are always negative and values closer to zero are stronger (e.g., -20 is stronger than -30). For example, an arrive strength could be set to -40 (very close) and a depart strength could be set to -70 (fairly far away). Default value is -60 for both. The Gimbal Manager App could be used to measure beacon strength in real-time to make sure that good values for these items are set.
Sighting Frequency
The interval at which the Gimbal Server will send sighting information to the ‘Sighting Callback URL’.
Exit Interval
The elapsed time that determines when a visit is closed. If during this elapsed time a sighting is not sent to the Gimbal Server, then the visit is over and a depart event is sent to the Sighting Callback URL.
Sighting Callback URL
When the Gimbal Server receives sighting information, the server will call this URL and send sighting information to the specified location.
Deep Link
In your Gimbal Manager’s Communications section, in Notification, you can set up your notifications to send your app users directly to a specific page in the app after receiving a Gimbal message. The Deep Link found in the MobileSmith Platform can be plugged into the notification created in the Gimbal Manager to accomplish this.
Gimbal SDK Changes
Here are some key differences in the v1 and v2 SDK APIs:
iOS
- Version 2 API no longer requires the Gimbal API key to be in the UserContext.plist file. Ensure that your application always calls the "setAPIKey:options:" during application startup
- Places now not only represent a geofence, but can also now represent one or more beacons. This means a place entry will be generated once you enter the geofence defined on the place, or when the device begins to see beacons associated to that place. To exit the place, the device must no longer be in the defined geofence (if defined), and no longer see any beacons associated to that place
- Communicates setup in the Gimbal Manager are now automatically presented as a NSLocalNotification. If you would like to handle the presentation or filter the communications that are about to be presented, make sure to implement the "communicationManager:presentLocalNotificationsForCommunications:forVisit:" method.
- In the Version 1 APIs, the unique identifier used was the string represented by the "receiverId" property in the FYXAppInfo object.In Version 2 API, this is now represented by the "applicationInstanceIdentifier" property in the Gimbal.h interface
- To register your application for instant push, you don't need to add any properties to the UserContext.plist or any additional calls to register for Gimbal push notifications. You just need to upload your APNS certificate in Gimbal Manager
- For full documenation on v2 APIs, please refer to the following pages:
Android
- Version 2 API no longer requires the Gimbal API key to be in the usercontext.properties file. Ensure that your application always calls the "Gimbal.setApiKey(this.getApplication(), "## API KEY ##") during application startup
- Places now not only represent a geofence, but can also now represent one or more beacons. This means a place entry will be generated once you enter the geofence defined on the place, or when the device begins to see beacons associated to that place. To exit the place, the device must no longer be in the defined geofence (if defined), and no longer see any beacons associated to that place
- Communicates setup in the Gimbal Manager are now automatically presented as a Notification (collapsed notifications if more than one). Whenever a push is sent to the client, Gimbal will call the CommunicationListener method PresentNotificationForCommunications. Your application can now decide whether or not to raise a notification to the User or allow the Gimbal SDK to raise the notification on your behalf
- In the Version 1 APIs, the unique identifier used was the string represented by the "receiverId" property. In Version 2 API, this is now represented by the "applicationInstanceIdentifier" property in the Gimbal interface
- To register your application for instant push, you need to call Gimbal.registerForPush ("## GOOGLE API KEY ##") in your application
Gimbal Manager Changes
- All analytics related to application running the Version 2 API's are located in the Gimbal Manager, Analytics->Analytics Beta
- The iOS and Android v2 Gimbal SDKs ship with a Basic Sample App which has source code to help you understand how to integrate the v2 APIs in your application
- For an overview of places, login to Gimbal Manager -> go to the Places tab and click on "Places Guide"
- Manage your Application Configurations
- v2 allows you to manage Application Configurations in Gimbal Manager. These configurations include the ability to individually turn on/off Geofence monitoring, Beacon monitoring, Communicate Delivery and Managing Ad Ids
- You can also set a Global Arrival/Departure RSSI for your application in Gimbal Manager
- Manage your Gimbal Geofences
- For any of your existing geofences, they will have automatically transitioned to the Places tab with the Place name being same as geofence name
- To create new geofences, you would create a new place and draw a geofence inside of the place
- Manage your Gimbal Beacons
- For your existing beacons, you will need to create Places to contain either 1 beacon per place or a group of n beacons per place
- You can create new Places from the Places tab in Gimbal Manager
- v2 also allows you to specify custom Arrival/Departure RSSI values per place. These settings are all managed in the Gimbal Manager and can be changed dynamically without requiring a change to the application client code
- To set your custom arrival/departure RSSI per place, select a Place in Gimbal Manager and click on "Show Advanced Options"
- Moving forward, when you activate new beacons, you have an option to specify whether the system should auto-create a place for the beacon
- Gimbal Communicate
- If you are using Gimbal communicate to trigger content for geofences, nothing changes in the Gimbal Manager setup between v1 and v2 geofence communicates
- If you are using Gimbal communicate to trigger content for beacons, you will need to create new communicates which will trigger content on Places (which will consist of one or more beacons)
- Clone your existing communicate which will create a new one. In the new communicate, go to Triggers and specify the Place at which you want to the content to be delivered. You no longer need the beacon name to be passed as a communicate attribute
- Until all your users completely transition from v1 to v2 SDK, you should leave both communicates active. Only one of the communicates will be delivered to the user depending on which version of the SDK is running on the user's device
Assets
The following section will discuss the various assets that need to be created in order to enable Gimbal to work with the MobileSmith platform. Assets created in the Gimbal Manager as well as the iOS Dev Center will be needed to tie everything together.
Mobile Dev Centers
When creating an app to use with the Gimbal beacons, you will need to have a Push Certificate, Push Certificate Password and the iOS Bundle ID for the iOS portion of the app. For Android Push Notifications, you will need to set up your app for the Google Cloud Messaging system. Mobile platform’s assets will be used in both the Gimbal Manager and the MobileSmith platform. For instructions on how to obtain these assets, see the App Submission documentation.
Gimbal Manager
There are several items that you will generate in the Gimbal Manager that will need to be entered into the MobileSmith platform. Navigate to the Gimbal Manager Login page:
https://manager.gimbal.com/login/users/sign_in
and sign in using your credentials. If you have not created an account yet, click the ‘Register’ button on this page and follow the process to sign up.
Applications
Once logged in, by default you will be placed onto the Applications page:
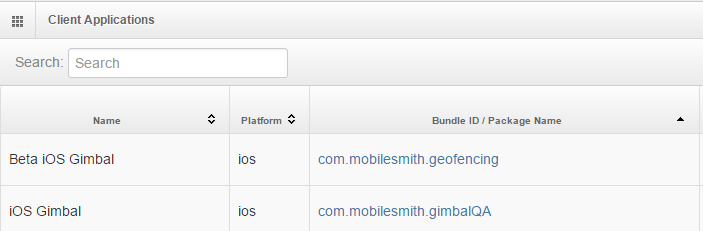
1. Click the ‘New Application’ button in the top right corner of the page. 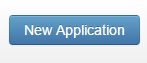
2. Select ‘iOS’ as your Platform and enter the iOS Bundle ID you created for your app. Create a separate application for Android following the same steps.
3. New for the SDK 2.0, are the required fields Name and Category; please enter these as appropriate for your application.
4. Click Generate so the system will generate the following information:
- Gimbal API Key
- Application ID
- Secret
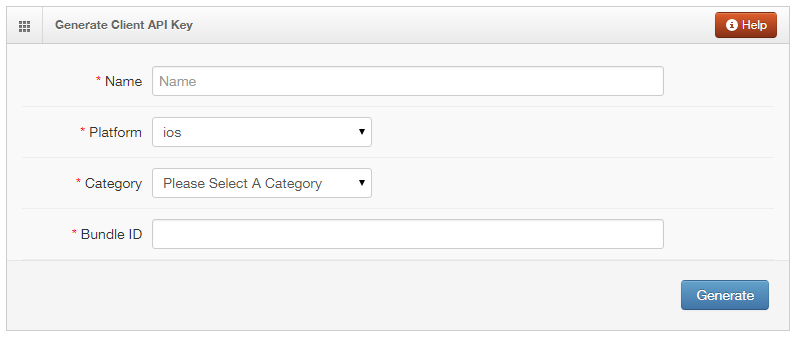
5. New for SDK 2.0: the Configuration section, which gives you customization options for your application. Please see the Proximity Enabled Applications portion of the Gimbal documentation for more information.
If you check the ‘Customize Place Detection with Beacons’ option, new options appear for the customization of how the SDK detects Places with Beacons. This section utilizes the RSSI information explained above.
![]()
6. In Version 1.x of the Gimbal SDK, the next step would be Proximity Details section. This portion is still included in the Gimbal Manager for users that have not updated to SDK 2.0, but not all details are required for SDK 2.0 use. Clicking on the ‘Show Advanced Options’ link will expose more options; the most important here is the required field ‘Visibility’, which determines determine the ability of your application to sight beacons and also how the server matches rules for server-side visits. See this Gimbal documentation on Application Visibility for more details.
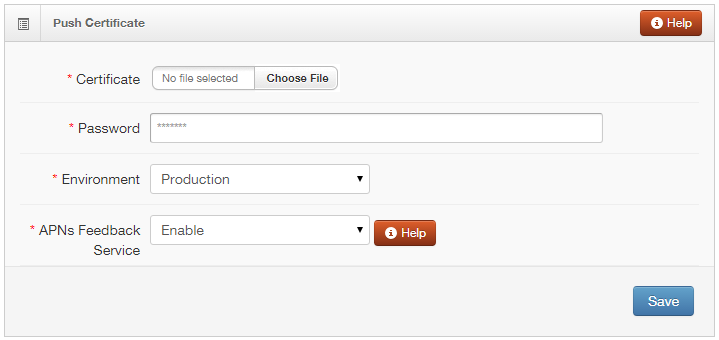
7. For iOS, in the Push Certificate section, upload your application Push Certificate (.p12 file) and enter the Push Certificate Password. For Android, enter the Google Cloud Messaging Key.
8. Select ‘Production’ as your environment
9. New for SDK 2.0: Feedback Service Management.
a. Select Enable to have Gimbal manage the APNs Feedback Service, or select Disable if you will manage the APNs Feedback Service.
10. Click Save. By adding the push certificate/messaging key, you will now be able to send instant communications from the Gimbal Manager.
Beacons
1. Select Beacons from the left nav bar and by default you will be placed on the Beacons submenu (previously Proximity). This is where you will set up all of your beacons.
2. Click the ‘Activate Beacon’ button in the top right corner of the page. You can also Import Public Beacons, Import Beacons and Export Beacons from the ‘Other Actions’ button to the right of the ‘Activate Beacons’ button.
![]()
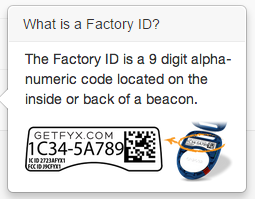
3. Enter a name for your beacon and the Factory ID which can be found on the beacon box, or inside the beacon itself.
4. If you wish to create a Place for the beacon, check the ‘Create Place’ checkbox.
5. Visibility should be set to ‘Private’ for your beacons.
6. Click the ‘Activate Beacon’ button to save your values.
![]()
My Beacons
Configured Beacons will appear on the main Beacons page under the My Beacons section:
![]()
Imported Public Beacon information and Imported Sharing Keys will also appear on the Beacons page.
Beacon Configuration
Beacon Configurations allow you to customize hardware specific attributes such as antenna type, transmit power, etc, for a particular beacon. This results in having the SDK detect the presense of that beacon in different ways. For example, adjusting the transmit power of a beacon can result in a greater detection distance. Please see this Gimbal Documentation for more details on best usage.
MobileSmith Platform
To enable Gimbal in the mobile app follow the steps below and enter information generated in the Gimbal Manager.
1. Navigate to App Stores –> App Settings –> Global App Settings.
2. Under the Basic Info section, select the checkbox next to the “Enable Gimbal?” field.
3. Click Apply to save your settings. This will add a Gimbal Manager AppBlock to your AppBlocks list.

4. Navigate to AppBlocks -> Gimbal Manager -> Configuration
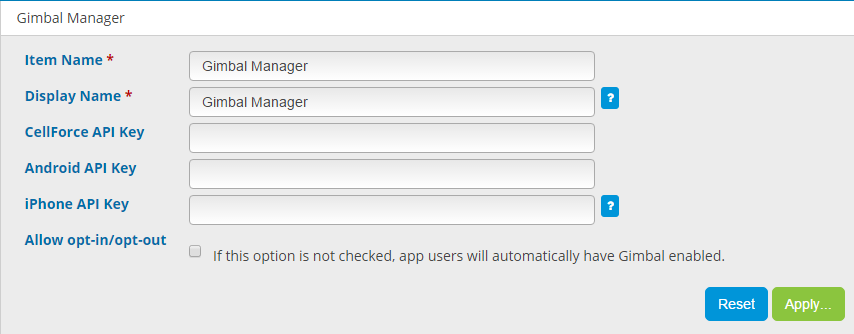
5. Enter the following fields and click Apply:
- Item Name: The feature name that only the MCD user of the application will see.
- Display Name: The display name that the device user of the application will see.
- CellForce API Key: API Key for users of CellForce, to register the application with the CellForce server.
- Android API Key: Value created in step 3 of the ‘Applications’ section above
- iPhone API Key: Value created in step 3 of the ‘Applications’ section above
- Allow opt-in/opt-out: Checking this option will add canvases to the Gimbal Manager AppBlock.
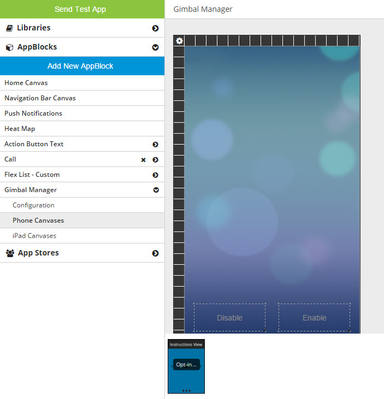
Allow opt-in/opt-out
Checking this option gives the MCD user the option to allow device application users the opportunity to enable and disable Gimbal from the application itself. If the option is not checked, Gimbal will be enabled automatically, and device users will not be able to disable Gimbal on the application.
Checking this option creates phone/iPad canvases that contain enable/disable buttons and space for instructions to be configured by the application creator. This opt-in message is presented to user only once the app is installed and opened on the device.
Gimbal functionality will only be included in apps that are built for distribution, as opposed to prototype apps. Therefore, when you have all of your information entered and the app is complete, navigate to App Stores > Build for Distribution and click the ‘Build for Distribution’ link. If any of your information is left out or entered incorrectly, an error message will appear at this stage to allow you to correct the issue.
You will receive an email with a link to your application. Click the link to download the application and follow the process to download the app to your mobile device.
Usage
Within the Gimbal Platform there are 2 main areas, Places and Communicate, where configurations can be set to control notifications to the user.
Places
After logging into the Gimbal Manager, navigate to the Places area using the left nav bar. Places contain all the configurable information for proximity of both Geofences and Beacons. Place information can also be imported and exported from this area.
To add a new Place, do the following:
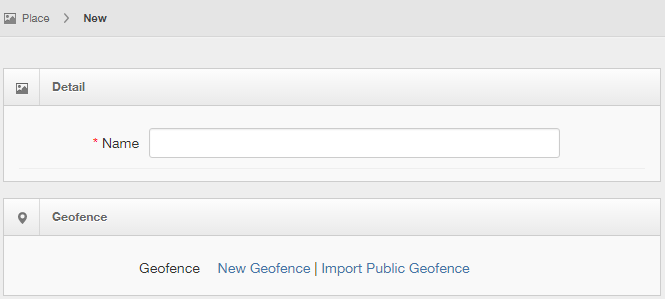
1. Click the New Place button in the top right corner of the page.

2. Enter a Place Name under the Detail section.
3. For Geofence, select New Geofence or Import Public Geofence
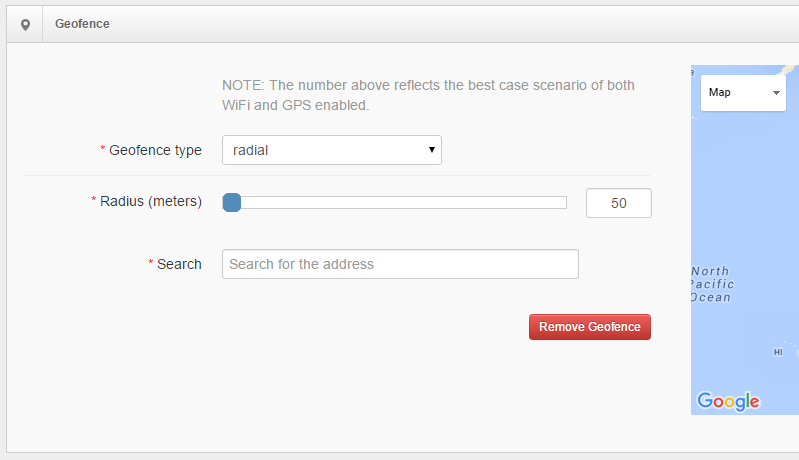
4. Choose the Geofence fence type from the dropdown (radial or polygonal).
5. Using the slide bar ‘At Radius’ you can adjust the diameter of your radius. Or you can enter a set distance in the box.
6. Enter the Address which will be the center point of your radius.
7. For Beacon placement in your Place, the next section is Beacons. Click in the Beacons field, and you are prompted to enter a search term, this being the name of a configured Beacon. The names of any found Beacons will appear in a menu below the field, from which you can pick Beacons to add to the Place. If you wish all Beacons in the Place to have the same RSSI settings, click the ‘Customize Place Detection with Beacons’ checkbox to reveal those options. You can also Reset to Default from this section.
![]()
8. From this page, you can also configure Attributes and Communications specific to the Place. See the Communication section of this document for more information on both.
9. When all values have been entered, click the ‘Create Place’ button in the bottom right corner of the page.
Communications
It is in the Communicate area of Gimbal Manager that you can tie specific communications to be displayed based on Place. Based on how you set up the communication, notifications can be delivered to the mobile application in various scenarios. When you add a new communication there are 3 sections: General, Triggers, and Notification.
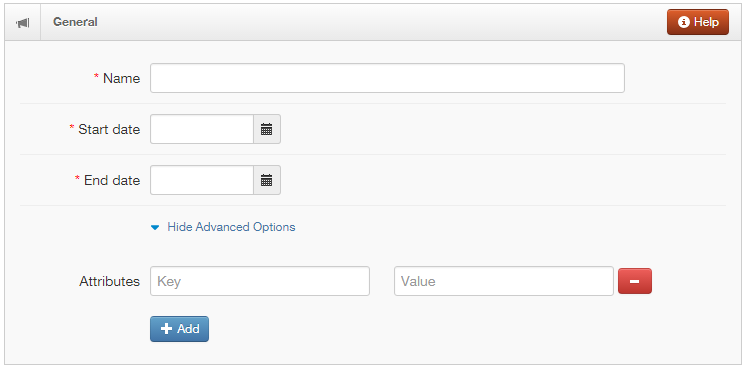
General
This is where you will enter a name, start date, end date and attributes for the communication.
Attributes are used to tie notifications to something specific by using key value pairs.
Beacons: Use a Key of ‘beacon_name’ and a Value of the actual name of the beacon to tied a notification to a specific beacon. When the user’s app comes into range of the specified beacon the notification will be displayed (in accordance with start/end dates).
Geofence: Use a Key of ‘rssi_arrive’ or ‘rssi_depart’ and a Value of the actual RSSI distance.
Depending on the key, when the user reaches the RSSI distance, the notification will be displayed.
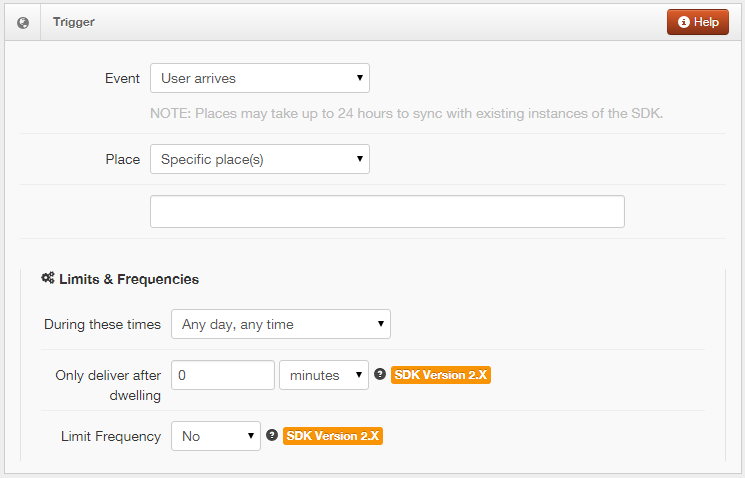
Trigger
Select Place and/or Event triggers for your communication. Event dropdown includes ‘User Arrives’, ‘User Departs’, Time of Day and ‘Fetch content by attributes’. You may also select 'Fetch content by attributes' if you do not wish to use a trigger. Please note that selecting 'Fetch content by attributes' requires the use of at least one communication attribute, set in the General section of Communications. The Place dropdown and subsequent entry field allows you to configure the communication by specific places, which are entered into the field below the dropdown by typing the Place name and choosing the specific ones to tie to this communication. Alternately you can choose ‘All of my Places’, which ties the communication to all of the configured communications.
New for SDK 2.0: Limits & Frequencies
You can put restrictions on the communications that are sent from the connected Place via the Limits & Frequencies section of Trigger. You can restrict the times communications are sent to the Place at the ‘During these times’ dropdown, you can hold delivery of a communication until the application user has been in range of the Place for a certain amount of time via the ‘Only deliver after dwelling’, which is set to minutes and hours, and you can limit the frequency of communications with Limit Frequency, which is a yes or no dropdown.
NOTE: For time-only triggers to work on iOS applications, you will need to configure APNS in the Application tab.
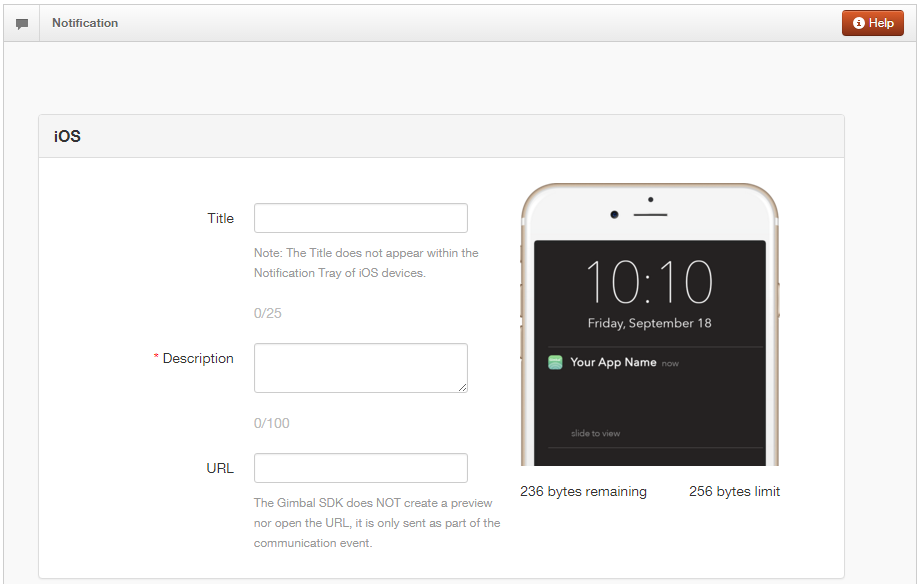
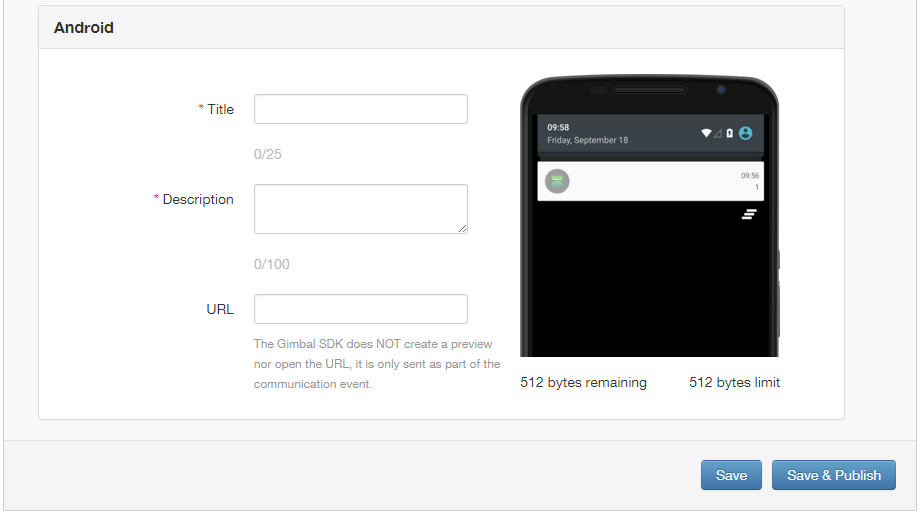
Notification
The notification you want to display in the app is configured in this section. Enter a Title, a Description and, if desired, a URL such as a Deep Link. Select whether you want one or both to display in the app message.
New for SDK 2.0: Device specific notifications
With the update, you can customize the notification according to iOS and Android devices. The notification section is split between the two platforms, and contains a preview of how the notification will appear on each.
When you have completed setup for all three sections of Communicate, you can either Save as a draft for later publishing, or Save & Publish, which will begin distribution of the Communication immediately.
Rules
Rules are used to create and publish server-side beacon visits. A server rule gives a developer the ability to receive notifications of server-side visits. Depending on the application's visibility, when the SDK sights a beacon, it sends this sighting to the Gimbal Manager Server. It will then determine if the sighting matches a developer's rule. Upon a rule match, the Gimbal Manager Server notifies the developer's server of visit events through the configured Sighting Callback URL.
You can create a rule using the following steps:
1. From the left nav bar, select Server Rules.
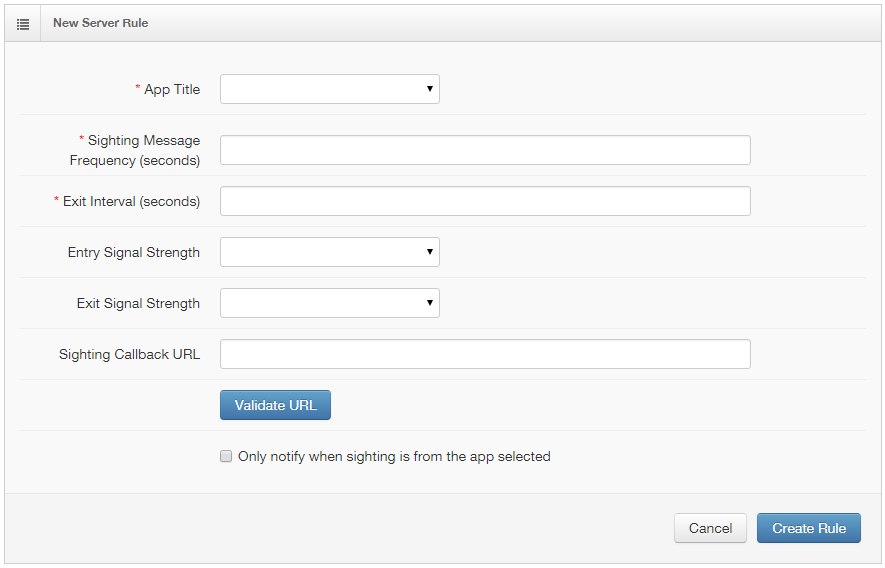
2. To create a New Server Rule, select the top right button:
3. Select the App Title from the drop down
- Enter the number of seconds for the Sighting Message Frequency
- Enter the number of seconds for the Exit Interval
- Optionally select an Entry and Exist Signal Strength
- There should be at least 10 points between entry and exit strengths
- Enter the Sighting Callback URL
- Select the checkbox, ‘Only notify when sighting is from the app selected’
Sighting Callback URL
The format for the Sighting Callback URL should match the URL below, except the package ID colored in Red should match the package ID of your application:
http://cms.mobilesmith.com/apps/gimbal/cfcs/gimbal.cfc?Method=LogEvent&PackageID=com.soln.S6CE126F390D6E9F9C2354284F392706F